1. About BCD-UI 5
1.1. Overview
BCD-UI 5 is a full-stack framework for building rich enterprise web applications. It bases on HTML5 and Java technologies and provides many artifacts typically needed in such environments.
BCD-UI can be used in any regular Java Jakarta EE application with at least web profile, for example a Tomcat is enough. Developers who today already deliver or plan to deliver such applications and find it hard to develop all functionality with only jQuery, React or Angular, will profit from using BCD-UI.
Some of BCD-UI’s features are:
-
Configurable server side database access and data exchange via ready-to-use web services
-
Client-side models, called DataProviders for retrieving, working with and displaying data
-
Several elaborated widgets needed in enterprise environments with two-way bindings to the data models
-
Ready-to-use components like pivot reports, charts, scorecards, smart data uploading and editable data grids to name some
-
Export of WYSIWYG and detail data
-
Infrastructure for internationalization, security, theming, page lifecycle
and many more, as you will learn in this tutorial.
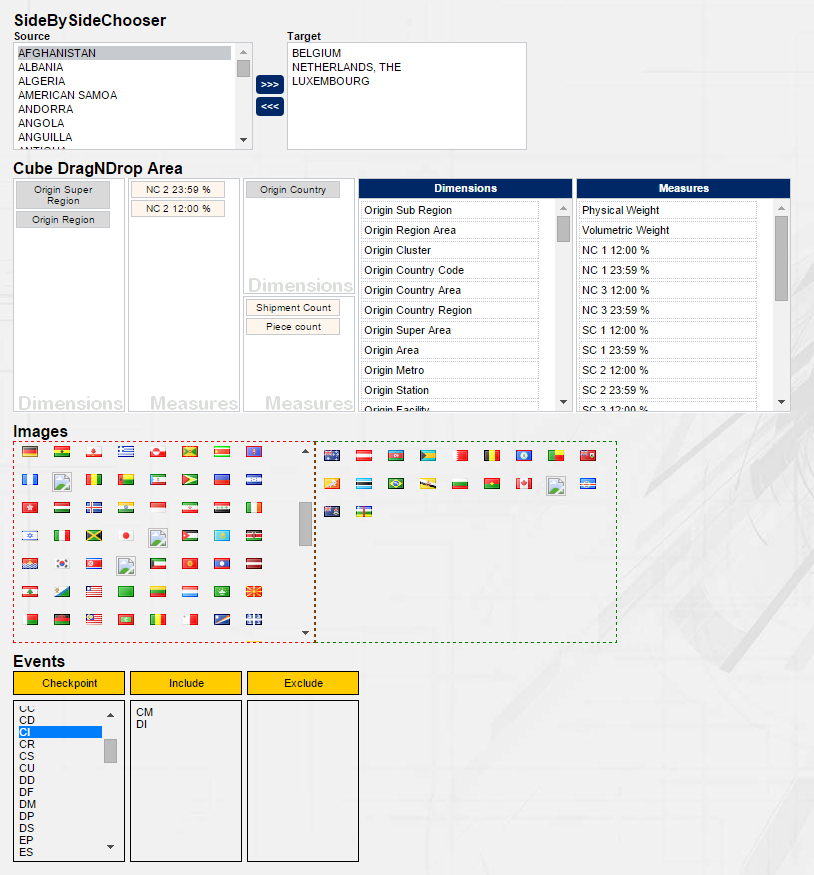
Assume you want to provide the user with the option of setting up a report by defining dimensions and measures and filter data by time and location like this:
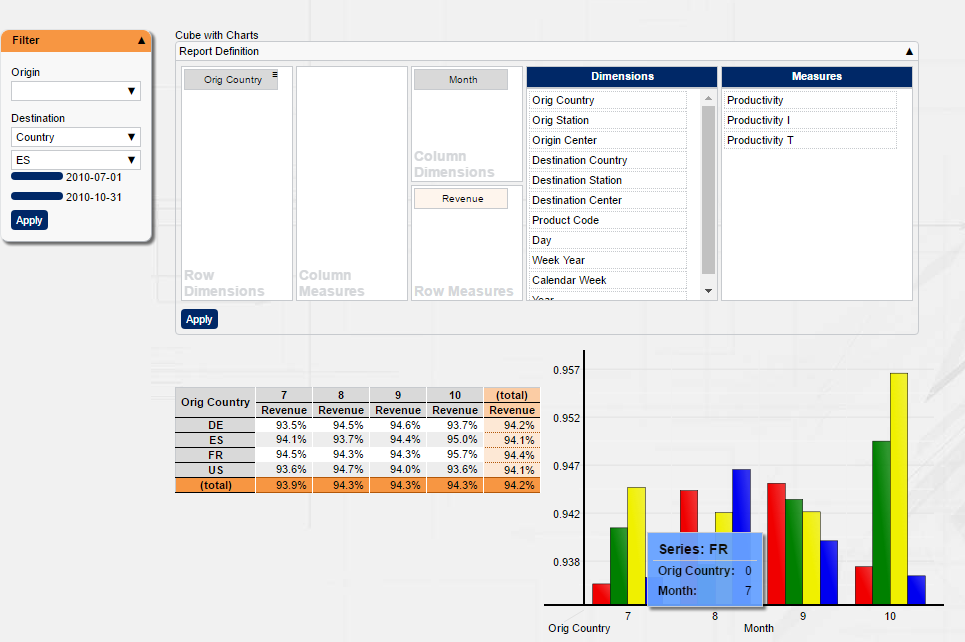
You will be surprised how easy you achieve this with BCD-UI.
And going further and tweak the application to your needs is where BCD-UI continues supporting you,
so you can provide solutions with higher complexity with less effort, fewer bugs and less performance issues than ever.
With BCD-UI you are free to extend in any direction needed using standard technologies. While you are not at all limited to BCD-UI components, you will often find an 80% solution already provided ready-to-use.
1.2. What about jQuery, Angular, Vue.js etc?
Good question, should you not rather use jQuery?
In fact, when using BCD-UI you will be using jQuery a lot directly and indirectly as BCD-UI itself is built with the help of jQuery and understands jQuery objects.
And while not using Angular directly, BCD-UI uses web-components, which is also the basis for Angular modules,
and you will find the basic approach of Angular when dealing with data the on client and building reusable modules is very similar.
Yet, both libraries, like many others, limit themselves to somewhat low-level development and client side topics.
jQuery thankfully provides an API, which should have been part of the browser already, plus a rich set of UI-widgets.
Angular brought architecture to a JavaScript client, where before many solutions tried without.
Both aspects are very important for enterprise applications and both are also part of BCD-UI.
But in the end, they do not provide you with database access, components on higher abstraction levels,
security or ready-to-use components and leave these complex parts for you to be solved.
Still, BCD-UI combines freely with of today’s standard libraries, as is itself comprised of standard technologies easy to integrate with everything else.
1.3. Is there commercial support?
Commercial support for BCD-UI if necessary can be provided by BusinessCode GmbH, an independent software vendor in Germany. We already delivered literally hundreds of solutions based on different versions of BCD-UI, ranging from temporary installations to cover transitions up to a number of large scale installations with over 10.000 distinct users for enterprise-critical scenarios. There is even a BCD-UI Enterprise Edition: BCD-UI-EE available, providing even more features and full life-cycle support. In most cases we think though the Community Edition available on GitHub and described here is fully supporting you use case.
2. Getting Started
At its core, a BCD-UI application is a standard Jakarta EE web application.
If you are not an experienced Java web application developer, make sure you have a plain Java web application running before you turn it into a BCD-UI application.
For the following, we assume you already have a blank application running.
| If you don’t know how to make a vanilla application running with your IDE and Tomcat, check the Bootstrap chapter. |
To turn a plain application into a BCD-UI application, just do these 4 steps, detailed out in Application Setup
-
Add bcd-ui-core.jar and bcd-ui-theme.jar, and their Java dependencies
-
Copy some entries into your web.xml
-
Define database connection in context.xml
-
Add log4j2.xml
and you are done.
2.1. Useful resources
Standard technologies
Target audience of this tutorial are developers already developing Java web applications. You should already be able to
-
Create and understand Java Jakarta web applications intro
-
Run Tomcat together with your favorite IDE, for example with Eclipse
-
Hav access to a standard SQL database and have some tables with data, for example Postgres
-
Know how to use JavaScript
-
Have an understanding of HTML, css, XML, Ajax
-
Be able to read and write XPath intro and XSLT short or in depth
Let’s continue by creating our first page with BCD-UI.
BCD-UI related links
-
BCD-UI’s full documentation including this tutorial and Java API
-
BCD-UI’s JavaScript API
-
BCD-UI’s project page on GitHub
-
BusinessCode GmbH, the company behind BCD-UI
3. Your first BCD-UI page
In this section we create a small BCD-UI application and explain some core concepts.
3.1. Overview
These are the steps of this section:
-
Page Setup: Create an HTML empty page for over-all layout
-
Use BCD-UI’s SimpleModel to load static data from an XML file
-
Add a Renderer to transform data to HTML
-
Use an AutoModel to dynamically load data from the database
-
Add a PeriodChooser an apply button to reload the page with data of the selected date
-
Use a SingleSelect to further filter the data
3.2. Step by step
Set the page up
While you are totally free in your page layout, BCD-UI comes with useful artifacts and page structure which we use here. Add the following as WebContent/simpleReq/index.html to your application and adjust the urls in <head> to ../
1
2
3
4
5
6
7
8
9
10
11
12
13
14
15
16
17
18
19
20
21
22
23
24
25
26
27
28
29
30
31
32
33
34
35
36
37
38
39
40
41
42
43
44
45
46
47
48
49
50
51
52
53
54
55
56
57
58
59
60
61
62
63
64
65
66
67
68
69
70
71
72
73
74
<!DOCTYPE HTML>
<html>
<head>
<meta charset="UTF-8"/>
<title>Blank Page</title>
<link rel="shortcut icon" href="./favicon.ico"/>
<script type="text/javascript" src="./bcdui/bcdui.js"></script> (1)
</head>
<body>
<div class="bcd__outer-wrapper"> (2)
<div class="bcd__wrapper">
<div class="bcd__horizontal-split">
<!-- Header -->
<div class="bcd__header">
<div class="bcd__header__upper">
<div class="bcd__header__logo"><img src="../bcdui/theme/images/bcd_logo.png" alt=""></div>
<div></div>
</div>
<div class="bcd__header__navigation"></div> (3)
</div>
<!-- Main area -->
<div class="bcd__vertical-split">
<!-- Left sidebar, there is also a right sidebar not shown here --> (4)
<div class="bcd__sidebar-left">
<div class="bcd__sidebar-left__inner bcdEffectCollapse">
<div class="bcd__form-container">
<section>
<div class="bcd__form-group">
<div class="bcd__select-container">
<!-- place your sidebar widgets here
<bcd-inputNg label="my input"...></bcd-inputNg>
-->
<bcd-buttonNg caption="Apply" onClickAction="bcdui.core.lifecycle.applyAction()"></bcd-buttonNg>
</div>
</div>
</section>
</div>
</div>
</div>
<!-- Main content area --> (5)
<div class="bcd__content-container">
<h1>Blank Page</h1>
<!-- place your main output here -->
<div id="myDataDiv"></div> (6)
</div>
</div>
<!-- Footer -->
<footer>
<p>© 2026 BusinessCode GmbH</p>
<nav>
<ul>
<li><a href="#">Imprint</a></li>
<li><a href="#">Privacy</a></li>
</ul>
</nav>
</footer>
</div>
</div>
</div>
<!-- Your JavaScript goes here. -->
<script type="text/javascript" src="./blankPage.js"></script> (7)
</body>
</html>
| 1 | Loads BCD-UI library including theme |
| 2 | Root of page structure of BCD-UI theme |
| 3 | Menu will go here |
| 4 | This we call 'SideBar', this is where we will later place report filters |
| 5 | Here we will place the data output and show the guiStatus' content |
| 6 | Here we will display our output |
| 7 | Any of your own JavaScript code goes into an extra js file |
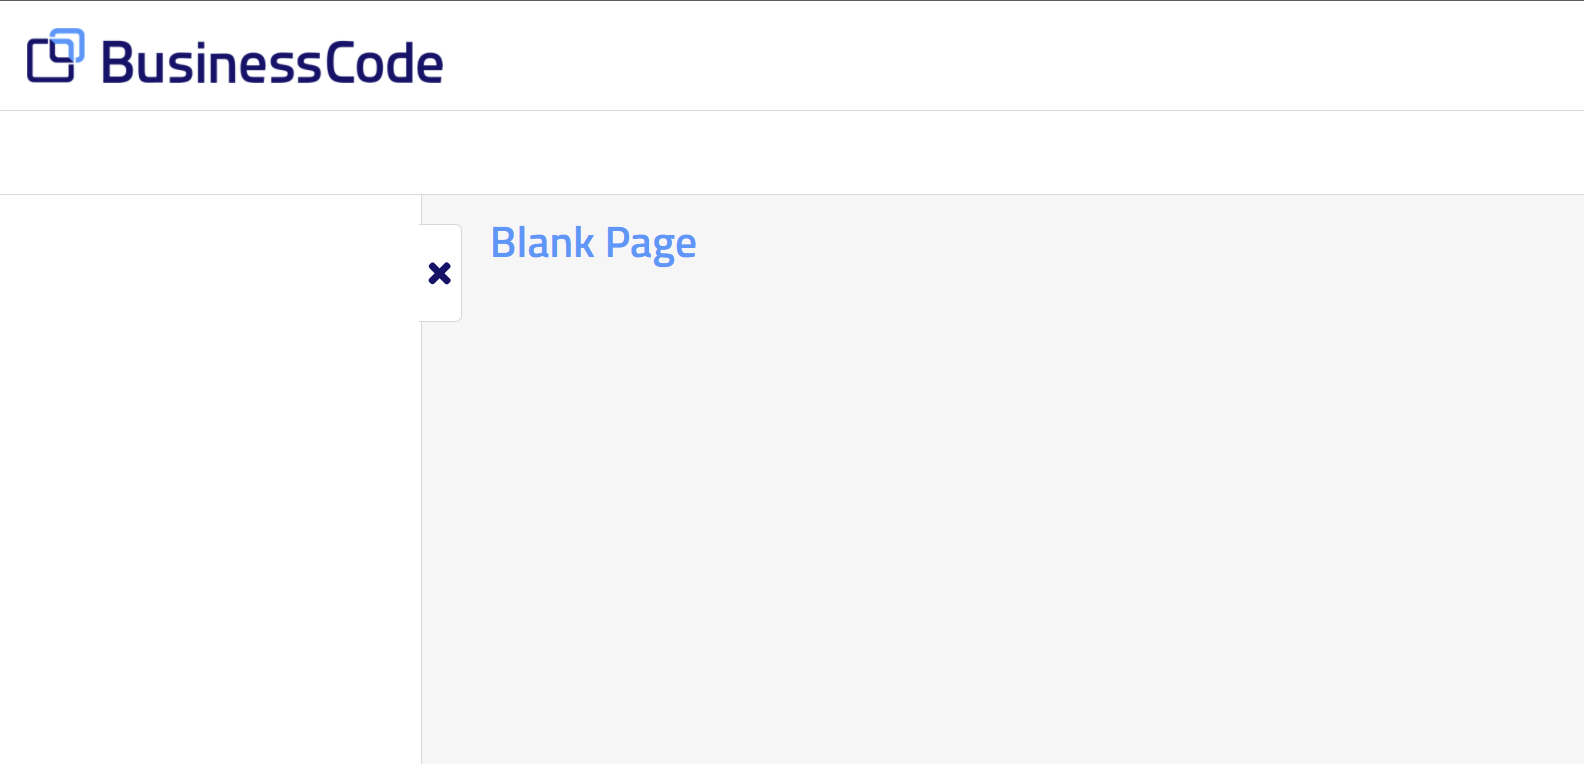
Now we already have an empty but fully styled page, start Tomcat and open it in a browser. If MyApp is you application’s name, open http://localhost:8080/MayApp/simpleReq/index.html
| Load you JavaScript content at the end of the page to make sure all elements you will addressed are there when you code runs. Otherwise, use bcdui.core.ready() to delay you code. |
|
BCD-UI theme has 2 parts: The part that is responsible for the overall page layout and structure is shown here. Usage of this part is optional. You can also use your favorite page structure and css instead. The part that styles widgets and components is mandatory to style these artifacts. |
Add static data
Add a file with the following content as /simpleReq/staticData.xml:
<Wrs xmlns="http://www.businesscode.de/schema/bcdui/wrs-1.0.0">
  <Header>
    <Columns>
      <C pos="1" id="ctr" dimId="ctr" caption="Country"   type-name="VARCHAR"/>
      <C pos="2" id="cw"              caption="C/W"       type-name="INTEGER"/>
      <C pos="3" id="low"             caption="Low"       type-name="NUMERIC"/>
      <C pos="4" id="height"          caption="Height"    type-name="NUMERIC"/>
      <C pos="5" id="height2"         caption="Height 2"  type-name="NUMERIC"/>
    </Columns>
  </Header>
  <Data>
    <R id="1"><C>BE</C><C>23</C><C>1200</C><C>1300</C><C>-20</C></R>
    <R id="2"><C>CZ</C><C>24</C><C>1234</C><C>1434</C><C>-15</C></R>
    <R id="3"><C>DE</C><C>25</C><C>1321</C><C>1421</C><C>0</C></R>
    <R id="4"><C>ES</C><C>26</C><C>1102</C><C>1202</C><C>20</C></R>
    <R id="5"><C>FR</C><C>27</C><C>1234</C><C>1334</C><C>30.5</C></R>
    <R id="6"><C>GB</C><C>28</C><C>1243</C><C>1343</C><C>45</C></R>
    <R id="7"><C>HU</C><C>29</C><C>1453</C><C>1553</C><C>52</C></R>
    <R id="8"><C>NO</C><C>30</C><C>1862</C><C>1962</C><C>58</C></R>
    <R id="9"><C>US</C><C>31</C><C>1913</C><C>2013</C><C>64</C></R>
  </Data>
</Wrs>
Above XML is a sample of a BCD-UI’s WebRowSet format Wrs, which is used to transfer data.
While you can use any data format with BCD-UI including other XML formats or JSON, using WebRowSet format provides many benefits and functionality as BCD-UI is aware of this format.
Now add the following script block to blankPage.js:
var staticData = new bcdui.core.SimpleModel("staticData.xml");
| The import makes BCD-UI JavaScript and TypeScript API stubs available to the editor. The files with the subs can be downloaded here from https://github.com/businesscode/BCD-UI-Docu/tree/master/resources |
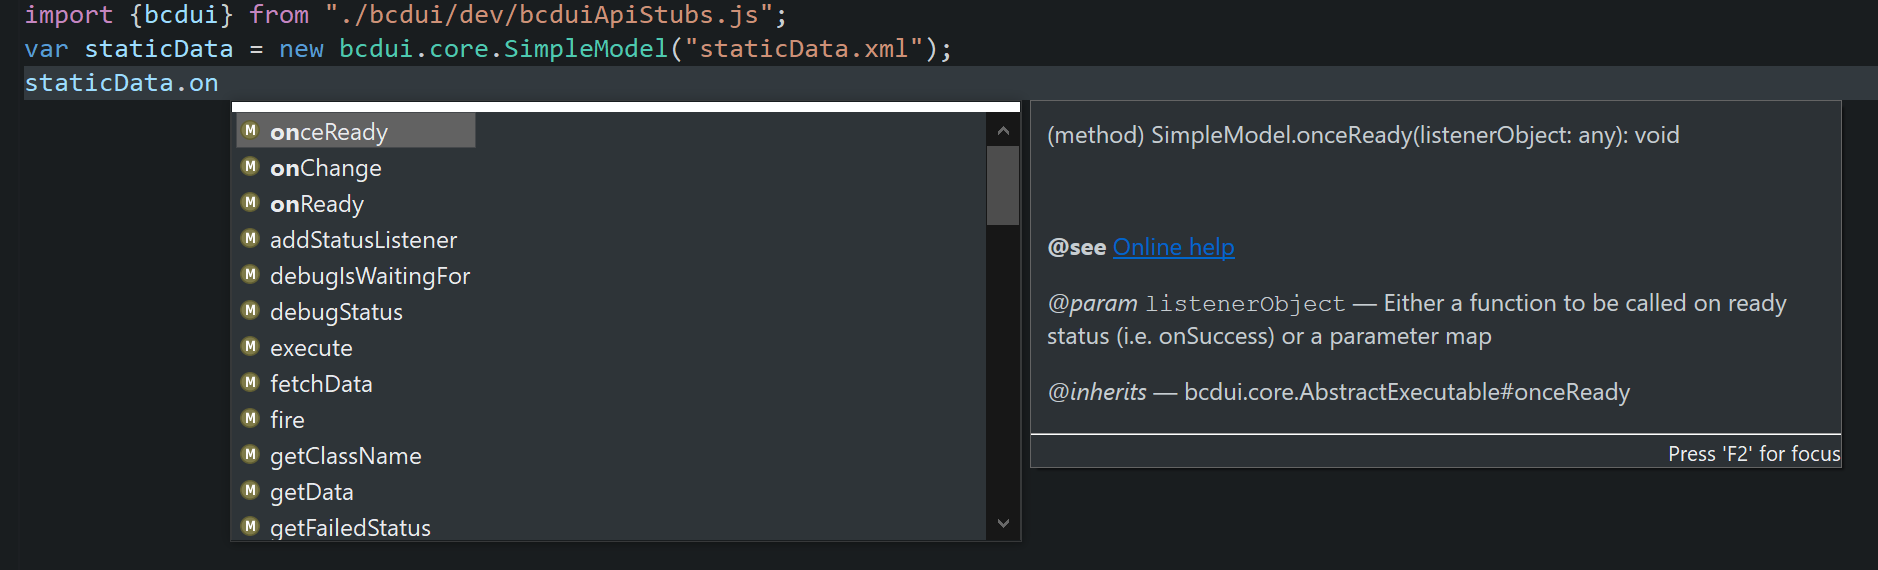
A bcdui.core.SimpleModel is used to load data from the server.
Like all models it is loaded lazy, so it is not loaded to the client until a displaying component requests it.
| There is a full JavaScript online API documentation for all classes of BCD-UI. Keep this open. |
Add a Renderer
Create a bcdui.core.Renderer to display the data. A Renderer expects at least a DataProvider (our SimpleModel is a DataProvider) plus an HTML element id (targetHtml) where the show the output.
var renderer = new bcdui.core.Renderer({
  inputModel: staticData,
  targetHtml: "myDataDiv"
});| By default, the result is rendered as a plain table. You will often want to provide some other layout. To do this, you create a custom XSLT, JavaScript or doT.js file turning Wrs into HTML and provide it to the renderer. We come to this later. |
The result is:
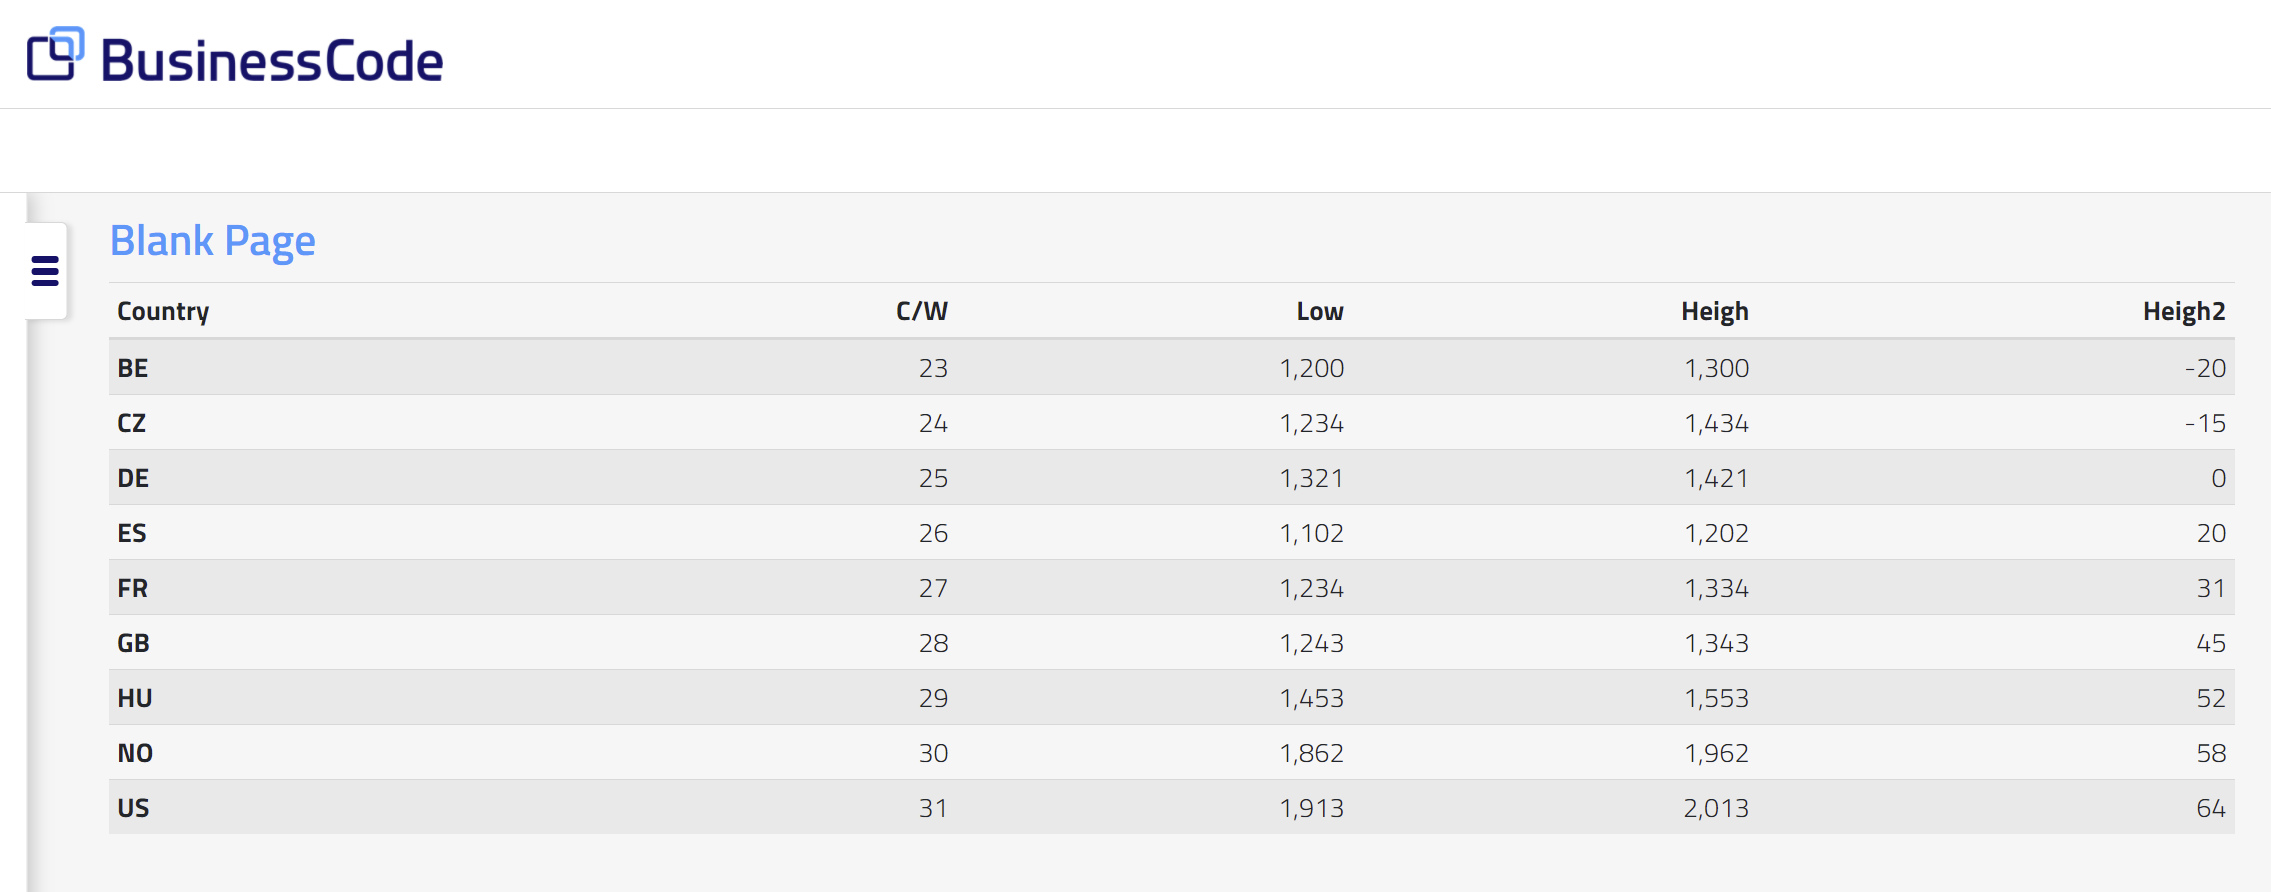
Congratulations, this is already your first BCD-UI page!
Use an HTML custom element instead
You can also use an HTML custom element to create a renderer. The advantage is that it goes right where it will appear. To do this, replace <div id="myDataDiv"></div> with
<bcd-renderer inputModel="staticData"></bcd-renderer>How does it reach the staticData variable?
While the JavaScript version above references the JavaScript variable staticData directly, the HTML custom element only knows the id of the input model. You register your DataProviders simply by giving them an ìd:
var staticData = new bcdui.core.SimpleModel({id: "staticData", url: "staticData.xml" });
The JavaScript variable, and the id are both staticData in this example, but they are completely separate things and do not need to be identical.
|
Load data from database
Instead of reading the data from a static file, we will now access the database.
Connect to your database
BindingSets connect BCD-UI to your database. Each database access is mediated by a BindingSet. For the following you obviously need a database and some data. Please identify or create a table with some columns including a date column, give it the id dy, and some data. Make sure you have the right database driver in your Java dependencies. For example add it to gradle() and refresh), or download it and put it into WEB-INF/lib.
Add the following as testData.xml to WEB-INF/bcdui/bindings, and adjust it to your table.
All server side config files of BCD-UI go into WEB-INF/bcdui. It’s subfolder bindings holds the binding files.
|
<BindingSet xmlns="http://www.businesscode.de/schema/bcdui/bindings-1.0.0"
  id="carRepairs" table="car_repairs"
  dbSourceName="jdbc/myDb">   (1) (2) (3)

  <C id="id" caption="Id" isKey="true"> (4)
    <Column>id</Column> (5)
  </C>
  <C id="dy" caption="Dy">
    <Column>dy</Column>
  </C>
  <C id="yr" caption="Year">
    <Column>EXTRACT( YEAR from dy)</Column> (6)
  </C>
  <C id="country" caption="Country">
    <Column>country</Column>
  </C>
  <C id="station" caption="Station">
    <Column>station</Column>
  </C>
  <C id="carsSold" caption="Cars sold">
    <Column>cars_sold</Column>
  </C>
  <C id="carsRepaired" caption="Cars repaired">
    <Column>cars_repaired</Column>
  </C>
</BindingSet>| 1 | id: The BindingSet’s logical name in the application |
| 2 | table: The real table/view name in your database |
| 3 | dbSourceName which database connection to use |
| 4 | A logical BindingItem name |
| 5 | The real column name in you database |
| 6 | You may any valid column expression here |
For dbSourceName use a name of a DataSource you defined in your context.xml during Application Setup.
Create an AutoModel
A bcdui.core.AutoModel allows for simple data loading cases, where filtering, grouping and ordering is sufficient.
In th following sample the requested data is filtered by country and day. We will add these filters later, for now they are not set and all data is loaded.
Add this to the script block at the end of the page:
var carRepairs = new bcdui.core.AutoModel({
  bRefs: "dy country station carsSold carsRepaired",
  filterBRefs: "country dy",
  bindingSetId: "carRepairs",
  isDistinct: true
});
To let the renderer show this data, change the renderer’s parameter to inputModel: carRepairs.
Reload the page: Now you are already using your database!
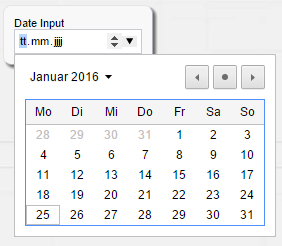
Add a PeriodChooser
In this section we add a bcdui.widget.PeriodChooser to retrieve a subset of our data specified by a date range. We also add an apply button to reload the page with this filter setting.
To place the period chooser, and the apply button on the page, add the two sections like the following to the element with class bcd__sidebar-left__inner, one for the period chooser and one for the apply button.
<section>
  <div class="bcd__form-group">
    <label>Period Chooser</label>
    <div class="bcd__select-container">
      <div id="periodChooserDiv"></div>
    </div>
  </div>
</section>
The chooser and the button are then created with JavaScript as follows:
bcdui.widget.createPeriodChooser({
  targetModelXPath: "$guiStatus/*/f:Filter/f:And[@id = 'myPeriodChooser']", (1)
  targetHtml: 'periodChooserDiv', (2)
  isWeekSelectable: true (3)
});
bcdui.widgetNg.createButton({
  onClickAction: bcdui.core.lifecycle.applyAction,
  targetHtml: 'applyDiv',
  caption: 'Apply'
});| 1 | This tells the PeriodChooser to write its selected result into the model named guiStatus at the specified path |
| 2 | This is the HTML element where the widget is displayed |
| 3 | These are further widget specific settings |
Voilà! data loaded from database with a filter.
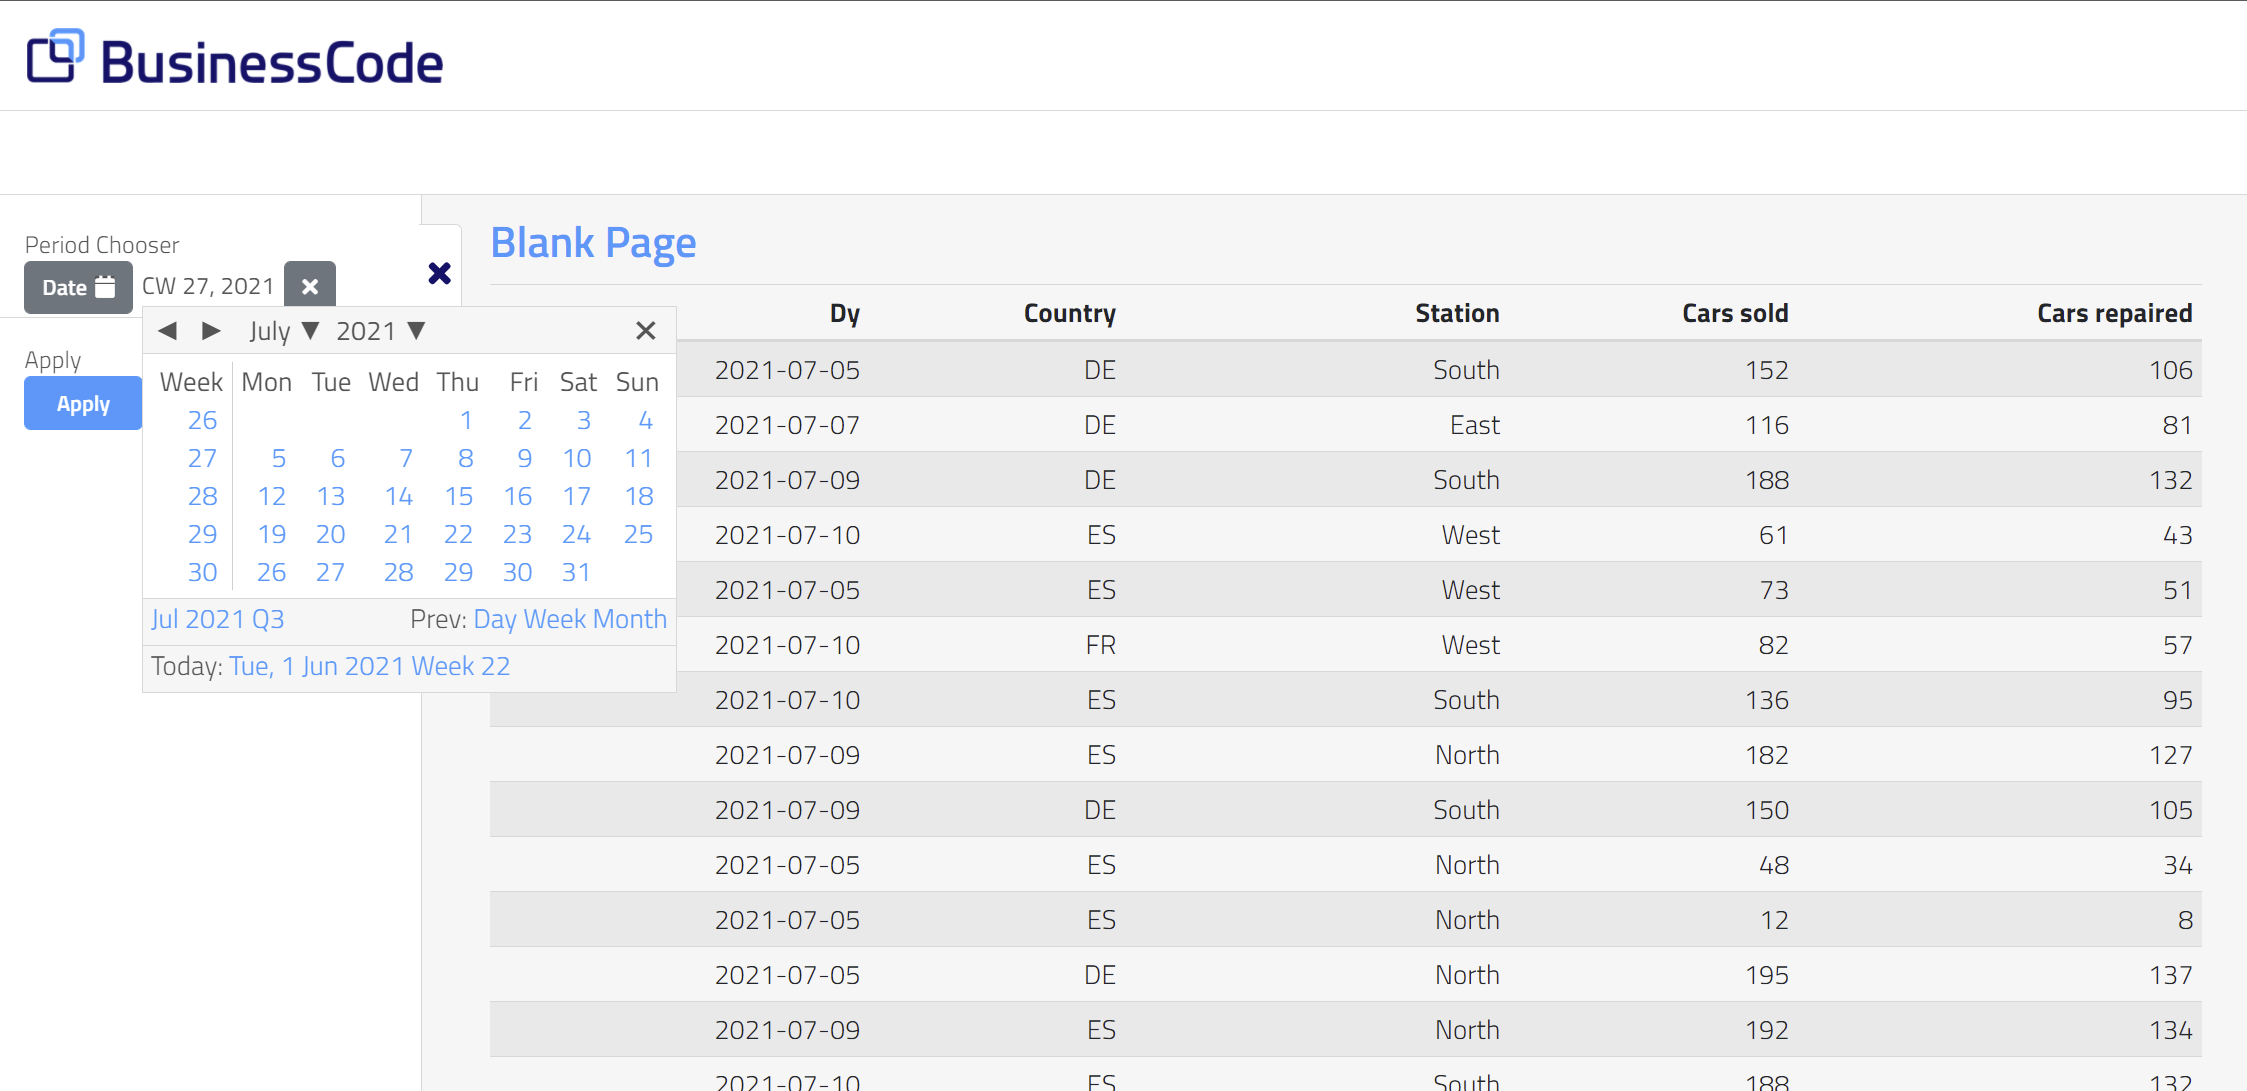
The PeriodChooser we will be using works on well-known BindingItem names to support some automatic functionality. It is mandatory to name date related BindingSet items on of dy, cw, cwyr, mo, qr, yr with an optional postfix.
|
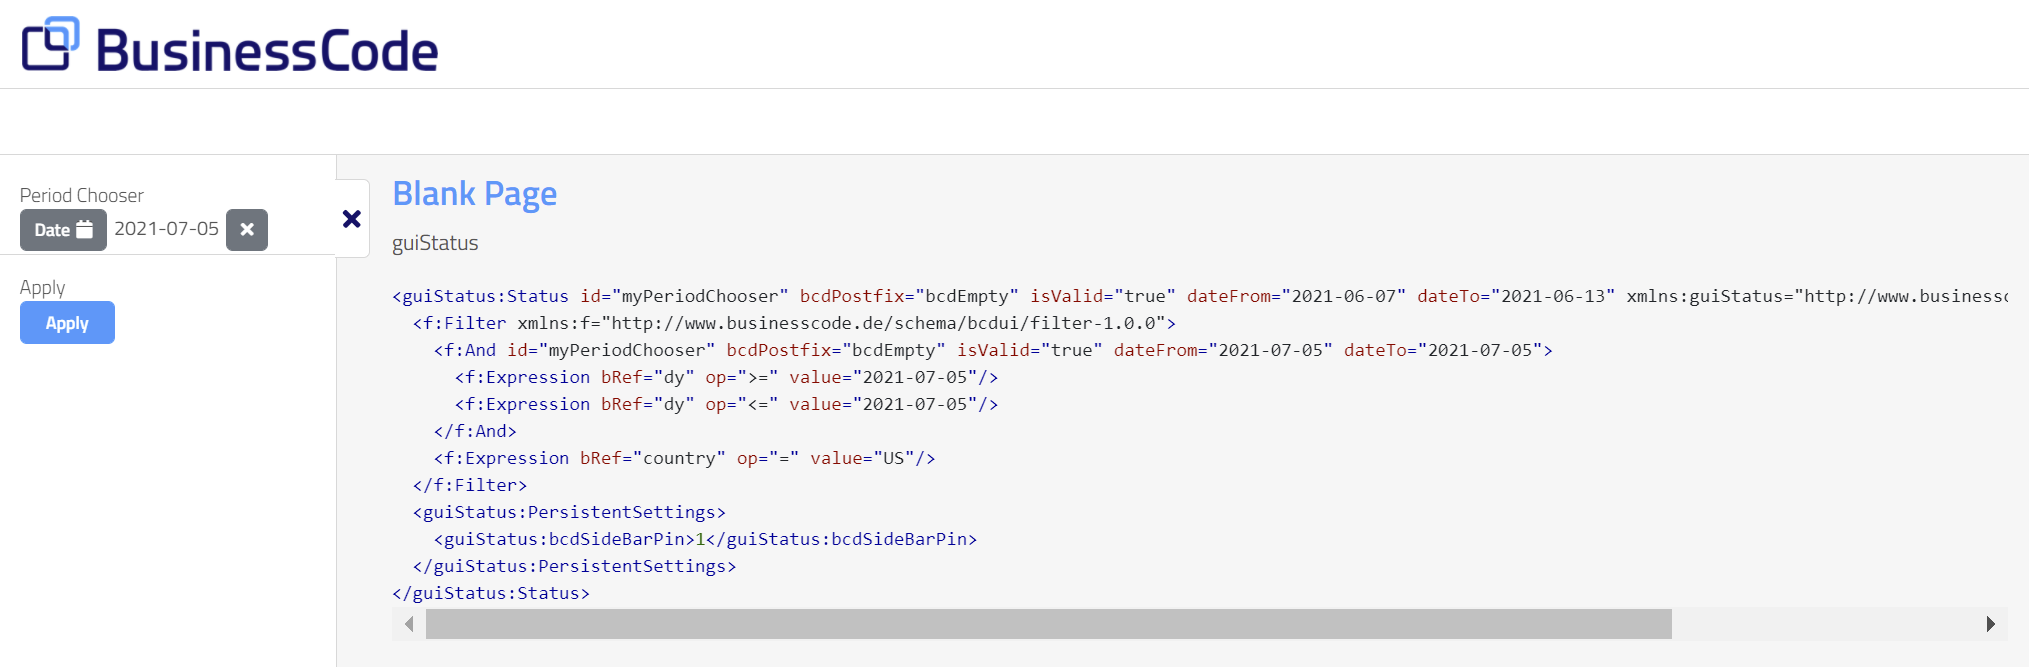
<C id="dy"><Column>booking_date</Column></C>The important guiStatus
BCD-UI creates a page-wide singleton model named guiStatus, accessible via bcdui.wkModels.guiStatus (or by name), which serves as the default place to store user interaction data.
To get an impression on how this guiStatus model looks like, add the following debugging utility to the JavaScript section in our page. Also add the target div with id myGuiStatusDiv in the main area within bcd__content-container:
bcdui.widget.visualizeXml.visualizeModel({
  inputModel: bcdui.wkModels.guiStatus,
  targetHtml: "myGuiStatusDiv"
});
This utility widget simply displays the content of the guiStatus to div#myGuiStatusDiv. Play with the period chooser and see the filter change.
This is done with the help of two-way binding of widgets and models. If the widget changes the model changes, but if the model changes it also propagates the changes back to the widget. We see more of this in the coming section.
When the apply button is clicked, the guiStatus document is sent to the sever, which uses f:Filter for limiting loaded data. You should see that the url has a guiStatus parameter with the (compressed) guiStatus.
So when you set up a widget to create a filter, the targetXPath argument describes what filter elements are written to the guiStatus. For example our example filter f:Filter translates to
SELECT ... FROM mytable WHERE booking_date BETWEEN '2021-01-01' AND '2021-01-31';Further details on Wrs requests and f:Filters can be found below
In praxis, you will debug the guiStatus by opening the JavaScript console of your browser and enter
bcdui.wkModels.guiStatus.getData()
you can then see the content of guiStatus

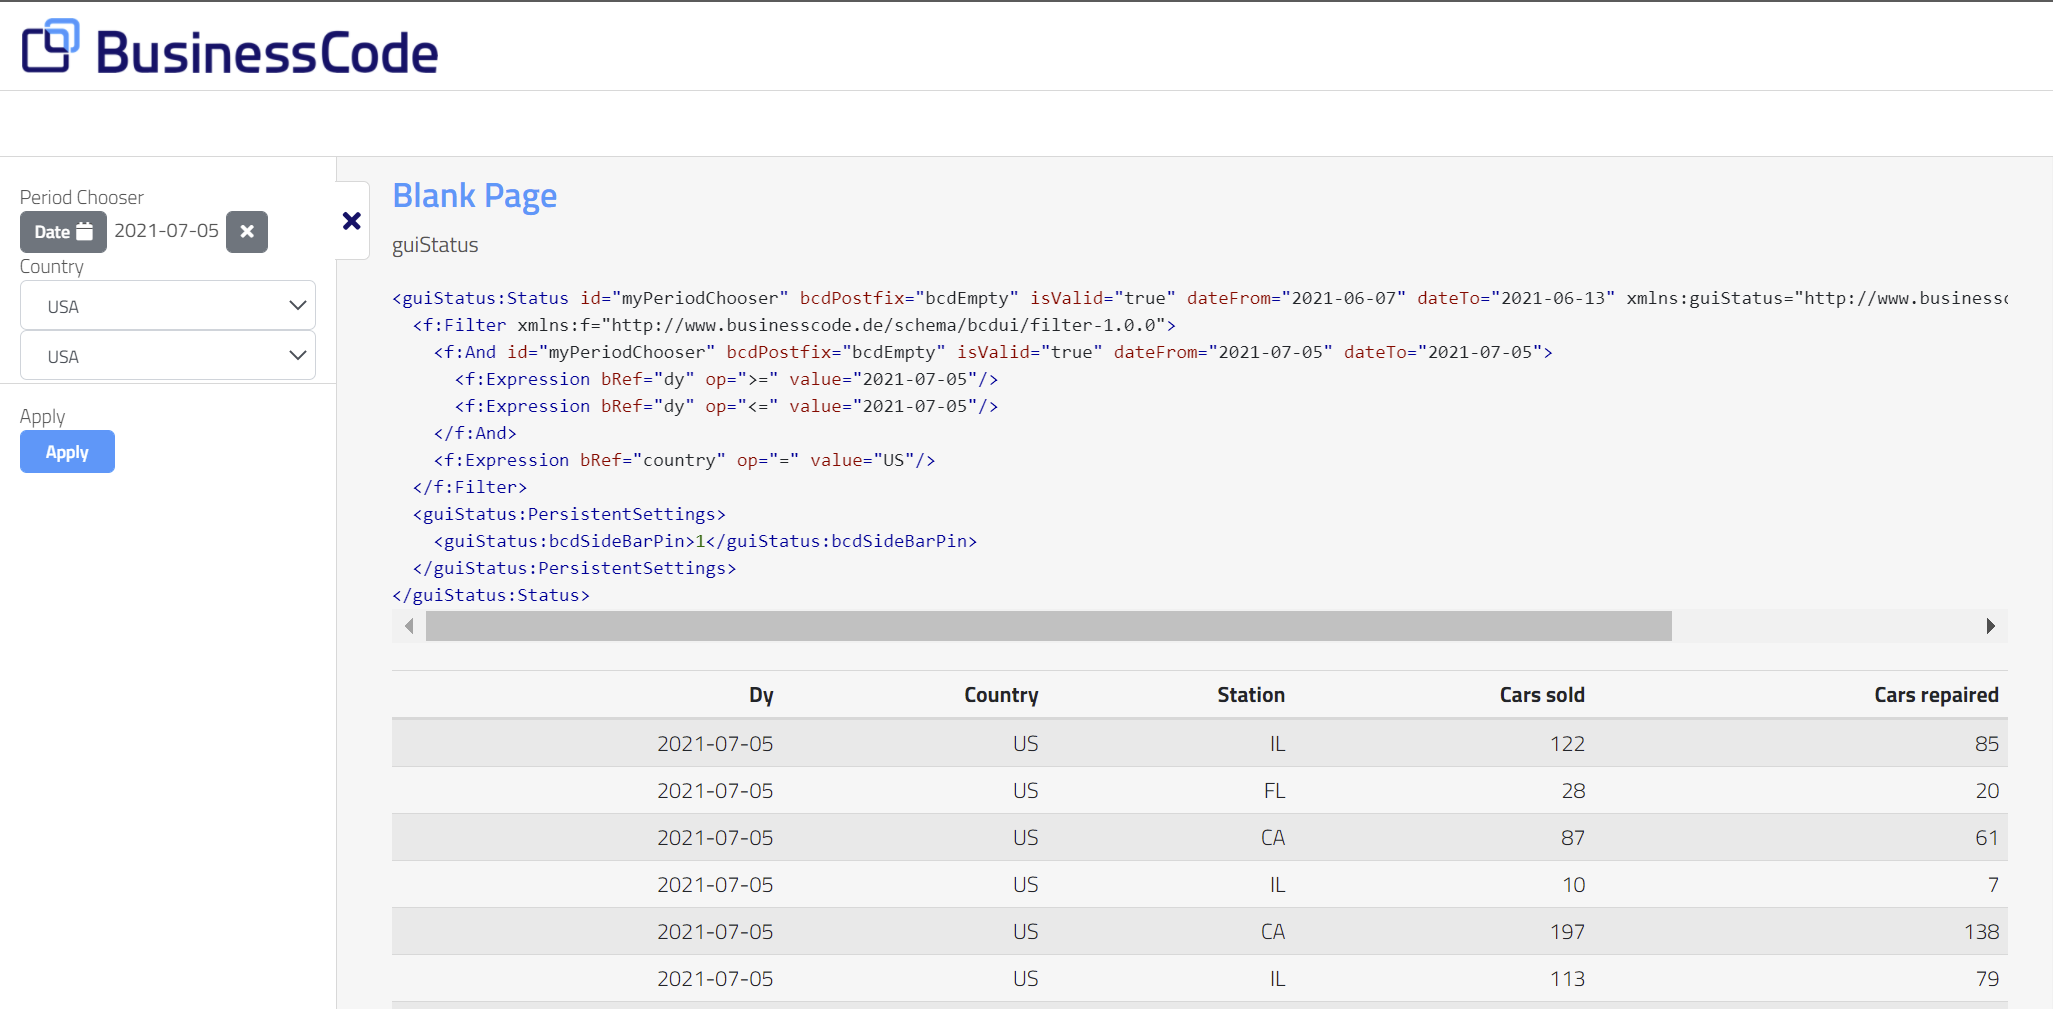
Add a SingleSelect
We do now add a more complex filter bcdui.widgetNg.SingleSelect:, which is using data for displaying a selection to the user.
Create a model from small static inline data with country data like this:
var countriesModel= new bcdui.core.StaticModel({
  id: "countriesModel",
  data: '<Wrs xmlns="http://www.businesscode.de/schema/bcdui/wrs-1.0.0"><Data>' +
      ' <R><C caption="Germany">DE</C></R>' +
      ' <R><C caption="USA">US</C></R>' +
      ' <R><C caption="Spain">ES</C></R>' +
      '</Data></Wrs>'
});
The bcdui.core.StaticModel gets a static inline string which is parsed and made available.
The id attribute makes the model available not only as a JavaScript object but also by name in BCD-UI’s registry. With that it can also be used in declarative contexts like the HTML custom elements and XPath expressions and more, where you cannot reference a JavaScript variable directly.
|
The SingleSelect widget we want to use here must be added to bcd__sidebar-left__inner div, in the same way as the apply button and the period chooser above.
The SingleSelect widget is again created with JavaScript. Note that the values which are presented to the user are referenced with the XPath expression. You should make yourself familiar with XPaths as they are used quite often.
bcdui.widgetNg.createSingleSelect({
  targetHtml: 'countryChooserDiv',
  targetModelXPath: "/*/f:Filter/f:Expression[@bRef = 'country' and @op = '=']/@value",
  optionsModelXPath: "$countriesModel/wrs:Wrs/wrs:Data/wrs:R/wrs:C/@caption",
  optionsModelRelativeValueXPath: ".."
});
The optional optionsModelXPath argument specifies the data source for the options presented to the user.
Because optionsModelXPath is a string attribute we had to set an explicit id for the StaticModel as mentioned.
References to a DataProviders in XPaths are built with a $ followed by the DataProvider’s id, like $countryModel.
|
<label>Country</label>
<div class="bcd__select-container">
  <bcd-singleselectng
      targetModelXPath = "/*/f:Filter/f:Expression[@bRef = 'country' and @op = '=']/@value"
      optionsModelXPath = "$countriesModel/wrs:Wrs/wrs:Data/wrs:R/wrs:C/@caption",
      optionsModelRelativeValueXPath = ".."></bcd-singleselectng>
</div>
Since the expression does not start with a $ with a model name, the chosen item will be stored in the guiStatus (it’s the default) using the targetXPath position.
In this case we write a filter on the "country" BindingItem.
You can find more about widgets here.
Two-way binding of widgets
If you have both versions of the country chooser (JavaScript and custom HTML) on the page, you will notice that they are always in sync. That is, if you change one, the other changes as well. This shows an important feature of BCD-UI.
|
When somebody (like our chooser) writes to a model (here guiStatus), the model informs all listeners about any change. This gives them the chance to reflect the value correctly at any time. |
Widgets use guiStatus as the default model but this concept is true for all models of BCD-UI and not only for widgets. For example paste the following line into your browser’s JavaScript console (adjust the xPath to your setup):
bcdui.wkModels.guiStatus.write("/*/f:Filter/f:Expression[@bRef='country']/@value", "US", true)It calls the write() method on guiStatus which is itself a StaticModel to set a value at the specified xPath and with true as the last parameter informs all dependent listeners, widgets etc about changes.
| As an exercise, create a new button on the top of the page calling a function setting your chooser to some value with this method. |
4. Minimal cube setup
In this section we will use one of BCD-UI’s powerful components, the Cube.
Now that you already managed create your first page in the previous section,
we will also take the chance and explain things in more detail.
4.1. Overview
A cube allows for slicing and dicing data by free dimensions easily and quickly in a pivot-like manner.
The following steps are necessary to create a report page:
- Define BindingSets for the logical data model
-
To access the database, you define BindingSets as the application’s logical view to the database.
- Set up a page
-
Load bcdui.js onto you HTML page and add the predefined divs needed by the theme
- Add report filters to the page
-
This allows you to define which data is taken into account for the report.
- Add a cube component on the page
-
This allows you to choose the dimensions and measures you want to see.
4.2. Step by step
Definition of the logical data model
BCD-UI uses BindingSets to access the underlying database.
A BindingSet defines the logical names and constraints, which apply when accessing the database.
We start with the BindingSet for the country list. Add the following file to WEB-INF/bcdui/bindings/myGeoData.xml, adjusted o a table you have:
<BindingSet xmlns="http://www.businesscode.de/schema/bcdui/bindings-1.0.0"
            id="myGeoData" table="BCDUITEST_MD_GEO">   (1) (2) (3)

  <C id="country" isKey="true" caption="Country"> (4)
    <Column>country</Column> (5)
  </C>
</BindingSet>| 1 | BindingSet root element namespace need to be correct |
| 2 | id is the logical name within the application |
| 3 | table is the physical name of the table or view it the database |
| 4 | Each bnd:C is a BindingItem represents an individual column, you give it a logical id, and you can enforce some attributes |
| 5 | This is the column expression for the database, often simply the column name but in can also be something more complex like substr(colname,2) |
BindingSets are located in WEB-INF/bcdui/bindings or sub-folder and are evaluated by BCD-UI on start time.
Information like the data type can be given in the file, otherwise it is derived from the column’s physical data type. But you can always overwrite this in the BindingSet if you need to.
To define a BindingSet for the table (or view) holding the data that shall be shown in a cube,
create a file WEB-INF/bcdui/bindings/myReportData1.xml and adjust the following content to your table and column names:
<BindingSet xmlns="http://www.businesscode.de/schema/bcdui/bindings-1.0.0"
            id="myReportData1" table="BCDUITEST_DEMO_SHIPMENT">

  <C isKey="true" id="transport_id" caption="Transport Id" type-name="VARCHAR">
    <Column>ITEM_ID</Column>
  </C>
  <C id="orig_country" caption="Origin Country" type-name="VARCHAR">
    <Column>ORIG_CTR</Column>
  </C>
  <C id="orig_area" caption="Origin Area" type-name="VARCHAR">
    <Column>ORIG_GEO_1</Column>
  </C>
  <C id="dest_country" caption="Destination Country" type-name="VARCHAR">
    <Column>DEST_CTR</Column>
  </C>
  <C id="dest_area" caption="Destination Area" type-name="VARCHAR">
    <Column>DEST_GEO_1</Column>
  </C>
  <C id="product_code" caption="Product code" type-name="VARCHAR">
    <Column>PRODUCT</Column>
  </C>
  <C id="dy" caption="Date" type-name="DATE">
    <Column>dy</Column>
  </C>
  <C id="yr" caption="YR" type-name="INTEGER">
    <Column>YR</Column>
  </C>
  <C id="mo" caption="MO" type-name="INTEGER">
    <Column>MO</Column>
  </C>
  <C id="cost" caption="Cost">
    <Column>cost</Column>
  </C>
  <C id="weight" caption="Weight">
    <Column>weight</Column>
  </C>
  <C id="volume" caption="Volume">
    <Column>shipment_size</Column>
  </C>
</BindingSet>
Page setup
Add a page WebContent/minimalCube/index.html to your application.
<!DOCTYPE HTML>
<html>
<head>
<meta charset="UTF-8"/>
<title>Blank Page</title>
<link rel="shortcut icon" href="./favicon.ico"/>
<script type="text/javascript" src="./bcdui/bcdui.js"></script> (1)
</head>
<body>
<div class="bcd__outer-wrapper"> (2)
<div class="bcd__wrapper">
<div class="bcd__horizontal-split">
<!-- Header -->
<div class="bcd__header">
<div class="bcd__header__upper">
<div class="bcd__header__logo"><img src="../bcdui/theme/images/bcd_logo.png" alt=""></div>
<div></div>
</div>
<div class="bcd__header__navigation"></div> (3)
</div>
<!-- Main area -->
<div class="bcd__vertical-split">
<!-- Left sidebar, there is also a right sidebar not shown here --> (4)
<div class="bcd__sidebar-left">
<div class="bcd__sidebar-left__inner bcdEffectCollapse">
<div class="bcd__form-container">
<section>
<div class="bcd__form-group">
<div class="bcd__select-container">
<!-- place your sidebar widgets here
<bcd-inputNg label="my input"...></bcd-inputNg>
-->
<bcd-buttonNg caption="Apply" onClickAction="bcdui.core.lifecycle.applyAction()"></bcd-buttonNg>
</div>
</div>
</section>
</div>
</div>
</div>
<!-- Main content area --> (5)
<div class="bcd__content-container">
<h1>Blank Page</h1>
<!-- place your main output here -->
<div id="myDataDiv"></div> (6)
</div>
</div>
<!-- Footer -->
<footer>
<p>© 2026 BusinessCode GmbH</p>
<nav>
<ul>
<li><a href="#">Imprint</a></li>
<li><a href="#">Privacy</a></li>
</ul>
</nav>
</footer>
</div>
</div>
</div>
<!-- Your JavaScript goes here. -->
<script type="text/javascript" src="./blankPage.js"></script> (7)
</body>
</html>| 1 | Loads BCD-UI library including theme |
| 2 | Root of page structure of BCD-UI theme |
| 3 | Menu will go here |
| 4 | This we call 'SideBar', this is where we will later place report filters |
| 5 | Here we will place the data output and show the guiStatus' content |
| 6 | Here we will display our output |
| 7 | Any of your own JavaScript code goes into an extra js file |
You should now be able to see a styled page if you navigate to it with the browser. Otherwise, you probably missed adding bcdui.jar and the web.xml entries, application setup.
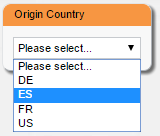
Add a report filter
Report filters are widgets allowing the user to restrict data to be shown in a report.
Many filters show values to choose from based on reference data.
The filter in this example uses a list of countries to choose from.
To add a model with the available data, add the following code to your script block at page bottom:
      // Load the geo data for the chooser
      var autoModel = new bcdui.core.AutoModel({
        id: "geoData", (1)
        bindingSetId: "myGeoData", (2)
        bRefs: "country", (3)
        isDistinct: true
});| 1 | Id of the loaded data if referenced in an XPath via $geoData |
| 2 | Id of the BindingSet used to retrieve the data |
| 3 | Space separated ids of the BindingItems of the BindingSet |
For the widget, if we create it via JavaScript, we need a place in HTML, where it should appear. We will add 2 widgets: A country chooser and a button to re-run the report.
                      <div class="bcd__select-container">
                        <span class="bcdCaption">Origin Country</span>
                        <div id="geoChooserTH"></div> (2)
                        <div id="applyTH"></div>

</div>| 1 | This is the container for the theme’s sidebar |
| 2 | This is where the country chooser goes |
| The sidebar is an extra area of the theme, often used for widgets. BCD-UI theme helps to create such an area, but there is no technical need to use it, you may place choosers anywhere on your page. |
Create the widgets:
      // Create a chooser for geo data
      bcdui.widgetNg.createSingleSelect({
        targetHtml: "geoChooserTH", (1)
        targetModelXPath: "$guiStatus/*/f:Filter/f:Expression[@bRef = 'orig_country' and @op = '=']/@value", (2)
        optionsModelXPath: "$geoData//wrs:Data/wrs:R/wrs:C[1]" (3)
      });
      // Create a button to re-execute the page
      bcdui.widgetNg.createButton({
        onClickAction: bcdui.core.lifecycle.applyAction, (4)
        targetHtml: 'applyTH',
        caption: 'Apply'
});| 1 | targetHtml tells us where to place the widget. |
| 2 | targetModelXPath defines where the output will be stored.
Note that this is an XPath and $guiStatus refers to a DataProvider with id 'guiStatus'. |
| 3 | optionsModelXPath tells us where the values to select from come from |
| 4 | bcdui.core.lifecycle.applyAction is a function that comes with BCD-UI for re-loading the page with the current guiStatus |
The chosen item will be stored in the guiStatus using the targetModelXPath’s form and position.
If a chooser uses f:Filter format for its output and places its output in guiStatus below /guiStatus:Status/f:Filter,
it is automatically picked up by the cube to limit the data retrieved from the server.
|
You can find more widgets here.
Define the cube
By default, the cube uses a file called cubeConfiguration.xml in the same folder as your HTML page.
This configuration file holds the Cube’s information about dimensions and measures and the source BindingSet.
If your BindingItems are different, adjust them here.
<cube:CubeConfiguration xmlns:cube="http://www.businesscode.de/schema/bcdui/cube-2.0.0"
                        xmlns:calc="http://www.businesscode.de/schema/bcdui/calc-1.0.0"
                        xmlns:dm="http://www.businesscode.de/schema/bcdui/dimmeas-1.0.0"
                        xmlns:wrq="http://www.businesscode.de/schema/bcdui/wrs-request-1.0.0">

  <wrq:BindingSet>myReportData1</wrq:BindingSet>
  <cube:Dimensions>
    <dm:LevelRef bRef="orig_country" total="trailing" caption="Origin Country"/>
    <dm:LevelRef bRef="orig_area"    total="trailing" caption="Origin Area"/>
    <dm:LevelRef bRef="dest_country" total="trailing" caption="Destination Country"/>
    <dm:LevelRef bRef="dest_area"    total="trailing" caption="Destination Area"/>
    <dm:LevelRef bRef="product_code" total="trailing" caption="Product Code"/>
    <dm:LevelRef bRef="dy"           total="trailing" caption="Day"/>
    <dm:LevelRef bRef="yr"           total="trailing" caption="Year"/>
    <dm:LevelRef bRef="mo"           total="trailing" caption="Month"/>
  </cube:Dimensions>
  <dm:Measures>
    <dm:Measure id="cost" caption="Cost">
      <calc:Calc type-name="NUMERIC" scale="1">
        <calc:ValueRef idRef="cost" aggr="sum"/>
      </calc:Calc>
    </dm:Measure>
    <dm:Measure id="weight" caption="Weight">
      <calc:Calc type-name="NUMERIC" unit="kg">
        <calc:ValueRef idRef="weight" aggr="sum"/>
      </calc:Calc>
    </dm:Measure>
    <dm:Measure id="volume" caption="Volume [cbm]">
      <calc:Calc type-name="NUMERIC" scale="1">
        <calc:ValueRef idRef="volume" aggr="sum"/>
      </calc:Calc>
    </dm:Measure>
    <dm:Measure id="volumeAvg" caption="Avg. Cost">
      <calc:Calc type-name="NUMERIC" scale="1">
        <calc:ValueRef idRef="volume" aggr="avg"/>
      </calc:Calc>
    </dm:Measure>
    <dm:Measure id="weightPerVolume" caption="Weight/Vol.">
      <calc:Calc type-name="NUMERIC" scale="3">
        <calc:Div>
          <calc:ValueRef idRef="weight" aggr="sum"/>
          <calc:ValueRef idRef="volume" aggr="sum"/>
        </calc:Div>
      </calc:Calc>
    </dm:Measure>
  </dm:Measures>
</cube:CubeConfiguration>
More options available for cubes are described here.
We already prepared the HTML to contain a div with id myData, this is where we will show our cube’s output.
Add the following to the script at the page bottom:
      // Create a Cube component
      var cube = new bcdui.component.cube.Cube({ targetHtml: "cubeTH" });
If you load the page for the first time, no data is displayed, because we did not yet tell the cube which one to show. You can do this statically or let the user decide, we go for the second option and add a powerful user interface.
Add a cube’s drag and drop area
To create a CubeConfigurator, add a file dimensionsAndMeasures.xml to your folder.
This one tells the CubConfigurator to just derive its content from dimensionsAndMeasures.xml.
<!-- Use the Cube's config for CubeConfigurator -->
<cube:CubeConfiguration xmlns:cube="http://www.businesscode.de/schema/bcdui/cube-2.0.0">
  <xi:include href="./cubeConfiguration.xml" xpointer="/*/*" xmlns:xi="http://www.w3.org/2001/XInclude"/>
</cube:CubeConfiguration>
Add this to the JavaScript area to create the actual cube component:
      // Create CubeConfigutator in form of a Drag and Drop Area
      bcdui.component.createCubeConfigurator({
        targetHtml: "cubeConfiguratorTH",
        cubeRenderer: cube.id,
        contextMenu: true,
        isDefaultHtmlLayout: true
      });
Testing the report
Congratulations, these were all steps required to set up a reporting cube. You can now test the report!
Where to go from here
5. Core concepts of BCD-UI
5.1. Using BCD-UI
Page core components
The following components are core on the client side of BCD-UI. They follow the well-known Model/View/Control architecture:
- DataProvider
-
DataProviders are client side models containing the data of the client, like reporting data, reference data and data reflecting user selections. On the client, models store their data per default as XML documents, on server side data is stored in a relational database. Models provide options for loading and changing data, informing listener about changes and saving data back to the server. Data is loaded lazily, i.e. only once it is needed.
- Renderer
-
Renderers are the views providing the visual parts of the application like reports, edit grids, charts or widgets. Renderer are implemented in XSLT, JavaScript or doT.js, taking a DataProvider as input and output HTML which is placed on the page. The default renderer outputs data as a table and can be extended or replace by custom logic.
- Controller
-
The controller reacts on user interaction, like a button click or a drag and drop activity. Controllers are small chunks of code implemented in JavaScript. This code can be provided by the BCD-UI library or by the project. Not only user interaction but also events thrown by models loading and changing can be used to trigger a controller.
- Widgets
-
Widgets are small views for user information and interaction like input fields, the menu and fly-overs. Widgets store their status per default in a page-wide guiStatus to make it and change events centrally available for all parts of the page.
- Components
-
Components are more complex views, for example cubes or charts, usually requiring a configuration XML. Components in most cases consist of multiple views and widgets working together.
- Page infrastructure
-
Page infrastructure comprises the guiStatus, mechanisms for object life-cycle etc. The guiStatus is the default model for all widgets and client-side status and thus usually contains all selections done by the user. Data requests use the guiStatus to decide which data to retrieve. This infrastructure also covers generic tasks like client side exports or fly-overs.
- Page layout structure
-
Page layout structure is a set of HTML elements and css classes making up the over-all look and feel of the page frame in corporate a theme.
Server core components
Core server components are:
- WebServices
-
WebServices exchange XML with a client’s DataProvider. WrsServlet is the default service for data model requests.
- BindingSets
-
BindingSets translate between the logical data model of a BCD-UI application and the physical databases and control access to the data. WebServices use bindings to create the appropriate SQL for data reading and writing.
- Servlets
-
Several servlets provide all kinds of services to BCD-UI clients. BCD-UI servlets are usually not addressed from users of BCD-UI directly. Servlets are listed here.
- Filter
-
Filter control the traffic from and to the server under different aspects as security and caching. Filters are listed here.
Delivered sources
Because BCD-UI applications are Jakarta EE applications, most artifacts are typical Jakarta EE elements. BCD-UI is delivered in the form of
- Jakarta EE Server components
-
Servlets and ServletFilters fulfilling server side tasks, for example access right evaluation or file upload.
- WebServices
-
WebServices serve for XML exchange with the client mainly for database access.
- JavaScript library
-
JavaScript code forms the base for the client-side controller of the standard Model/View/Control pattern.
- JSP tag library
-
JSP tags are wrappers of the JavaScript functionality to ease their use on JSP pages. Usage of JSP is optional.
- XSLT library
-
XSLT forms the base of views of the standard Model/View/Control pattern.
- Configuration files
-
Configuration XML files allow to modify the behaviour of BCD-UI’s components.
Each artifact can be extended or replaced by custom-written Java, and Javascript implementing the given interfaces.
6. Client infrastructure
This chapter describes the life-cycle of BCD-UI artifacts on a client HTML page. Understanding this flow of events is crucial to working with BCD-UI.
6.1. Page live-cycle
BCD-UI pages are standard HTML pages.
You can mix BCD-UI with any other HTML technology or HTML-based library.
For BCD-UI artifacts, the following flow of events applies.
All events are fully asynchronous.
- Page-Loading phase
-
-
The page is loaded by the browser
-
BCD-UI live-cycle artifacts are constructed
-
bcdui.wkModels.guiStatussingleton, per default holding information of the user’s selection like chooser settings, is initialized from the guiStatus parameter of the page’s URL. -
bcdui.wkModels.guiStatusEstablishedsingleton is constructed. It is a frozen copy of guiStatus -
Any ModelUpdater on guiStatus and guiStatusEstablished are executed and then both become ready
-
Renderer on the page responsible for building the visible parts like widgets, edit grids and reports execute themselves. Only Renderer execute themselves, all other AbstractExecutables wait to be executed.
-
The renderer ask their input and parameter bcdui.core.DataProviders to execute.
-
DataProvider can depend on other data providers as input. Thus, DataProviders form dependency trees, which execute recursively. Only once all needed input and parameter data providers have become ready, a DataProvider proceeds the execution and becomes ready itself. See chapter on DataProviders below for more details.
-
Once its input is ready, each Renderer creates its associated views and displays it
-
- Page-Interaction phase
-
-
The user can use widgets and views to provide input and settings.
-
Each activity of the user results in some change of a DataProvider.
-
Changes to the UI, like chooser settings or sorting per default lead to changes in the guiStatus.
-
Changes to business data will be stored separate DataProviders.
-
Please note, no change of model data triggers any change of any view per se.
Instead, you set up listeners, which inform Renderer to refresh, if needed.
-
-
A save on a DataProvider event will send the data to the associated web-service, usually WrsServlet, which then stores the data into the database.
-
Other activities like in-place drill down will lead to additional data being loaded.
-
- Page-Leaving phase
-
-
Pressing apply, menu navigation or drill-over events will cause the browser to leave the page.
-
A call to applyAction will in addition append the current guiStatus as a parameter to the called URL, thus the new page will initialize its settings according to the chooser of the calling page.
-
6.2. guiStatus Singleton
BCD-UI instantiates a well-known guiStatus along with a frozen guiStatusEstablished copy in each page loading phase.
The guiStatus is a standard StaticModel, but is object of the following extra-handling:
-
It can be found at
bcdui.wkModels.guiStatus/bcdui.wkModels.guiStatusEstablished -
They have the fixed id guiStatus / guiStatusEstablished
-
It is initialized during page load with the guiStatus URL parameter of the page and executed. It is guaranteed to be ready when executing code in
bcdui.core.ready( function() { myCode } ). -
It is the default target model for widgets, i.e. it applies if an XPath does not start with an explicit $modelId
-
It is an implicit parameter to all transformations, for example in XSLT it can be accessed with
<xsl:param name="guiStatus"/>; -
The applyAction appends its content to the url of the called page
-
Base64 encoding is used to make it URL friendly, and it is compressed to prevent it from exceeding IE’s URL length restriction
-
-
guiStatusEstablished reflects best the values of the page loading phase and is not influenced by later user activity
-
On server side it is decompressed and decoded by a servlet filter and provided via
getHttpRequest().getAttribute("guiStatusDoc");
6.3. DataProviders
One main concept on client side of the BCDUI library are bcdui.core.DataProviders.
All these objects offer a getData() method returning their data (XML, String etc.), which can be used by other objects.
DataProviders construct their data in different ways
-
Some DataProvider like SimpleModel send HTTP GET or POST request to the server when executed. This can be any URL for a static file for example, or a request document to WrsServlet.
-
On server side for each request, the web services evaluate the request documents and consult the binding definitions for the appropriate places in connected databases. The BindingSets translate the requested logical data ids into physical databases, views, tables and columns.
-
-
Some DataProviders, like the ModelWrapper, apply XSLTs and another transformation rules to their input data and provide the result as their data.
Available data providers
This is the list of available data providers, and their action on execute() to become ready.
- SimpleModel
-
A load data from a URL. The source can be static, or a Wrs request document to contact the WrsServlet. If it is in autoRefresh mode, it will reload whenever the request document changes. Auto-refresh mode is useful to load for small data immediately on user interaction.
- StaticModel
-
Receiving its data in form of a string or JSON.
- ModelWrapper
-
Executes a chain of transformations like XSLTs on its input data. The input model is not changed.
- ModelUpdater
-
Similar to ModelWrapper but replaces the target model’s content with the transformation result.
- Renderer
-
Executes a chain of transformations like XSLTs and inserts the result into the page’s HTML at targetHtml. The input model is not changed.
- ConstantDataProvider
-
Holds a scalar data type String|Number|Boolean, useful for parameters
- PromptDataProvider
-
Prompts the user for a string input.
- DataProviderWithXPath
-
Gets a source data provider and an xPath and provides the evaluated xPath.
Calling execute(true) on a data provider will enforce the data provider to re-execute even in it is already in ready-state.
DataProviders inform their listeners about change events so that they can update.
You can find the API documentation here bcdui.core.DataProvider.
Object Registry
bcdui.factory.objectRegistry is a singleton constructed by BCD-UI in page load.
Objects are registered if they get an explicit id assigned.
DataProviders are plain JavaScript objects, which you can use via their JavaScript API.
But whenever you want to address a DataProvider by id in a declarative API, you need to give the DataProvider an explicit id on creation.
Examples are HTML Custom Element parameters or an XPath in targetModelXPath.
If you provide such an id parameter, the object is centrally registered and can be retrieved by its id later.
var m1 = new bcdui.core.StaticModel( { data: "<Root a='1'/>" } ); (1)
var m2 = new bcdui.core.StaticModel( { id: "myId", data: "<Root a='2'/>" } ); (2)

m1.execute(); (3)
var targetModelXPath = "$myId/@a"; (4)
var m22 = bcdui.factory.objectRegistry.getObject("myId"); (5)| 1 | Standard way, no id assigned, the object is not registered |
| 2 | An id is assigned for access from declarative APIs. The object is automatically registered. |
| 3 | Ase the StaticModel from JavaScript |
| 4 | Access by id in an XPath, for example a targetModelXpath of a widget |
| 5 | Retrieve the JavaScript object from the bcdui.factory.objectRegistry, resulting to m22 === m2. |
Dependency Tree
DataProviders and Renderers from dependency trees and automatically take care that their input is ready and executed if not. If you want to use such a DataProvider See the following examples:
// Dependency tree is automatically taken care for from BCD-UI objects
var m1 = new bcdui.core.SimpleModel({ url: "mydata.xml" }); (1)
var mw1 = new bcdui.core.ModelWrapper({ inputModel: m1, chain: function(doc, args) { return doc; } }); (2)

// When accessing from js, you need to make sure the DataProvider is ready
var m2 = new bcdui.core.SimpleModel({ url: "mydata.xml" });
console.log( m2.isReady() ); // Outputs 'false' (3)
// null === m2.getData(); (4)
m2.execute();
m2.onReady(
  function() { (5)
    console.log( m2.isReady() ); // Outputs 'true'
    m2.getData();
  }
);

// Wait for multiple DataProviders
bcdui.factory.objectRegistry.withReadyObjects(  m1, m2, (6)
  function() {
    ...
  }
);| 1 | SimpleModel will nor load until execute() is called by someone |
| 2 | BCD-UI objects will call execute() on any of their input, of it finds it not ready. Here mw1 will execute m1 and wait for m1 to become ready before continuing with its own action. Chain can be one or more js function(s) or xslt stylesheet(s) which does some actual transformation on the document. |
| 3 | The newly created SimpleModel m2 is not ready to be used, getData() will return null |
| 4 | Call execute() explicit in this situation and wait for it to become ready |
| 5 | Note, execute() is always asynchronous, except for StaticModel |
| 6 | There are helper functions to wait for multiple DataProviders |
7. Components
7.1. Overview
BCD-Suite contains several ready-to-use components. Here we describe the following, mode can be found in the online docu.
- Cube
-
Cubes provide an easy way for slicing and dicing data according to dimensions into a report table
- ScoreCard
-
A ScoreCard combines KPIs of several aspects into a cross-division or cross-aspect view giving a comprehensive overview for a manager.
- Tree report
-
A tree report suites the requirement of showing aggregated data with the option to drill in-place into a more detailed view. An important option is to defer loading of lower levels to the moment a user actually drills into details.
- Charts
-
Charts allow for an easy visualization of data in various common ways.
7.2. Cube Component
Cubes
Cubes allow slicing and dice data by free dimensions easily and quick in a pivot-like manner. For a sample page setup with a cube, please check this tutorial.

The dimensions and measures can either be preset during development, or the user can be given a choice of dimensions and measures for his own selection.
Features
BCD-UI cube and cube configurator offer a variety of features:
- Free selectable or preset dimensions and measures
-
Whether the administrator allows free selection of dimensions or measures partly or totally can be configured
- Row and column dimensions are possible
-
None, one or many break down dimensions can be selected independently for rows and columns. In addition, measures can be shown so that they are only broken down be row dimensions even if also column dimensions are selected.
- WYSIWYG export into PDF and spreadsheets
-
The spreadsheet export allows to further work wih the numbers. User formulas are being replaced by the calculation results.
- Sorting
-
Sorting can be done without the need to re-run the report
- TOP-N
-
Allows top or bottom n rows dimension/measure selections
- Subtotals and grand totals
-
Can be added on the fly without the need to re-run the report
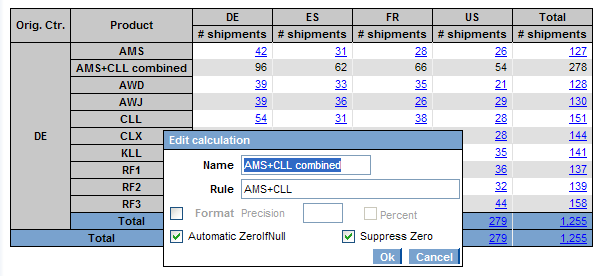
- User editable formulas for cell values
-
Can be added on the fly without the need to re-run the report
- Detail export on cell level
-
The choosers as well as the cell’s position is taken into account. This allows to exactly export those details which are behind the cell’s number. For indicator-like percentage numbers it is possible to export only the failed details.
- Easy combination with graphs
-
Multi measures or multi-dimensions can easily be turned into series in the graphs.
- Named templates
-
Named templates allow offering common selections to the user
- Show numerator and denominator of percentage numbers and fractions in tool tips
-
This feature allows to understand the volumes behind the percentage without running a new report.
- Optimized performance behavior
-
Cubes can dynamically choose different data tables with the highest aggregation available for the report dynamically with the help of BindingSetGroups for performance optimization.
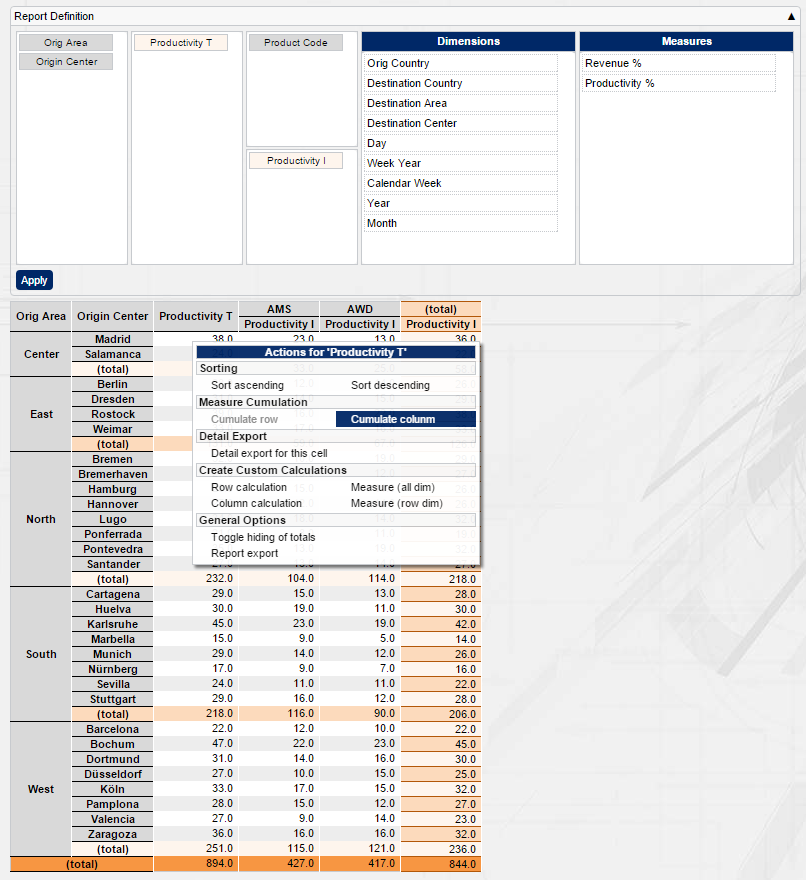
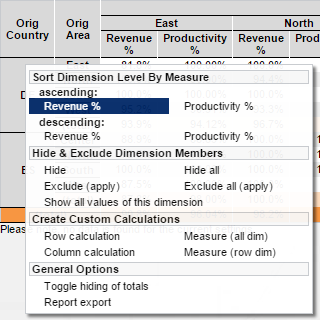
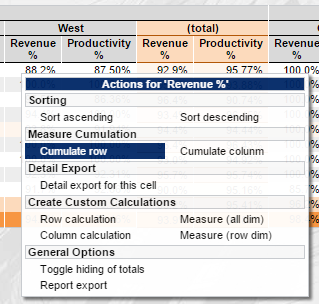
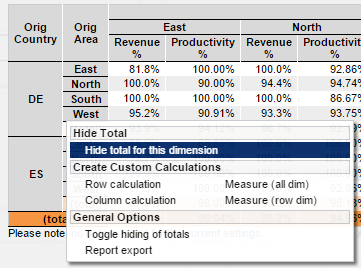
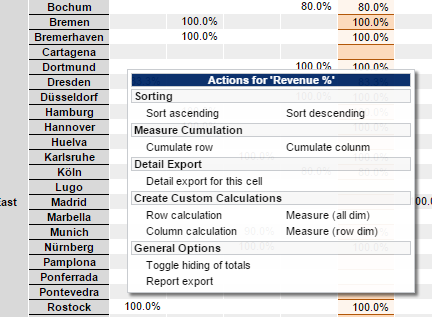
A context menu supports several actions on the cube or a cell, depending on where it opens.
Cube Configuration Document
The cube needs a configuration file (by default: ./cubeConfiguration.xml) which lists the data source (binding set), the current layout (selected dimensions and measures) and the measure definitions.
You can provide a static one like this or let the user build one with the CubeConfigurator, see below.
<cube:CubeConfiguration xmlns:cube="http://www.businesscode.de/schema/bcdui/cube-2.0.0"
                        xmlns:calc="http://www.businesscode.de/schema/bcdui/calc-1.0.0"
                        xmlns:dm="http://www.businesscode.de/schema/bcdui/dimmeas-1.0.0"
                        xmlns:wrq="http://www.businesscode.de/schema/bcdui/wrs-request-1.0.0">

  <cube:Layout> (1)

    <cube:Dimensions hideTotals="false">  (2)
      <cube:Rows>
        <dm:LevelRef total="trailing" bRef="orig_country"/>
        <dm:LevelRef total="trailing" bRef="orig_area"/>
      </cube:Rows>
      <cube:Columns>
        <dm:LevelRef total="trailing" bRef="product_code"/>
      </cube:Columns>
    </cube:Dimensions>

    <cube:Measures>  (3)
      <cube:RowDims/>
      <cube:AllDims>
        <dm:MeasureRef idRef="cost"/>
        <dm:MeasureRef idRef="weight"/>
      </cube:AllDims>
    </cube:Measures>

  </cube:Layout>

  <wrq:BindingSet>myReportData1</wrq:BindingSet> (4)

  <dm:Dimensions> (5)
    <dm:LevelRef bRef="orig_country" total="trailing" caption="Origin Country"/>
    <dm:LevelRef bRef="orig_area"    total="trailing" caption="Origin Area"/>
    <dm:LevelRef bRef="dest_country" total="trailing" caption="Destination Country"/>
    <dm:LevelRef bRef="dest_area"    total="trailing" caption="Destination Area"/>
    <dm:LevelRef bRef="product_code" total="trailing" caption="Product Code"/>
    <dm:LevelRef bRef="dy"           total="trailing" caption="Day"/>
  </dm:Dimensions>

  <dm:Measures> (6)
    <dm:Measure id="cost" caption="Cost">
      <calc:Calc type-name="NUMERIC" scale="1">
        <calc:ValueRef idRef="cost" aggr="sum"/>
      </calc:Calc>
    </dm:Measure>
    <dm:Measure id="weight" caption="Weight">
      <calc:Calc type-name="NUMERIC" unit="kg">
        <calc:ValueRef idRef="weight" aggr="sum"/>
      </calc:Calc>
    </dm:Measure>
    <dm:Measure id="weightPerVolume" caption="Weight/Vol.">
      <calc:Calc type-name="NUMERIC" scale="3">
        <calc:Div>
          <calc:ValueRef idRef="weight" aggr="sum"/>
          <calc:ValueRef idRef="volume" aggr="sum"/>
        </calc:Div>
      </calc:Calc>
    </dm:Measure>
  </dm:Measures>

</cube:CubeConfiguration>| 1 | This is the actual layout of the cube, its elements references items defined in the next sections |
| 2 | These are the actually applied dimensions of the report, they can be row, column or both (all) |
| 3 | These are the actually applied measures |
| 4 | This is the BindingSet from which to get the data, it connects to the database |
| 5 | These are the dimensions in principle available. In most cases this included via is xi:include because it is reused |
| 6 | These are the measures in principle available. In most cases this included via is xi:include because it is reused |
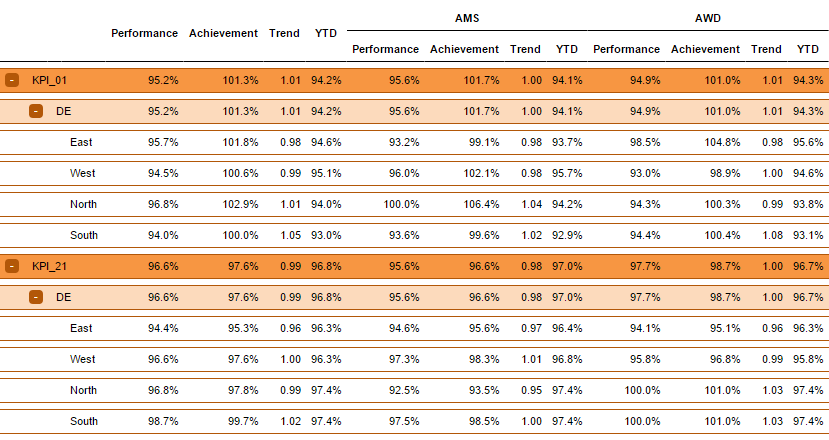
If you add a bcdui.component.cube.Cube, this sample leads to:
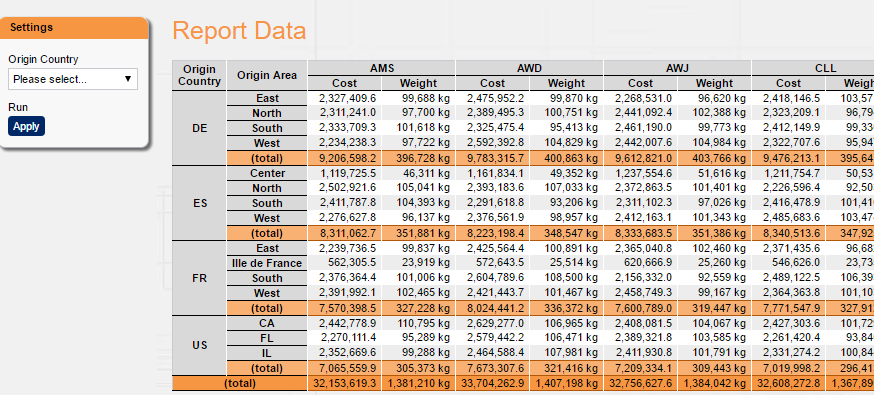
See cube-2.0.0.xsd for the exact format and options.
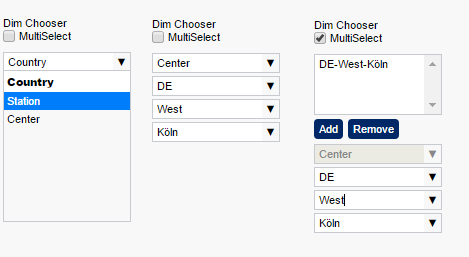
CubeConfigurator
The cube:Layout part above can also be defined by the user via a drag-and-drop area. This sample shows the drag and drop user interface, also supporting ranking editing, and a cube summary display.
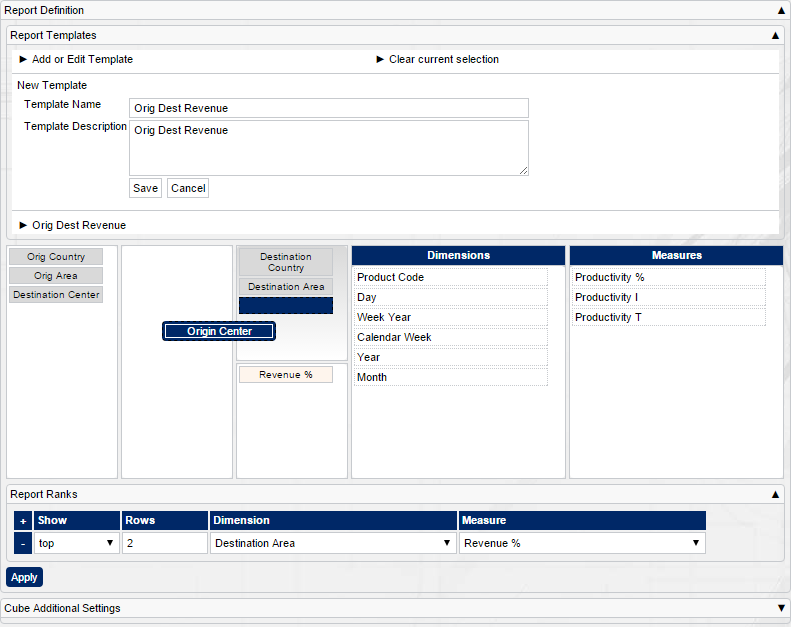
This configurator also needs a configuration file (by default: ./dimensionsAndMeasures.xml) which references dimensions and measures available to the user.
Often, this information is simply derived from cubeConfiguration.xml
<!-- Use the Cube's config for CubeConfigurator -->
<cube:CubeConfiguration xmlns:cube="http://www.businesscode.de/schema/bcdui/cube-2.0.0">
  <xi:include href="./cubeConfiguration.xml" xpointer="/*/*" xmlns:xi="http://www.w3.org/2001/XInclude"/>
</cube:CubeConfiguration>
7.3. ScoreCard Component
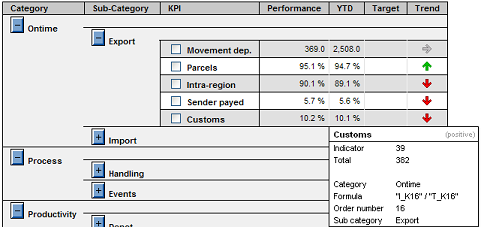
Scorecard overview
A ScoreCard is a KPI based, one-stop, comprehensive overview of all aspects of an area of responsibility.
KPIs - key performance indicators - are aggregated values of performance, volumes, productivity, process compliance and other aspects shown plain or in a break-down, often with a target.
Because a ScoreCard covers overview about different aspects and different business objects, a ScoreCard often serves as the entry point into reporting and supports drilling into further analysis.
- Measures
-
Measures can be aggregated, often calculation, values, representing a measurable quantity like a count of pieces or sum of weight. Measures and indicator measures form the base of KPIs.
- Indicator measures
-
Indicator measures are special boolean measures, representing for example a process compliance. For example, whether a contract process was closed in planned time. Indicator measures inherit all possibilities from ordinary measures but allow additional features.
- KPI
-
A KPI represents a key performance value and is calculated based on measures. A KPI has a calculation definition, a unit, which is often percent and a description. Often it is associated with targets and other attributes.
- Aspects
-
They describe what aspects of KPIs are shown on a ScoreCard. Typical aspects are performance or YTD, trends or achievements. Calculation rules of aspects are not dependent on a specific KPI, but they can make use of KPI specific data and calculations. There are three types of aspects:
-
Kpi aspects modify the KPI calculation in some way, for example YTD or previous-period performance and re-execute the clients KPI calculation.
-
Attribute aspects load additional data like targets or comments for each KPI. They don’t aggregate up.
-
Meta aspects only use other aspects in their calculation, like trend, using the performance and the previous-period performance.
-
- KPI Targets
-
Targets are KPI aspects indicating, what value a KPI should have. The comparison of a KPI value with the target provides the achievement.
- ScoreCard
-
A ScoreCard or dashboard shows a set of KPIs together with their attributes and aspects and provides drill over possibilities.
Configuration
To set up a scorecard, the following steps are required:
-
Create the definition for the aggregators, i.e. define where and how to find the measures based on BindingSets
-
Optionally create the definition for aspects, i.e. define where and how to find additional information about KPIs like targets or previous-period performance
-
Create the definition for all KPIs, i.e. define the calculation rules for KPIs based on the available measures.
-
Create an HTML page with a bcdui.component.scorecard.Scorecard
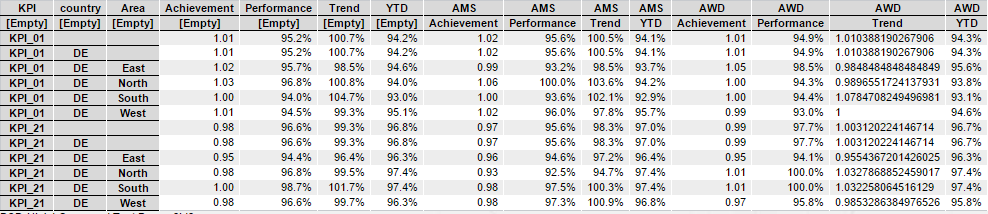
The scorecard is configured with following schema scorecard-1.0.0.xsd. A typical scorecard configuration has the following structure:
<?xml version="1.0" encoding="UTF-8"?>
<scc:ScorecardConfiguration xmlns:scc="http://www.businesscode.de/schema/bcdui/scorecard-1.0.0"
                            xmlns:calc="http://www.businesscode.de/schema/bcdui/calc-1.0.0"
                            xmlns:dm="http://www.businesscode.de/schema/bcdui/dimmeas-1.0.0">

  <scc:Layout> (1)

    <scc:KpiRefs>  (2)
      <scc:KpiRef idRef="k01" />
      <scc:KpiRef idRef="k02" />
      <scc:KpiRef idRef="k03" />
    </scc:KpiRefs>

    <scc:AspectRefs>  (3)
      <scc:AspectKpi/>
      <scc:AspectRef idRef="bcdYtd"/>
    </scc:AspectRefs>

    <scc:Dimensions>  (4)
      <scc:Rows>
        <scc:LevelKpi/>
      </scc:Rows>
      <scc:Columns>
        <dm:LevelRef bRef="yr" sort="descending" />
        <dm:LevelRef bRef="mo" sort="descending" captionBRef="mo_caption" sortBy="mo"/>
      </scc:Columns>
    </scc:Dimensions>

  </scc:Layout>

  <scc:Kpis aspectKpiCaption="Actual">  (5)

    <scc:Kpi id="k01" caption="K01 Cpt">
      <calc:Calc scale="2" type-name="NUMERIC" zeroIfNullOp="true" unit="%">  (6)
        <calc:Div>
          <calc:ValueRef idRef="K01.i" aggr="bcdSum"/>  (7)
          <calc:ValueRef idRef="K01.t" aggr="bcdSum"/>
        </calc:Div>
      </calc:Calc>
      <scc:Categories geoLevel="gl" ibob="ob"/>  (8)
    </scc:Kpi>

    <scc:Kpi id="k02" caption="K02 Cpt">
      <calc:Calc scale="2" type-name="NUMERIC" zeroIfNullOp="true" unit="%">
        <calc:Div>
          <calc:ValueRef idRef="K02.i" aggr="bcdSum"/>
          <calc:ValueRef idRef="K02.t" aggr="bcdSum"/>
        </calc:Div>
      </calc:Calc>
      <scc:Categories geoLevel="gl" ibob="ib"/>
    </scc:Kpi>

    <scc:Kpi id="k03" caption="K03 Cpt">
      <calc:Calc scale="2" type-name="NUMERIC" zeroIfNullOp="true" unit="%">
        <calc:Div>
          <calc:ValueRef idRef="K03.i" aggr="bcdSum"/>
          <calc:ValueRef idRef="K03.t" aggr="bcdSum"/>
        </calc:Div>
      </calc:Calc>
      <scc:Categories geoLevel="reg" ibob="ob"/>
    </scc:Kpi>
  </scc:Kpis>

  <!-- Additional aggregators and aspects go here -->  (9)

</scc:ScorecardConfiguration>| 1 | This is the actual layout, referencing the definitions below |
| 2 | List of KPIs to be included in the scorecard |
| 3 | List of aspects to be shown, applied to each KPI |
| 4 | Dimensions if a break-down is requested |
| 5 | KPI definitions, usually, this is included via xi:include from a separate file because it is reused |
| 6 | Each KPI comes with its formula |
| 7 | bcdSum refers to a built-in aggregation, using sum and going on BindingSet bcd_sc_kpi |
| 8 | Categories allow grouping KPIs in the layout |
| 9 | Beside build-in scc:Aspects and scc:Aggregators, you can set up your own here |
The content of the scc:ScorecardConfiguration is straight forward can easily be set up by a user or the wizard.
The underlying definitions for scc:Aggregators and scc:Aspects can be seen in the source code and taken as a template for own ones.
Aggregators
An aggregator describes how the system can retrieve measures from the database.
It does so by providing an XSLT generating a WrsRequest.
The scorecard provides input to this XSLT at runtime, informing about the measures needed.
It is also providing an optional xsl:param name="customParameterModel", allowing to provide free additional information.
In many cases, using the built-in scc:Aggregators will be sufficient.
Aspects
Aspects are additional information about KPIs like targets, trends or year-to-date values. An aspect definition is valid across all KPIs. Aspects can provide their information in three forms.
- Aspect WrqModifier
-
Provides a means of generating a new request from an aggregator’s request, for example to the KPI table for previous period performance.
- Aspect WrqBuilder
-
Provides a means of generating a new request from scratch, for example to a table with target information.
- Aspect Calc
-
A calculation on to of KPI performance and other aspects, for example the trend based on (performance) / (previous period performance), or the achievement based on performance and target. The calculation can reference values via:
-
calc:KpiRefrefers to the KPIs performance, i.e. to the KPI’s definition. -
calc:AspectRef idRef="asp_refers to the result of the aspect with the id aspId for the current KPI. -
calc:AggregatorRef idRef="agg_refers to a property of the lead measure of the current KPI, taken from the aggregator @aggrId. -
calc:AggregatorRef idRef="asp_refers to a property of the lead measure of the current KPI, taken from the aggregator @aggrId.
-
<scc:Aspects
  xmlns:scc="http://www.businesscode.de/schema/bcdui/scorecard-1.0.0"
  xmlns:calc="http://www.businesscode.de/schema/bcdui/calc-1.0.0">

  <scc:Aspect id="trend" caption="Trend">
    <calc:Calc>
      <calc:Div>
        <calc:KpiRef/>
        <calc:AspectRef idRef="asp_previousPeriod_kpi_$"/>
      </calc:Div>
    </calc:Calc>
  </scc:Aspect>

</scc:Aspects>
Data storage
Measures for the scorecard are stored in columns. Beside the dimensions and the measure columns, there is a mandatory column @bRef='bcd_measure_id' indicating the measure. Measures may have multiple properties. In such cases, a row holds one column per such property.

7.4. Tree Report Component
Tree Report Overview
A Tree Report allows for rendering data in a tree structure. This can be done for any Wrs, may it be generated, loaded via a direct Wrq or based on a CubeModel or a ScorecardModel for example.
Fixed depth trees
Assume you have the following data
from a Wrq or a CubeModel for example, then you can set up a Render chain like this:
      var rendererA = new bcdui.core.Renderer({
        chain: ["../bcdui/js/component/treeView/generateTree.xslt",
          "../bcdui/js/component/treeView/rendering.xslt"],
        targetHtml: "myDataPTh",
        inputModel: new bcdui.core.SimpleModel( "parentWrs.xml" )
      });
and it will display the data in the following way:
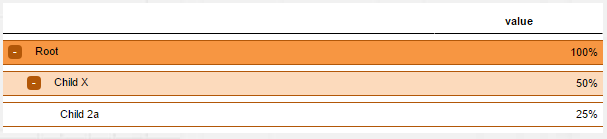
Trees of variable depths
There is also support for a tree with unknown depth, where each row has an id column with an optional parentId attribute.
<?xml version="1.0" encoding="UTF-8"?>
<wrs:Wrs xmlns:wrs="http://www.businesscode.de/schema/bcdui/wrs-1.0.0">

  <wrs:Header>
    <wrs:Columns>
      <wrs:C pos="1" id="kpi_id" caption="KPI" dimId="kpi_id">
        <wrs:A name="parentId" id="parentId"/>    (1)
      </wrs:C>
      <wrs:C pos="2" id="value" caption="value" />
    </wrs:Columns>
  </wrs:Header>

  <wrs:Data>
    <wrs:R>
      <wrs:C>Root</wrs:C>                         (2)
      <wrs:C>100%</wrs:C>
    </wrs:R>

    <wrs:R>
      <wrs:C parentId="Root">Child X</wrs:C>      (3)
      <wrs:C>50%</wrs:C>
    </wrs:R>

    <wrs:R>
      <wrs:C parentId="Child X">Child 2a</wrs:C>
      <wrs:C>25%</wrs:C>
    </wrs:R>
  </wrs:Data>

</wrs:Wrs>| 1 | The id column is the one with the parentId attribute declared |
| 2 | Having no parentId means being top-level. Multiple top-level rows are allowed |
| 3 | The parentId attribute connects it to the parent. |
If you apply a renderer with the chain if the sample above, the result will be:
7.5. Chart Component
Charts Overview
Charts can be easily integrated into pages and support the dynamic user experience of BCD-UI. For example a report allowing to order or filter data can be enhanced by a chart reflecting these changes immediately. Charts do also support for user interaction. For example drilling from an item of the chart or exporting data can be developed.
-
Supporting all standard chart types: Pie, Line, Point, Area, Bar, Scattered, Stacked Bar and Stacked Area with 1 and 2 y-axes
-
Sensitive to user interaction like hover and click on individual bars or pieces in a pie chart
-
Supporting on-the-fly creation and modification on the client
-
Export as images and to PDF
-
Easy integration with existing reports with custom calculations, as it is re-using client data and sensitive to client side data manipulations
-
Appearance can be controlled via a dynamic model allowing for switching layout and data source on the fly
-
Customer tool tips, on click actions, customer and automatic colors and scaling
Usage
To use a chart, you need to set up a chart configuration, provide the data and create the chart itself.
Create a file with a sample chart configuration like this:
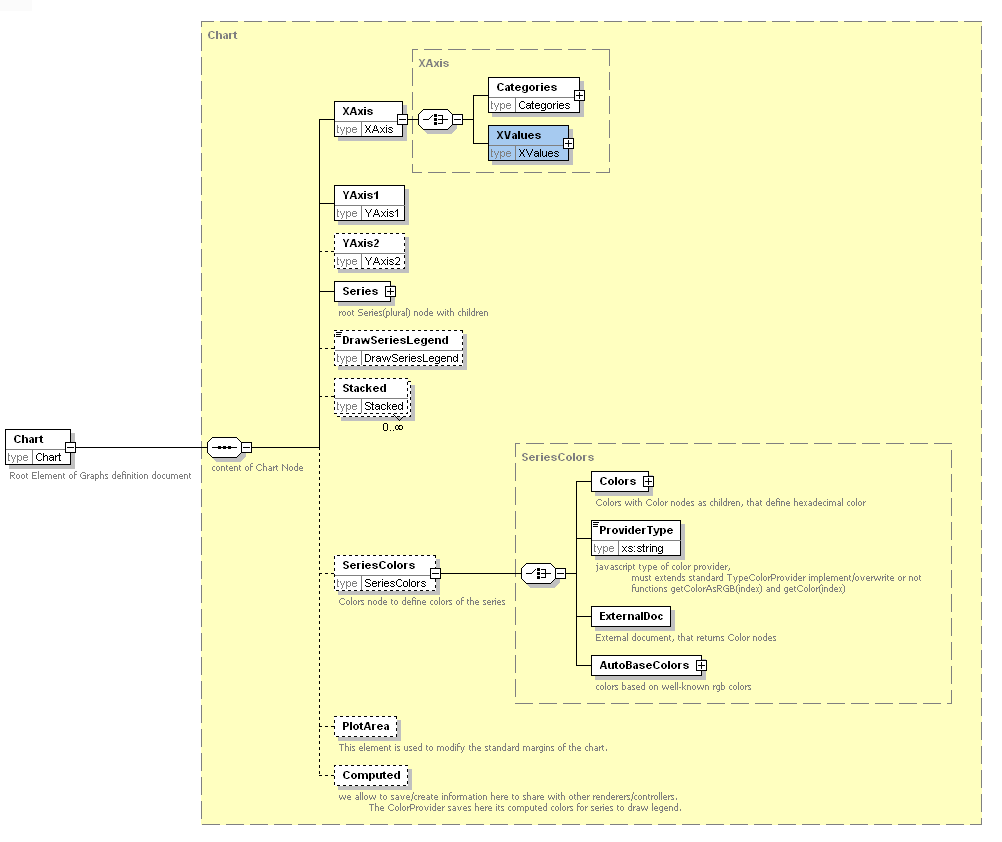
<chart:Chart xmlns:chart="http://www.businesscode.de/schema/bcdui/charts-1.0.0"
             title="Revenue vs. Volume">

  <chart:XAxis caption="Country">
    <chart:Categories modelId="chartData" nodes="/wrs:Wrs/wrs:Data/wrs:R/wrs:C[1]"/> (1)
  </chart:XAxis>

  <chart:YAxis1 caption="Revenue" unit="€"/> (2)
  <chart:YAxis2 caption="Volume" unit="cbm"/>

  <chart:Series>

    <chart:Series rgb="rgb(220,0,0)" caption="Volume" chartType="AREACHART"> (3)
      <chart:YData modelId="chartData" nodes="/wrs:Wrs/wrs:Data/wrs:R/wrs:C[3]"/>
    </chart:Series>

    <chart:Series rgb="#0000EE" caption="Revenue" chartType="LINECHART" yAxis1Or2="2">
      <chart:YData modelId="chartData" nodes="/wrs:Wrs/wrs:Data/wrs:R/wrs:C[2]"/>
    </chart:Series>

  </chart:Series>

</chart:Chart>| 1 | This controls the x-axis, which model the data comes from and which nodes to include |
| 2 | This controls the y-axis, like unit, size and caption |
| 3 | Each data series can have a different appearance |
Then add this to your page:
            <div id="bcdBodyContainer">
              <div class="bcdCaption">Chart</div>
              <div id="chartTH" style="width: 400px; height: 200px"></div> (1)
</div>| 1 | Note that we assigned an explicit size. |
| Charts require an explicit size of their target HTML element. Set it either inside the chart definition or assign it via CSS. Otherwise, 'No data' may be shown though there is data |
Then add this JavaScript code:
    var chartConfig = new bcdui.core.SimpleModel( "chartConfig.xml" );
    var chartData = new bcdui.core.SimpleModel( {id: "chartData", url: "../sampleWrs.xml" } ); (1)
var chart = new bcdui.component.chart.XmlChart({ targetHtml: 'chartTH', config: chartConfig }); (2)| 1 | In our sample we are using the Wrs, which is shown in Your first BCD-UI page, you may also use that and create a file chartData.xml from it. Note that we assigned an explicit id to the data as it is referenced via id from within chartConfig.xml |
| 2 | The bcdui.component.chart.XmlChart takes a configuration XML |
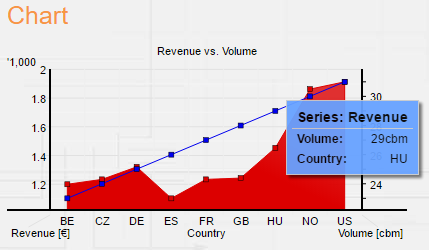
These few lines already result in
Sample charts
Charts with 2 axes
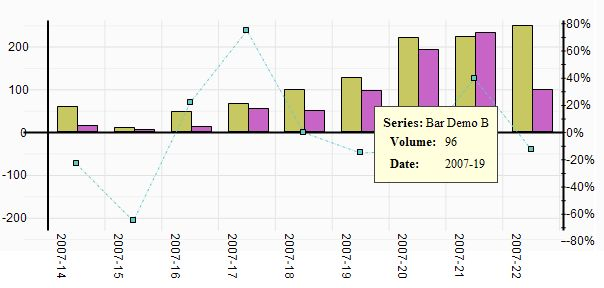
This sample shows a graph with to different axes, and a fly-over on the chart line when hovering with the mouse over the chart.
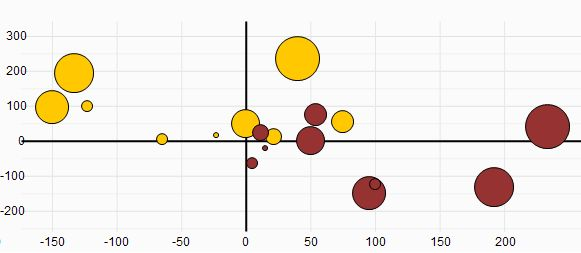
Scattered chart
A scattered chart can display three values at a time, here the x-position of a circle shows the size of the customer, the y position shows the revenue done with the customer, and the size of the circle shows the growth of the revenue done with the customer in the last 12 months.
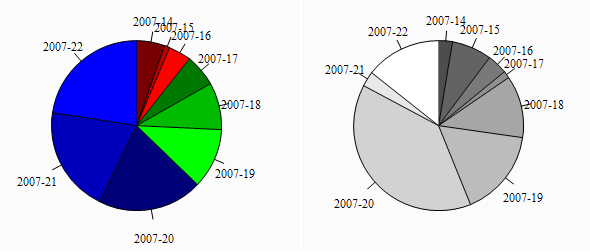
Pie charts
This sample shows that chart can be created with auto-coloring or printer friendly in black-and white.
Legend
Charts can have legends.
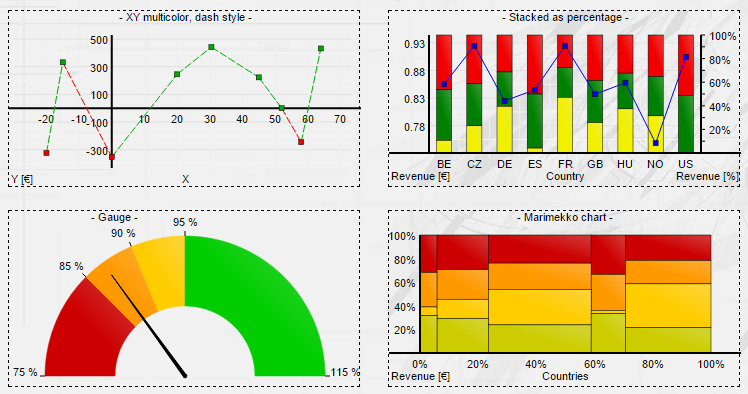
More examples
There are even more charts available, like stacked bar charts, gauge, marimekko and multicolor line charts.
Auto Charts
Sometimes you may not even need an explicit chart configuration, if a useful chart can be derived from Wrs data alone.
Auto charts provide the following heuristics:
- One Measure and one row plus one column dimension
-
column dimension, row dimension determines the series.
- One Measure and two row-dimensions. Categories
-
Outer dimension, inner dimension determines the series.
- One Measure and two column-dimensions. Categories
-
Outer dimension, inner dimension determines the series.
- Multiple Measures and one row dim
-
Each measure becomes a series. Allows bar, line, point and area (pie in case of 1 measure)
- Multiple Measures and one column dim
-
Each measure becomes a series. Allows bar, line, point and area (pie in case of 1 measure)
              <div id="chartTH" style="width: 600px; height: 150px; display:inline-block"></div>
<div id="chartLegendTH" style="width: 50px; height: 150px; display:inline-block"></div> // Create CubeConfigutator in form of a Drag and Drop Area
var chartConfig = new bcdui.core.ModelWrapper({
chain: "../bcdui/js/component/chart/configurationFromWrs.xslt",
inputModel: cube
});
var chart = new bcdui.component.chart.XmlChart({
id: "chart",
targetHtml: "chartTH",
config: chartConfig
});
bcdui.component.chart.createChartLegend( {
targetHtml: "chartLegendTH",
chartRendererId: "chart"
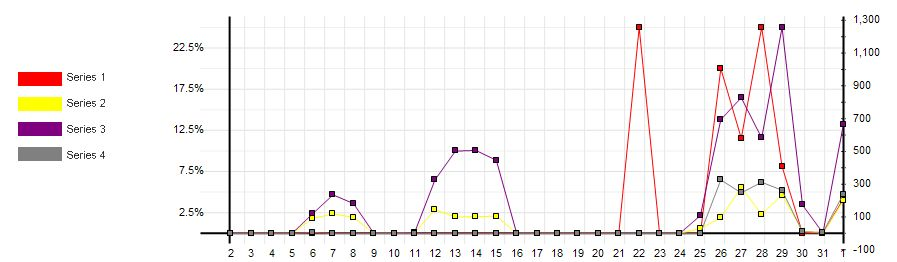
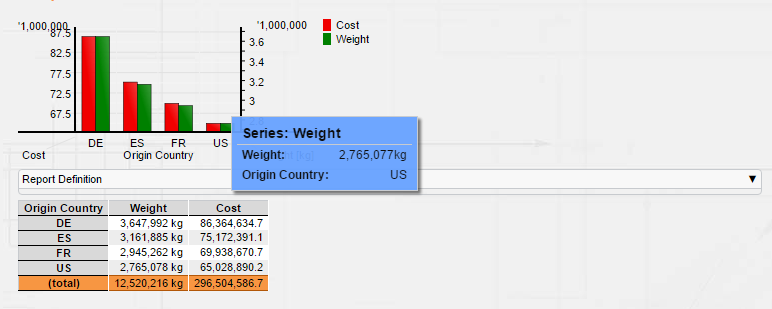
});This chart is dynamically derived from the cube without predefined chart config:
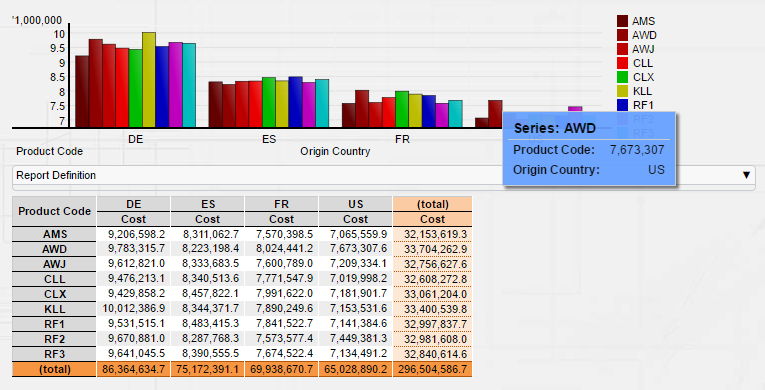
After the user did some new selections in the cube’s drag and drop area, this one is created. Note how a second axis was created because the measures have different units.
8. Widgets Overview
8.1. Widgets Overview
Widgets are small visual objects for user interaction.
Commonly they store their state, the user’s selection in a target model (by default guiStatus).
The targetModelXPath parameter points to the exact place where data is stored.
Widgets usually work in 2 ways.
If the user clicks/selects/does an action on it, the target value changes.
On the other hand, when you change the value from outside, e.g. via JavaScript,
the widget should update itself visually to be in sync with the value.
Some widgets have an options model reference as data source, for example entries in a drop-down box.
The option model is referenced via optionsModelXPath and optional optionsModelRelativeValueXPath.
They point to value and caption information used for the widget.
Creation
As widgets support their API in different languages, widgets can be created in different ways.
All are expecting the same set of parameters. When using js, providing targetHtml is mandatory.
bcdui.widgetNg.createSingleSelect( {
  targetModelXPath: "/*/f:Filter/f:Expression[@bRef = 'orig_ctr' and @op = '=']/@value",
  ...
});<bcd-singleselectng
targetModelXPath = "/*/f:Filter/f:Expression[@bRef = 'orig_ctr' and @op = '=']/@value"
... >
</bcd-singleselectng> (1)| 1 | Note that some browsers do not allow self-cosing elements ('/>') here |
<w:singleSelect id="myId" ... /><xsl:call-template name="singleSelect">
<xsl:with-param name="id" select="'myId'"/>
...
</xsl:call-template><xapi:SingleSelect targetModelXPath = "/*/f:Filter/f:Expression[@bRef = 'orig_ctr' and @op = '=']/@value" />Using JavaScript and HTML Custom Elements is by far the most common way.
| While you can create widgets from JavaScript, HTML custom elements, XSLT, XAPI and jsp, the result and behavior is exactly the same. You can easily derive the parameters from the JavaScript api documentation. |
8.2. Overview bcdui.WidgetNg

SideBySide Chooser
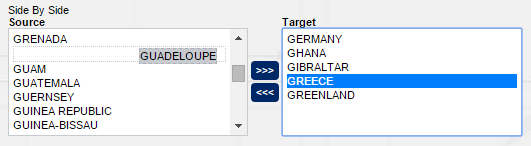
SideBySide Chooser: A side-by-side chooser allowing selection and ordering of items

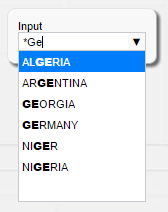
Suggest Input
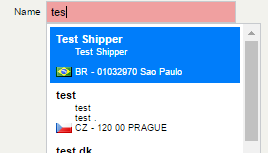
Suggest Input: A drop-down selector with autocompletion functionality and custom rendering
8.3. Overview bcdui.widget
Menu
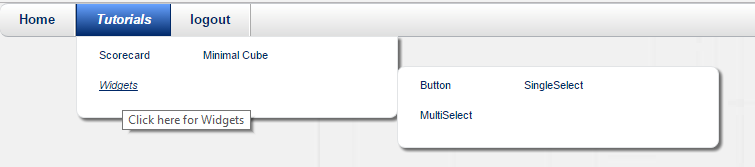
Menu: A top menu bar widget
To create a menu follow these steps: First create a WEB-INF/bcdui/menu/menu.xml file with the format of menu-1.0.0.xsd. It is picked-up on next restart.
<!-- Define Menu structure -->
<Menu xmlns="http://www.businesscode.de/schema/bcdui/menu-1.0.0" id="gettingStarted" isDefault="true">
  <Entry id="home" caption="Home" href="/" title="start screen"/>
  <Entry id="Intro" caption="Intro">
    <Entry id="bindings" caption="Bindings" href="/binding" title="Click here for Bindings"/>
    <Entry id="simpleRequest" caption="Simple Request" href="/simpleRequest" title="Click here for a Simple Request"/>
    <Entry id="widgets" caption="Widgets" href="/widgets" title="Click here for Widgets">
      <Entry id="menu" caption="Menu" href="/menu" title="Click here for a Menu"/>
    </Entry>
    <Entry id="api" caption="🔒Api" href="/api" title="Login with admin/pw123"/>
  </Entry>
  <Entry id="components" caption="Components">
    <Entry id="exports" caption="Exports" href="/exports" title="Click here for Exports"/>
    <Entry id="minimalCube" caption="Minimal Cube" href="/minimalCube" title="Click here for a Minimal Cube"/>
    <Entry id="cube" caption="🔒 Cube" href="/cube" title="Login with cubeUser/pw456"/>
    <Entry id="charts" caption="Charts" href="/charts" title="Click here for Charts"/>
    <Entry id="scorecard" caption="Scorecard" href="/scorecard" title="Click here for Scorecard"/>
    <Entry id="treeReport" caption="Tree Report" href="/treeReport" title="Click here for Tree Report"/>
    <Entry id="xsltLibrary" caption="XSLT Library" href="/xsltLibrary" title="Click here for XSLT Library"/>
  </Entry>
  <Entry id="logout" caption="Logout" href="/logout" title="Click here to logout"/>
</Menu>
provide a place where to show it, depending on your theme
<div class="bcd__header">
  <div class="bcd__header__upper">
    <div class="bcd__header__logo"><img src="../bcdui/theme/images/bcd_logo.png" alt=""></div>
    <div><bcd-credentialsMenu></bcd-credentialsMenu></div>
  </div>
  <div class="bcd__header__navigation"></div>
</div>
and call
bcdui.widget.createMenu({ targetHtml: ".bcd__header__navigation" });The menu is capable of respecting different scopes and even user rights, see XSD for details.
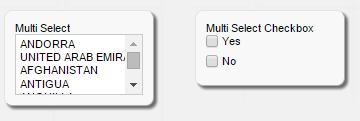
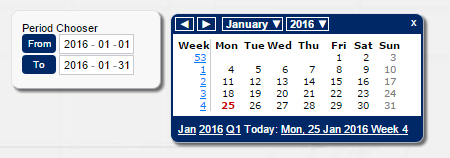
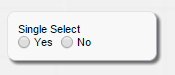
Tab
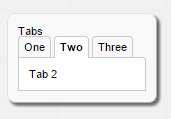
Tab: Tabs allow switching between different views of the same data or between different data within a page
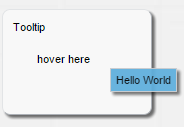
9. Themes
9.1. Themes overview
In order to support different adjustable look and feel of widgets and components, BCD-UI provides theme support. This allows it to be adjusted to a corporate standard.
- Overall Page layout
-
Defines the common page structure and coloring of all pages This overall structure provides a div for each major page component, like title, menu, sideBar, body, which are identified via their id. The default page layout uses basic class definitions from the 960 grid system (http://960.gs/). This is a blank empty page with all major parts:
<!DOCTYPE HTML>
<html>
<head>
<meta charset="UTF-8"/>
<title>Blank Page</title>
<link rel="shortcut icon" href="./favicon.ico"/>
<script type="text/javascript" src="./bcdui/bcdui.js"></script> (1)
</head>
<body>
<div class="bcd__outer-wrapper"> (2)
<div class="bcd__wrapper">
<div class="bcd__horizontal-split">
<!-- Header -->
<div class="bcd__header">
<div class="bcd__header__upper">
<div class="bcd__header__logo"><img src="../bcdui/theme/images/bcd_logo.png" alt=""></div>
<div></div>
</div>
<div class="bcd__header__navigation"></div> (3)
</div>
<!-- Main area -->
<div class="bcd__vertical-split">
<!-- Left sidebar, there is also a right sidebar not shown here --> (4)
<div class="bcd__sidebar-left">
<div class="bcd__sidebar-left__inner bcdEffectCollapse">
<div class="bcd__form-container">
<section>
<div class="bcd__form-group">
<div class="bcd__select-container">
<!-- place your sidebar widgets here
<bcd-inputNg label="my input"...></bcd-inputNg>
-->
<bcd-buttonNg caption="Apply" onClickAction="bcdui.core.lifecycle.applyAction()"></bcd-buttonNg>
</div>
</div>
</section>
</div>
</div>
</div>
<!-- Main content area --> (5)
<div class="bcd__content-container">
<h1>Blank Page</h1>
<!-- place your main output here -->
<div id="myDataDiv"></div> (6)
</div>
</div>
<!-- Footer -->
<footer>
<p>© 2026 BusinessCode GmbH</p>
<nav>
<ul>
<li><a href="#">Imprint</a></li>
<li><a href="#">Privacy</a></li>
</ul>
</nav>
</footer>
</div>
</div>
</div>
<!-- Your JavaScript goes here. -->
<script type="text/javascript" src="./blankPage.js"></script> (7)
</body>
</html>- Default styles
-
The theme css files are compiled from scss, see https://sass-lang.com.
BCD-UI’s scss files include a default styling for all widget, component, modules and general page layout.
Adjusting
To use the style, just css-import allStyles.css and make sure you got the well known divs available. Put all pages content, like choosers or reports in divs with the appropriate id like id="bcdBodyContainer" or id="bcdSideBarContainer". The theme takes care to position the elements correctly and provide them with the right color and size. See chapter 'Page structuring' below for details.
9.2. Implementation
Defining a new theme
A new theme can be defined by creating a theme folder structure identically the generic one. The images subfolder can hold additional, custom images. The scss file holds a list of variables which can be used to define custom coloring, custom logos etc. After setting up the variables, the file holds includes to the default generic scss files and finally you can overwrite specific styles, e.g. for creating a custom menu layout.
So if your company layout needs a general coloring of green and red, you modify the 2 variables $corporate-color and $corporate-color-alt. And maybe your body background should be a fixed image, then you can overwrite the body style after importing the default ones.
[...]
$corporate-color-alt:       #FF0000;  // my new alternative color is red
$corporate-color:           #00FF00;  // my new main color is green
[...]
@import '../../../generic/theme/sass/_standardPage.scss';
[...]
body {
  background: #f1f1f1 url("../images/bg.jpg") no-repeat center 0 fixed; // and do some overwriting with a fixed image
}
[...]
All available variables can be found in _constants.scss.
Themes folder structure
This is the .jar package structure of the compiled style:
\theme
  \css                          <--  Common css parts except page structure definition
    \allStyles.css              <--  compiled css file holding all styles
  \images                       <--  image container
10. Internationalization
10.1. Internationalization
Internationalization (I18n) allows to provide the user interface in different languages to different users.
To allow this, caption, text, number and date formats can be adjusted on runtime depending on a user’s language setting.
I18n will typically operate on front end captions and date formats, but can also in certain cases operate on data level when reading from a database.
The translation happens on client side in browser by parsing HTML elements that contain bcdTranslate attribute with i18n key as value.
Each renderer automatically translates its content before pasting the HTML transformation result into HTML document.
Translation for static HTML contents can be triggered separately.
I18n Setup
In order to set up BCD-UI internationalization either you have to declare a BindingSet @id=bcdui_i18n or save a static file at /myProject/bcdui/conf/messages.xml in WRS format according to BindingSet @id=bcdui_i18n with i18n messages, a sample is under BCD-UI/src/js/i18n/messages.xml.
The BindingSet and data table should have 3 columns named "key", "lang" and "value". The content of the "lang"-column can have values conform the java.util.Locale values, or a value "default". Defaults: * i18n model URL: /bcdui/servletsCached/WrsServlet/i18n - the mapping to the URL could be changed in web.xml
-
i18n model request document: /bcdui/i18n/requestDoc.xml- default request document for default i18n model
-
static i18n file in project: /bcdui/messages.xml - a static file in WRS format with some default BCDUI messages
I18n on client side
The client is provided with an XML containing the translated values for the chosen language. The translation APIs are available in JS, XSLT or static HTML. Please note that the file is cached on the client and thus does not harm performance.
The following fragment shows a sample I18n.xml file created by BCD-UI:
<Data format="bcdI18n" isKeyNormalized="true">
  <bcd_autoCompletionBox_emptyValue lang="en">Please select</bcd_autoCompletionBox_emptyValue>
  <bcd_autoCompletionBox_clearOption lang="en">Please select</bcd_autoCompletionBox_clearOption>
</Data>
The translation happens under the hood when working with renderers, consider following XSLT fragment (which produces HTML):
...
<xsl:template match="/">
  <div bcdTranslate="report.header"></div>
  <table>
  ..
  </table>
</xsl:template>
...
you solely need to place a 'bcdTranslate' attribute with an i18n key on an HTML element to be translated.
In case you have a mass of data to translate (i.e. contents of a table), then you would write more performant code when translating explicitly via XSLT i18n API: The following fragment shows how to use i18n translation XSLT API for table data translation:
<xsl:import href="i18nUtilsTemplate.xslt"/>
<xsl:param name="bcdI18nModel" select="//*[1=2]"/>

<xsl:template match="wrs:C">
  <td>
    <!-- get value of a key -->
    <xsl:call-template name="getMessageByKey">
      <xsl:with-param name="key">bcd_autoCompletionBox_emptyValue</xsl:with-param>
    </xsl:call-template>
  </td>
</xsl:template>
This is more performant than implicit 'bcdTranslate' for big number of elements.
The following fragment shows how to use I18n in HTML/JS in case you create HTML without a renderer (i.e. via JS DOM scripting):
<div id="rootElement2Translate">
  <div id="autoCompletionBox_1" bcdTranslate="bcd_autoCompletionBox_emptyValue">
    first none i18n value
  </div>
  <div id="autoCompletionBox_2" bcdTranslate="bcd_autoCompletionBox_clearOption">
    second none i18n value
  </div>
</div>

bcdui.i18n.translateHTMLElement({elementOrId:"rootElement2Translate"});
Please note that you don’t need to trigger translation of static HTML via JS-API which is delivered by web-server during page-request, as the translation kicks in automatically once the document has been loaded.
The bcdui.i18n JS object is created by BCD-UI runtime. In addition, we can translate HTML attributes by setting its names into @bcdTranslateAttrs, like @bcdTranslateAttrs="alt" @alt="my Photo"
I18n during data access
Sometimes, data derived from the database should depend on the language setting. For example, status code captions of events are to be translated for an export without the possibility to use XSLT for translation. In such cases, the *default item mechanism of * is to be used. To achieve this, create a Binding, joining the event data with the translation table and let the SubjectFilter filter the appropriate rows.
i18n interpolation
Interpolation supported, lets assume we want to have a message like 'Value must be between 10 and 20', where 10 and 20 are provided during translation.
To achieve that the caption shall read: 'Value must be between {0,integer} and {1,integer}', the message key may be 'my.info' and msgkey parameter
has to be 'some.info|10|20'
11. Exports
11.1. Detail exports
BCD-UI supports export of detail data to spreadsheets, this applies to free defined exports and to export from cube or scorecard.
Sylk .slk format
A main issue is the data type detection of Excel when opening a csv dat export.
In many cases data is interpreted and displayed as a date where it should be a number for example.
On the other hand, a detail in native Excel format is very inefficient and becomes very slow for larger data sets.
To address this, detail exports in BCD-UI are done in sylk format per default.
Sylk is a test format like csv but allows us to include data format information.
Plain data export
To export data to sylk (or csv), prepare a Wrq WebRowSetQuery and hand it over to the export. If you have prepared the following Wrq:
<?xml version="1.0" encoding="UTF-8"?>
<WrsRequest
  xmlns="http://www.businesscode.de/schema/bcdui/wrs-request-1.0.0"
  xmlns:f="http://www.businesscode.de/schema/bcdui/filter-1.0.0">
  <Select>
    <Columns>
      <C bRef="dy" caption="Date (desc)"/> (1)
      <C bRef="orig_country"/>
      <C bRef="dest_country"/>
      <C bRef="weight"/>
      <C bRef="cost"/>
      <C bRef="volume"/>
    </Columns>
    <From>
      <BindingSet>myReportData1</BindingSet>
    </From>
    <f:Filter> (2)
      <f:Expression bRef="orig_country" op="=" value="FR"/>
    </f:Filter>
    <Ordering> (3)
      <C bRef="dy" order="desc"/>
      <C bRef="orig_country"/>
      <C bRef="dest_country"/>
    </Ordering>
  </Select>
</WrsRequest>| 1 | You can rename columns for you export, per default the caption given in the BindingSet are used or its id if not given |
| 2 | We will introduce a dynamic filter below |
| 3 | You may want to sort your download |
Then you just hand this over to the export
var wrq = new bcdui.core.SimpleModel( { id: "wrq", url: "wrq.xml" } );
function exportData() {
  bcdui.component.exports.excel.detailExport( { wrq: wrq, fileName: 'exportFile.slk' } );
}
When calling exportData(), the Wrq gets executed against the database, return the result and Excel will open. We do now add a button to call exportData() and, more interesting, add a PeriodChooser to control the exported time range:
<bcd-periodChooser
    caption="Export date"
    targetModelXPath="$wrq/*/wrq:Select/f:Filter/f:And[@id='dy']"></bcd-periodChooser> (1)
<bcd-buttonNg caption="Export detail data" onClickAction="exportData()"></bcd-buttonNg>| 1 | Don’t use self-closing tags ('<../>') for HTML5 Custom Elements, it fails in some browsers |
The PeriodChooser will add a node to f:Filter:
<f:And id="dy">
<f:Expression bRef="dy" op=">=" value="2021-09-14"/>
<f:Expression bRef="dy" op="<=" value="2021-09-14"/>
</f:And>As you can see by executing wrq.getData() or wrq.promptData() in the browser console after selecting a date.
In the same way you can add a country chooser or whatever chooser you like. If you prepare such a node in you Wrq, the chooser, it will initialize with that value, as it is its targetModelXPath.
Cube and Scorecard Detail Export
When working with cubes or scorecards, you might want a detail export for a specific cell within the cube. A Wrq should be created which takes the page’s general (sidebar) filters plus the filters of the specific cell position into account. Plus there might be additional filters needed that you provide.
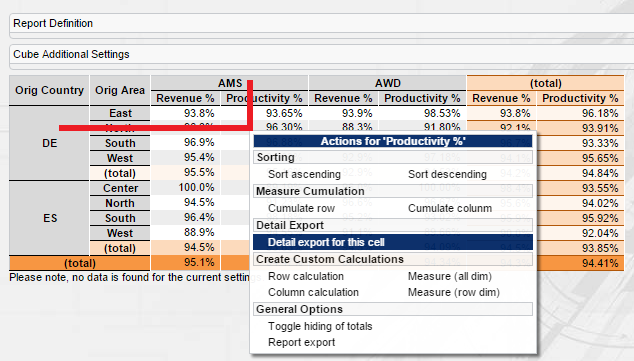
Luckily BCD-UI provides you everything to quickly set up such a cube cell detail export. First you need a way to execute the detail export on a specific cell. This is done by adding the Detail Export functionality in the context menu. The default context menu lists it, too. Secondly, your Cube / Scorecard configuration needs to list the columns to be exported.
<dm:DetailDataDefaults xmlns:dm="http://www.businesscode.de/schema/bcdui/dimmeas-1.0.0"
  xmlns:wrq="http://www.businesscode.de/schema/bcdui/wrs-request-1.0.0">
  <dm:DetailData>
    <dm:AppendColumns>
      <wrq:C bRef="m02_i" caption="Bkg Ref"/>
      <wrq:C bRef="m02_t" caption="Bkg Type"/>
    </dm:AppendColumns>
  </dm:DetailData>
</dm:DetailDataDefaults>
Leads to two exported columns:
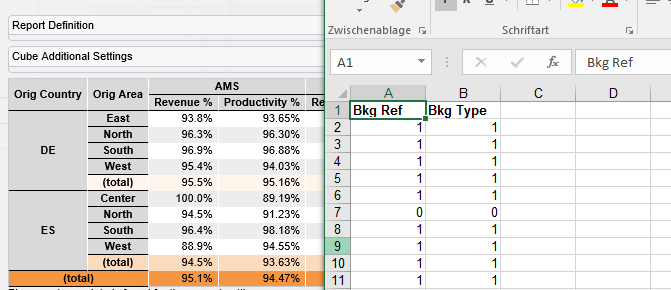
More On Export
If you need additional filters, define a detail export filter on measure or KPI level:
<dm:Measure xmlns:dm="http://www.businesscode.de/schema/bcdui/dimmeas-1.0.0"
  id="m01_i" caption="Bkg Ref">
  <calc:Calc type-name="NUMERIC" xmlns:calc="http://www.businesscode.de/schema/bcdui/calc-1.0.0">
    <calc:ValueRef idRef="m01_i" aggr="sum"/>
  </calc:Calc>
  <dm:DetailData>
    <f:Filter xmlns:f="http://www.businesscode.de/schema/bcdui/filter-1.0.0">
      <f:Expression op="=" value="1" bRef="m01_i"/>
    </f:Filter>
  </dm:DetailData>
</dm:Measure>
You don’t want a general export list, but a measure specific one:
<dm:Measure xmlns:dm="http://www.businesscode.de/schema/bcdui/dimmeas-1.0.0"
  xmlns:wrq="http://www.businesscode.de/schema/bcdui/wrs-request-1.0.0"
  id="m01_i" caption="Bkg Ref">
  <calc:Calc type-name="NUMERIC" xmlns:calc="http://www.businesscode.de/schema/bcdui/calc-1.0.0">
    <calc:ValueRef idRef="m01_i" aggr="sum"/>
  </calc:Calc>
  <dm:DetailData>
    <dm:Columns>
      <wrq:C bRef="m01_i_sub_a"/>
      <wrq:C bRef="m01_i_sub_b"/>
    </dm:Columns>
  </dm:DetailData>
</dm:Measure>
Putting static columns at the start or end of a detailExport list is also possible:
<dm:DetailDataDefaults xmlns:dm="http://www.businesscode.de/schema/bcdui/dimmeas-1.0.0"
  xmlns:wrq="http://www.businesscode.de/schema/bcdui/wrs-request-1.0.0">
  <dm:DetailData>
    <dm:PrependColumns>
      <wrq:C bRef="yr" caption="Year"/>
      <wrq:C bRef="mo" caption="Month"/>
    </dm:PrependColumns>
    <dm:AppendColumns>
      <wrq:C bRef="orig_country" caption="Origin Country"/>
      <wrq:C bRef="dest_country" caption="Dest Country"/>
    </dm:AppendColumns>
  </dm:DetailData>
</dm:DetailDataDefaults>
You can also export data as Excel Hyperlink cells.
To do this, add a wrq:A attribute named "bcdSylkUrl" to the cell, the cell’s value is appended to the provided URL.
If the url starts with a /, the current application path is used as a prefix.
<dm:Measure xmlns:dm="http://www.businesscode.de/schema/bcdui/dimmeas-1.0.0"
  xmlns:wrq="http://www.businesscode.de/schema/bcdui/wrs-request-1.0.0"
  id="mProductivity_t" caption="Productivity T">
  <calc:Calc type-name="NUMERIC" scale="1" xmlns:calc="http://www.businesscode.de/schema/bcdui/calc-1.0.0">
    <calc:ValueRef idRef="m02_t" aggr="sum"/>
  </calc:Calc>
  <dm:DetailData>
    <dm:Columns>
      <wrq:C bRef="m02_t">
        <wrq:A name="bcdSylkUrl" bRef="bcdSylkUrl">
          <wrq:Calc type-name="VARCHAR">
            <wrq:Concat>
              <wrq:Value>/myPage/myPageController.jsp?ref=</wrq:Value>
              <wrq:ValueRef idRef="m01_t"/>
            </wrq:Concat>
          </wrq:Calc>
        </wrq:A>
      </wrq:C>
    </dm:Columns>
  </dm:DetailData>
</dm:Measure>
11.2. WYSIWYG exports
The BCD-UI contains two kinds of WYSIWYG (what-you-see-is-what-you-get) exports:
- Spreadsheet
-
Spread sheet WYSIWYG exports are useful when the exported numbers are to be used in further calculations.
-
PDF WYSIWYG exports are useful when the formatting of the report including coloring is the core requirement.
Export to PDf and image is available in BCD-UI-EE Enterprise Edition only.
Spread sheet
You can export an HTML Element and its context to a spreadsheet by calling bcdui.component.exports.exportWysiwygAsExcel():
<bcd-buttonNg
    caption="Export report to Excel"
    onClickAction="bcdui.component.exports.exportWysiwygAsExcel({rootElement: 'exportDiv'})"></bcd-buttonNg>
The following picture shows a cube on the left and on the right you see this cube exported to Excel.
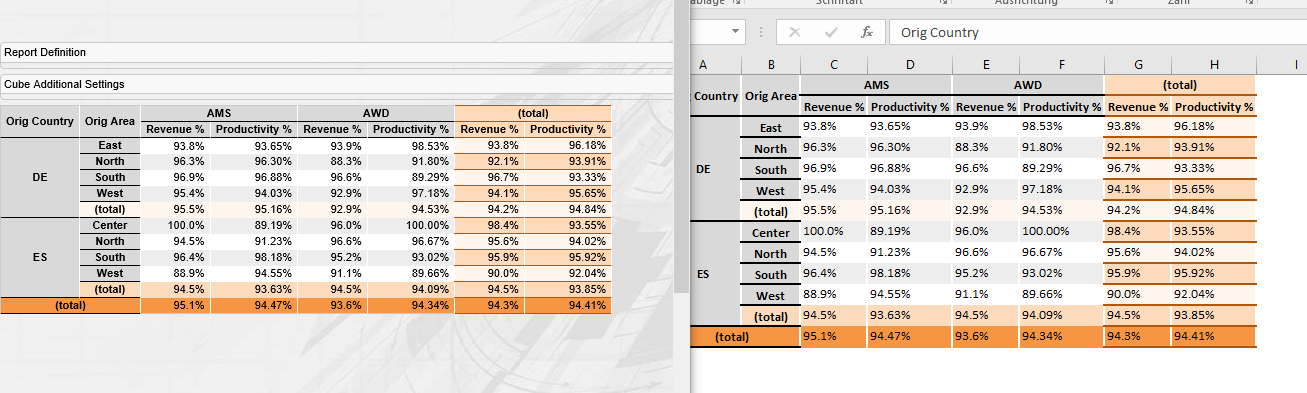
12. XSLT library
12.1. Overview
The XSLT library contains a set of generic XSLTs for often required tasks.
Most of these XSLTs work with Wrs, which is the exchange format from and to the server.
They may be used in a chain of a ModelWrapper, ModelUpdater or a Renderer.
You find then at bcdui/xslt/ followed by the path shown for each item.
12.2. List of utils
Data Transformation
| Order and filter columns |
Only include listed columns the order given by the parameter. |
| Pagination |
Limit and access data with a given page size |
| Join to Wrs |
Join two Wrs over data keys, supports inner, left outer and cross joins. |
| Transpose grouping |
Transpose a dimension column into a row (i.e. it becomes a column dimension). All data cells are adjusted accordingly. |
| Validate |
Validates the data of the input WRS against the WRS header. Adds a validation-result WRS into the input WRS' header. |
Data Manipulation
| Insert |
Insert n consecutive empty rows (with new row ids), auto-fill in mandatory columns if they only have on possible value. |
| Duplicate |
Duplicate a range of rows (with new row ids). |
| Delete |
Delete (=mark as deleted) a range of rows. |
| Restore |
Restore a range of rows, marked as deleted. |
| Merge |
Merge one WRS into another. Existing rows (same row-id) will be modified, rows with new row-ids will be inserted (marked as inserted). |
Data Visualization
| Render |
Render a Wrs to HTML. This renderer is used per default by all components: |
| Number formatting |
Formats the data according to their format defined in the WRS header (scale, unit, later also i18n). |
| Tree rendering |
Beside default rendering, you can use a tree renderer for tree-like data. See Tree Report Component for this. |
Parametrization
All wrs modifying XSLT get their parameters via an XML of type
xsltParams-1.0.0.xsd.
There is an element defined for each of the stylesheets with the same name which holds the parameters.
The document becomes parameter paramModel and each XSLT will look for a matching entry.
You will usually have only one such file for all page content.
With the optional paramSetId attribute you can have multiple sets of the same type
for example to provide two HtmlBuilder with different parameters from the same parameter document.
While this mechanism may look a bit over-sized in small samples, it scales great in real world usage.
Switching off sorting and row/col span building for HtmlBuilder with XsltParameters would look like the following.
      // Create an inline XsltParameters document for HtmlBuilder with plain output,
      // i.e. unsorted without row span
      var xsltParams = new bcdui.core.StaticModel( (1)
        "<xp:XSLTParameters " +
        "  xmlns:xp='http://www.businesscode.de/schema/bcdui/xsltParams-1.0.0'>" +
        "  <xp:HtmlBuilder>" + (2)
        "    <xp:SortRows>false</xp:SortRows>" + (3)
        "    <xp:MakeRowSpan>false</xp:MakeRowSpan>" +
        "  </xp:HtmlBuilder>" +
        "</xp:XSLTParameters>");

      // HtmlBuilder with XsltParameters
      var rendererB = new bcdui.core.Renderer({
        targetHtml: "myDataATh",
        inputModel: new bcdui.core.SimpleModel( "../sampleWrs2Dim.xml" ),
        parameters: { paramModel: xsltParams } (4)
});| 1 | If the parameters get longer, you will likely create an extra file, static or dynamically as shown here. |
| 2 | HtmlBuilder will look for an xp:HtmlBuilder element with no, or a matching paramSetId attribute |
| 3 | Element and parameter names and meaning can be found in xsltParams-1.0.0.xsd |
| 4 | Name of the parameter with the parameters is always paramModel |
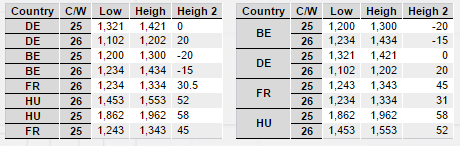
Javascript counterparts
Many of these also have counterparts in JavaScript at bcdui.wrs.wrsUtil. For example
      var data = new bcdui.core.SimpleModel({ id:"data", url: "../sampleWrs.xml" });
      data.onReady({ executeIfNotReady: true, onlyOnce: true, onSuccess: function() {
          bcdui.wrs.wrsUtil.deleteRows({model: data, rowStartPos: 1, rowEndPos: 2});
          bcdui.wrs.wrsUtil.insertRow({model: data, rowStartPos: 3, rowEndPos: 4});
          bcdui.widget.visualizeXml.visualizeModel({ targetHtml: "myDataUTh", idRef: "data" });
        }});
leads to
<?xml version="1.0"?>
<Wrs xmlns="http://www.businesscode.de/schema/bcdui/wrs-1.0.0">
  <Header>
    <TransactionsNumber>2</TransactionsNumber>
    <TransactionsNumber>1</TransactionsNumber>
    <Columns>
      <C pos="1" id="ctr" dimId="ctr" caption="Country"  type-name="VARCHAR"/>
      <C pos="2" id="cw"  dimId="cw"  caption="CW"       type-name="INTEGER"/>
      <C pos="3" id="low"             caption="Low"      type-name="NUMERIC"/>
      <C pos="4" id="height"          caption="Height"   type-name="NUMERIC"/>
      <C pos="5" id="height2"         caption="Height 2" type-name="NUMERIC"/>
    </Columns>
  </Header>
  <Data newSelection="1 3 5 3">
    <D id="1"><C>BE</C><C>23</C><C>1200</C><C>1300</C><C>-20</C></D>
    <D id="2"><C>CZ</C><C>24</C><C>1234</C><C>1434</C><C>-15</C></D>
    <I id="I_1_3"><C/><C/><C/><C/><C/></I>
    <I id="I_1_3_2"><C/><C/><C/><C/><C/></I>
    <R id="3"><C>DE</C><C>25</C><C>1321</C><C>1421</C><C>0</C></R>
    <R id="4"><C>ES</C><C>26</C><C>1102</C><C>1202</C><C>20</C></R>
    <R id="5"><C>FR</C><C>27</C><C>1234</C><C>1334</C><C>30.5</C></R>
    <R id="6"><C>GB</C><C>28</C><C>1243</C><C>1343</C><C>45</C></R>
    <R id="7"><C>HU</C><C>29</C><C>1453</C><C>1553</C><C>52</C></R>
    <R id="8"><C>NO</C><C>30</C><C>1862</C><C>1962</C><C>58</C></R>
    <R id="9"><C>US</C><C>31</C><C>1913</C><C>2013</C><C>64</C></R>
  </Data>
</Wrs>
Note the two deleted rows at the beginning in the two inserted rows after.
See documentation of bcdui.wrsUtil package for more information and other helpers.
String Utilities
Common string operations which do not come with XSLT-1.0 are provided via string utility template
part of bcdui/xslt/stringUtils.xslt.
| printRows |
prints a multi-line string with an indent row by row |
| left-trim |
cuts of whitespace from string |
| right-trim |
cuts of whitespace from string |
| trim |
cuts of whitespace from string start and end |
| stringRepeater |
repeats a given string |
| lastIndexOf |
Finds the last occurrence of a character |
| replaceString |
In string |
| tokenize |
splits up a |
| nthToken |
Gets the n-th token starting at 1 of a delimiter separated string |
The following example shows how to use it.
<xsl:stylesheet version="1.0"
                xmlns:xsl="http://www.w3.org/1999/XSL/Transform">

  <xsl:import href="../bcdui/xslt/stringUtil.xslt"/> (1)

  <xsl:output method="xml" version="1.0" encoding="UTF-8" indent="no"/>

  <xsl:variable name="myString">This is a useless test. It will give a useless result</xsl:variable>  (2)

  <!-- Replace 'useless' by 'useful' -->
  <xsl:variable name="myNewString">
    <xsl:call-template name="replaceString">  (3)
      <xsl:with-param name="str" select="$myString"/>
      <xsl:with-param name="find" select="'useless'"/>
      <xsl:with-param name="replacement" select="'useful'"/>
    </xsl:call-template>
  </xsl:variable>

  <!-- and run through the non empty single nodes and do something with each node -->
  <xsl:template match="/*">
    <ul>
      <li>Old: <xsl:value-of select="$myString"/></li>  (4)
      <li>New: <xsl:value-of select="$myNewString"/></li>
    </ul>
  </xsl:template>
</xsl:stylesheet>| 1 | Import stringUtils.xslt |
| 2 | This is the original string |
| 3 | Here we create a new string by applying the named template replaceString |
| 4 | And output the result. |
Transformation into non-WRS
These XSLT translate between a simplified clipboard format and WRS. The in/output is
<Wrs xmlns:wrs="..">
  <Data><R><D/>..<D/></R><R><D/>..<D/></R>..</Data>
</Wrs>
without any header. A js function is responsible for transforming csv from clipboard from and into the simplified format.
| Copy |
Puts the content of a WRS in clip board format into the clipboard. |
| Paste/Paste as new |
Pasts the content of the clipboard given in the clip board format to a row in a given WRS. |
Later versions of BCD-UI are likely to support transformations to CSV, Sylk and Excel XML
12.3. Using exslt:node-set()
Here we have a more complex sample, which makes use of tokenize but also exslt:node-set().
While this is not directly related to stringUtils.xslt, we take the chance to show this useful feature here.
<xsl:stylesheet version="1.0" exclude-result-prefixes="exslt msxsl"
                xmlns:xsl="http://www.w3.org/1999/XSL/Transform"
                xmlns:wrs="http://www.businesscode.de/schema/bcdui/wrs-1.0.0"
                xmlns:exslt="http://exslt.org/common"
                xmlns:msxsl="urn:schemas-microsoft-com:xslt"> (1)

  <xsl:import href="../bcdui/xslt/stringUtil.xslt"/> (2)

  <msxsl:script language="JScript" implements-prefix="exslt">  (3)
    this['node-set']= function (x) { return x; }
  </msxsl:script>

  <xsl:output method="xml" version="1.0" encoding="UTF-8" indent="no"/>

  <xsl:variable name="myString">This is a test</xsl:variable>  (4)

  <!-- split up the string -->
  <xsl:variable name="myStringTokens">  (5)
    <xsl:call-template name="tokenize">
      <xsl:with-param name="string" select="$myString"/>
      <xsl:with-param name="delimiter" select="' '"/>
    </xsl:call-template>
  </xsl:variable>
  <!-- build a nodeset -->
  <xsl:variable name="myNodes" select="exslt:node-set($myStringTokens)"/>  (6)

  <!-- and run through the non empty single nodes and do something with each node -->
  <xsl:template match="/*">
    <ul>
      <xsl:for-each select="$myNodes/wrs:Wrs/wrs:Data/wrs:R[wrs:C[.!='']]">  (7)
        <li><xsl:value-of select="."/></li>
      </xsl:for-each>
    </ul>
  </xsl:template>
</xsl:stylesheet>| 1 | To use exslt:node-set() declare exslt and msxml as namespaces |
| 2 | Import our utils |
| 3 | This magic line makes exslt:node-set() available in Internet Explorer |
| 4 | This is the string which we will split into DOM nodes |
| 5 | Call tokenizer named template from stringUtils.xslt, it will return a Wrs like string |
| 6 | Here, with the help of exslt:node-set(), we turn the returned string into a real DOM nodeset |
| 7 | And we can then walk through the node set as if it was part of a parameter, or the input document |
12.4. XSD Schema
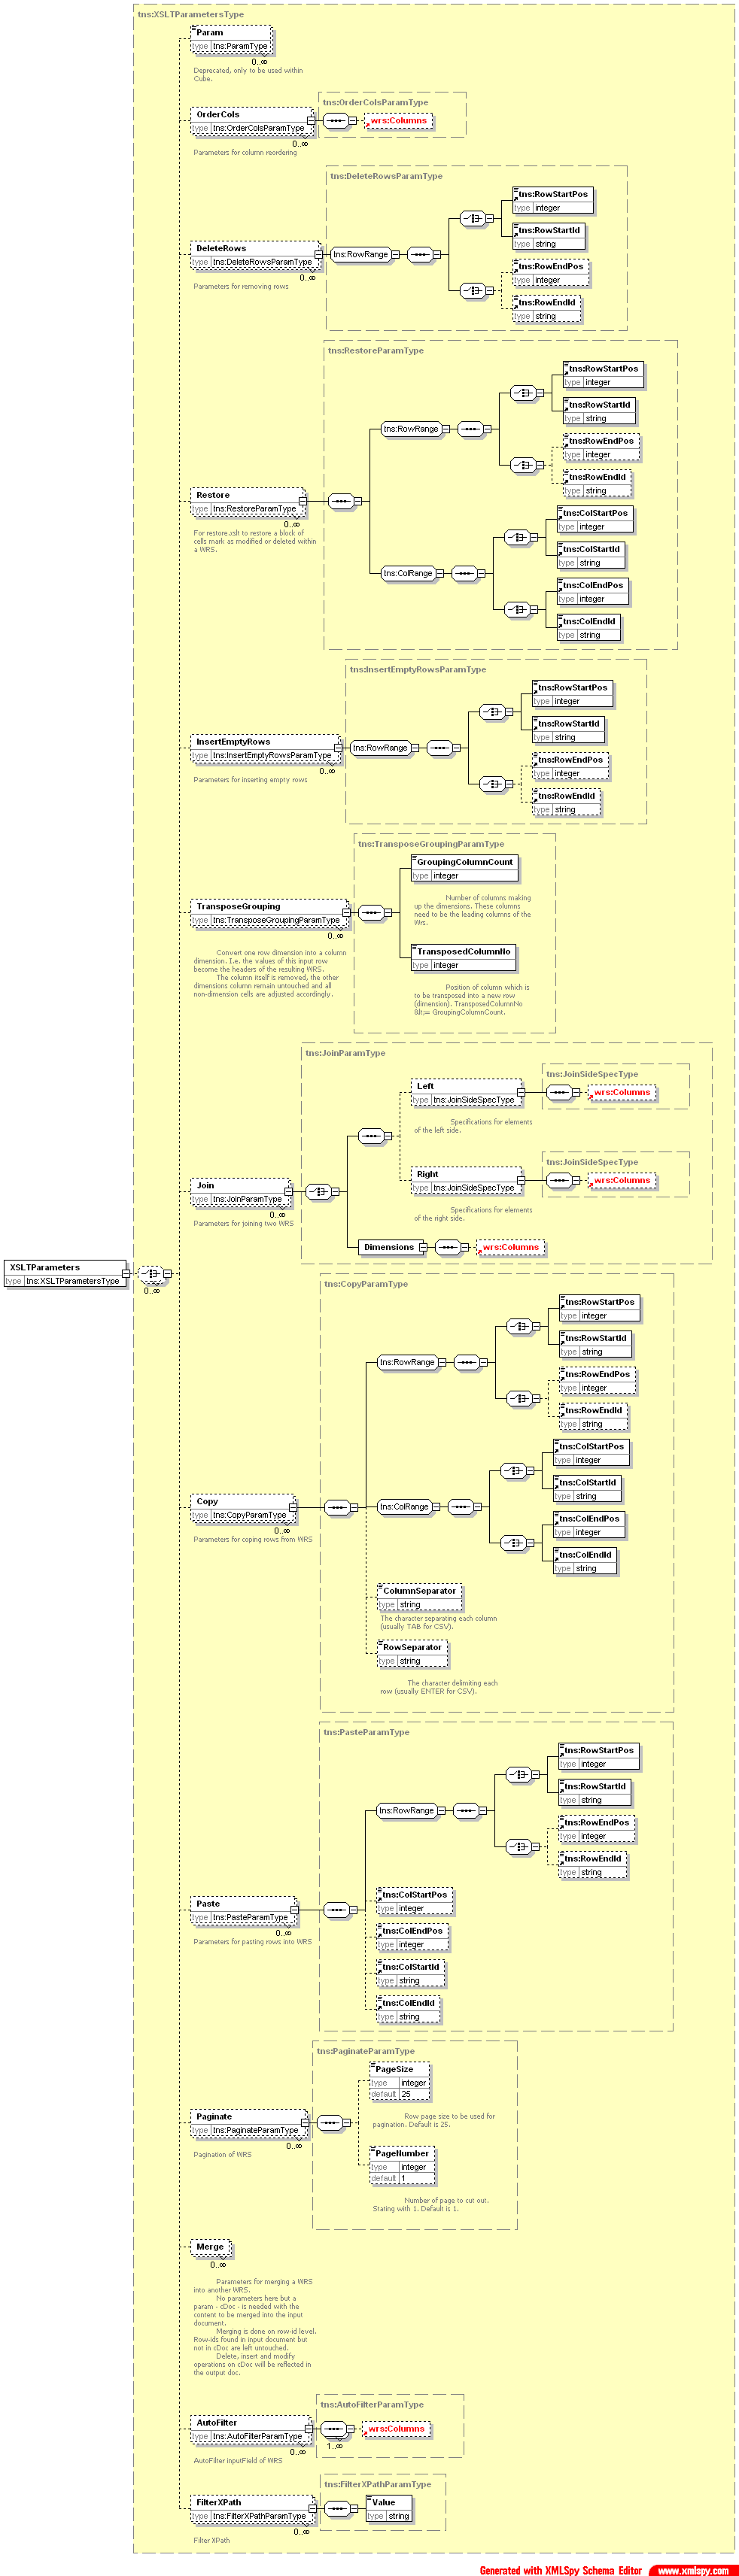
13. Api in different languages
13.1. Apis Overview
Core objects, widgets and components can be created in different APIs, all leading to the same resulting object.
-
JavaScript is the most common, and most powerful way
-
HTML Custom Elements are available for widgets and components, i.e. for all visible objects
-
JSP provides wrapper for object creation
-
For XSLT named templates are available for creation of thr objects
-
XAPI allows you to trigger creation of objects from XML
In the following chapters we show the same sample for each language API:
13.2. JavaScript API
JavaScript is the most common and powerful usage of BCD-UI objects. As opposed to the other APIs, it is not declarative but instead you work wit the real objects. Start by importing the library
<script type="text/javascript" src="../bcdui/bcdui.js"></script>For visual output of widgets, components and renderer, you need to create a targetHtml on you page
<div class="bcdCaption">Output of a Javascript renderer</div>
<div id="rendererTH"></div>
Best is to put your JavaScript code at the page bottom. This way you are sure your targetHtml elements are created already:
var model = new bcdui.core.SimpleModel({ url: "../sampleWrs.xml" });
var renderer = new bcdui.core.Renderer({
  chain: "../bcdui/xslt/renderer/htmlBuilder.xslt",
  targetHtml: "rendererTH",
  inputModel: model
});
13.3. HTML5 Custom Elements API
HTML5 Custom Elements look like standard HTML tags, but provide custom functionality. They will become more and more common in the next time.
-
There are HTML Custom Elements for widgets, components and the renderer, i.e. for all objects creating visual output.
-
The naming of the tags follows the naming of the JavaScript API, preceded by 'bcd-'.
-
The output is placed at the location of the tag, i.e. no targetHtml is necessary
-
To reference other objects, for example DataProviders, you need to give those objects and explicit id
Place the renderer or widget where you expect the output
<bcd-renderer inputModel="myModel"></bcd-renderer> (1)| 1 | For HTML5 Custom Elements, don’t use self-closing elements ('/>'), use an explicit closing tab instead |
Create non-visual objects with JavaScript and make sure you assign an id
var model5 = new bcdui.core.SimpleModel({
  id: "myModel", (1)
  url: "../sampleWrs.xml"
});| 1 | Assign an id because HTML5 Custom Elements need strings as parameters |
13.4. JSP API
To use BCD-UI’s taglib, make sure to add bcui-ui-jsptaglib.jar to WEB-INF/lib.
Start by importing the taglibs needed on your page.
<%@ taglib uri="http://de.businesscode.web/jsp/taglib/bcdui/activity" prefix="a"%>
<%@ taglib uri="http://de.businesscode.web/jsp/taglib/bcdui/bcdui" prefix="b"%>
<%@ taglib uri="http://de.businesscode.web/jsp/taglib/bcdui/widget" prefix="w"%>
<%@ taglib uri="http://de.businesscode.web/jsp/taglib/bcdui/widgetNg" prefix="wng"%>
<%@ taglib uri="http://de.businesscode.web/jsp/taglib/bcdui/webpage" prefix="webpage"%>
<%@ taglib uri="http://de.businesscode.web/jsp/taglib/bcdui/component" prefix="cmp"%>
Then use <b:init/> tag to load and start BCD-IU
<head>
  <meta charset="UTF-8"/>
  <title>BCD-UI JSP sample</title>
  <b:init />
</head>
Tags have the same name and parameters as their JavaScript counterparts, except SimpleModel, which is named model in jsp. Our tags allow tag nesting for parameters. A renderer or widget will create its output at the place of the tag, so on this case you do not need a targetHtml parameter.
<div id="bcdBodyContainer">
  <div class="bcdCaption">Output is placed here</div>
  <b:renderer> (1)
    <b:inputModel>
      <b:model url="../sampleWrs"></b:model>
    </b:inputModel>
  </b:renderer>
</div>| 1 | Output is placed where the tag is |
13.5. XSLT API
You can call our named templates from XSLT to create BCD-UI objects, including core, widgets and components.
This is useful, if you have an XSLT creating HTML allowing very dynamic UIs.
Such an XSLT may look like this:
<xsl:stylesheet xmlns:xsl="http://www.w3.org/1999/XSL/Transform" version="1.0">

  <xsl:import href="../bcdui/js/core/core.xslt"/> (1)
  <xsl:output method="html" encoding="UTF-8" indent="yes"/>

  <xsl:template match="/*">
    <div> (2)
      <!-- Create a model -->
      <xsl:call-template name="model"> (3)
        <xsl:with-param name="id" select="'myModelXslt'"/> (4)
        <xsl:with-param name="url" select="'../sampleWrs.xml'"/>
      </xsl:call-template>
      <!-- Output its result right here -->
      <xsl:call-template name="renderer">
        <xsl:with-param name="inputModel">myModelXslt</xsl:with-param>
      </xsl:call-template>
    </div>
  </xsl:template>

</xsl:stylesheet>| 1 | Import bcdui/core/core.xslt, bcdui/widget/widget.xslt, bcdui/widgetNg/widgetNg.xslt and or , bcdui/component/component.xslt |
| 2 | Embed the tags in your HTML output |
| 3 | The XSLT template names follow the js API names in lower case |
| 4 | The parameter names follow the js API |
First create a place where to show the result:
<div class="bcdCaption">Output of XSLT</div>
<div id="rendererXsltTH"></div>
Then create a Renderer to show it, and it will trigger the creation of the objects:
      var rendererXslt = new bcdui.core.Renderer({
        chain: "xsltApiSample.xslt",
        targetHtml: "rendererXsltTH"
});-
It is not possible to use core:modelUpdater on the guiStatus to initially transform it. Please use either JS or JSP API for that purpose.
-
Following widgets from /bcdui/js/widget/widget.xslt are not available in this API: blindUpDown, loginForm, userMessagesEditor, userMessagesViewer
13.6. XAPI API
XAPI is a fully declarative way to create BCD-UI objects in XML. It can be used directly and allows for easy creation of a Domain Specific Language (DSL) in XML for your customers on top of it.
An XAPI file looks like the following:
<Root xmlns:xapi="http://www.businesscode.de/schema/bcdui/xmlapi-1.0.0">
  <xapi:Model id="myModelXapi" url="../sampleWrs.xml"/> (1)
  <h2>Some HTML here</h2> (2)
  <xapi:Renderer targetHtml="rendererXapiTh" inputModel="myModelXapi"/>
</Root>| 1 | Tag and parameter names follow JavaScript API |
| 2 | You can freely mix and nest with HTML here |
The minimal way to apply it is to create the following XSLT. In your version you may want to extend this by your DSL functionality.
<xsl:stylesheet version="1.0"
                xmlns:xsl="http://www.w3.org/1999/XSL/Transform"
                xmlns="http://www.w3.org/1999/xhtml"
                xmlns:html="http://www.w3.org/1999/xhtml"> (1)

  <xsl:import href="../bcdui/js/core/core.xslt"/> (2)
  <xsl:output method="html" version="1.0" encoding="UTF-8" indent="no"/>

  <xsl:template match="/*">
    <div> (3)
      <xsl:apply-templates select="*"/>
    </div>
  </xsl:template>

  <!-- Copy html content 1:1 -->
  <xsl:template match="html:*"> (4)
    <xsl:copy>
      <xsl:copy-of select="@*"/>
      <xsl:apply-templates/>
    </xsl:copy>
  </xsl:template>

</xsl:stylesheet>| 1 | Add a html namespace so that we can copy that later 1:1 |
| 2 | Import needed XSLT (see comment above XSLT API) |
| 3 | You can freely mix in and nest with HTML |
| 4 | Here we make sure we copy HTML content 1:1 |
Then use the standard way to apply this stylesheet to the xapi file. Make sure you created the targetHtml before
      var rendererXapi = new bcdui.core.Renderer({
        chain: "xapiMinimalRenderer.xslt",
        targetHtml: "rendererXapiTH",
        inputModel: new bcdui.core.SimpleModel( "xapi.xml" ) (1)
});| 1 | A short way to create a SimpleModel and pass it
|
13.7. Create your own Domain Specific Language DSL
The real power of XSLT API and XAPI is that you can easily extend it to your own Domain Specific Language.
First extend the XSLT used for the XAPI sample by an XSLT template reflecting you DSL.
In our case we added cust:MyRenderer, which is convenient as it gets the data url directly, removing the need to create an extra DataProvider.
While this is a very simple example, you can easily extend it to a complete DSL.
<xsl:stylesheet version="1.0"
                xmlns:xsl="http://www.w3.org/1999/XSL/Transform"
                xmlns="http://www.w3.org/1999/xhtml"
                xmlns:html="http://www.w3.org/1999/xhtml"
                xmlns:cust="http://www.businesscode.de/schema/bcdui/customization-1.0.0"> (1)

  <xsl:import href="../bcdui/js/core/core.xslt"/>
  <xsl:output method="html" version="1.0" encoding="UTF-8" indent="no"/>

  <!-- Your DSL extension -->
  <xsl:template match="cust:MyRenderer"> (2)

    <H2>Output of DSL</H2>

    <xsl:call-template name="model"> (3)
      <xsl:with-param name="id">dataModel</xsl:with-param>
      <xsl:with-param name="url" select="@dataUrl"/> (4)
    </xsl:call-template>

    <xsl:call-template name="renderer">
      <xsl:with-param name="targetHtml" select="@targetHtml"/>
      <xsl:with-param name="inputModel">dataModel</xsl:with-param>
    </xsl:call-template>

  </xsl:template>

  <xsl:template match="/*"> (5)
    <div>
      <xsl:apply-templates select="*"/>
    </div>
  </xsl:template>

  <!-- Copy html content 1:1 -->
  <xsl:template match="html:*">
    <xsl:copy>
      <xsl:copy-of select="@*"/>
      <xsl:apply-templates/>
    </xsl:copy>
  </xsl:template>

</xsl:stylesheet>| 1 | Use xmlns:cust=http://www.businesscode.de/schema/bcdui/customization-1.0.0 namespace for your extensions as it is known to the browser’s XPath, BCD-UI adds it there. |
| 2 | This is where your DSL is handled, note the 'cust' namespace. You can create any HTML content and BCD-UI objects here. Here you may also call apply-templates to resolve nested XAPI calls in a more complex sample. |
| 3 | Internally it will translate into calls to XSLT API |
| 4 | Here the value of your 'dataUrl' parameter is passed |
| 5 | Standard handling of XAPI |
Create a renderer with the dslRenderer.xslt as chain and the following as inputModel
<Root xmlns="http://www.w3.org/1999/xhtml"
      xmlns:cust="http://www.businesscode.de/schema/bcdui/customization-1.0.0"> (1)
  <h2>Some HTML content</h2> (2)
  <cust:MyRenderer targetHtml="rendererDslTh" dataUrl="../sampleWrs.xml"/> (3)
</Root>| 1 | Make sure to HTML content is in HTML namespace |
| 2 | You can freely mix and nest with HTML content |
| 3 | Here you make use of your custom DSL |
and you will see your own DSL in action!
14. Security
14.1. Security Overview
BCD-UI supports security with the following features
-
https:// hosting, partly or complete
-
Company authentication and authorization mechanisms like central LDAP and single login can be applied
-
SQL injection prevention
-
no-cache no-store to protect secure data on shared computers, see caching
-
Integration of Apache Shiro access rules
-
Easy declarative user rights for:
-
-
Restrict write access
-
Advanced row-level security support for all databases
-
Trigger additional actions when writing to a BindingSet, including keeping a history of data changes
-
-
Menu structure shown to the user, for example whether admin pages are offered for navigation, see @rights attribute in menu-1.0.0.xsd
-
-
Windows single-sign-on for EnterpriseEdition
14.2. Security access filter
A security access filter serves as the central entry point to the application and validates each access against the security policy. Each request is checked whether it addresses a
-
Public resource: Not in scope of the filter, the filter will let the request through
-
Protected resource
-
Accessed in a valid session: The filter will let the request through
-
No valid session but auto-login: Auto-login is available through the use of HTTP cookies.
-
No valid session: The filter will re-direct the request to the login page to establish a valid session with a valid login.
-
After login, the original request is processed.
For each url path you can also set required rights in the shiro.ini file.
Developer view
Developers need to follow these rules to implement secure applications:
-
Enable ShiroFilter security filter in web.xml to enforce login for non-public areas
-
Configure the CachingFilter to send user dependent and sensitive data with
no-cache -
Invalidate sessionId on log-off and session timeout explicitly
-
The system supports deep links, i.e. redirecting to the originally requested page after login
The system uses the first unsuccessfully access url for redirection. Make sure all resources addressed from the public login page are also public, otherwise the user is forwarded to that resource (often a .css file) after the successful login attempt in, when the target was the login page.
Shiro permissions
The Shiro subject of the current session represents the user in the system.
Rights can be queried via SecurityUtils.getSubject().isPermitted(value).
Apache Shiro, supports a hierarchical permission structure and wild-cards in the hierarchy.
For example one user may only be allowed page:report:scorecard where else another user may be granted
access to all pages page:* .
Login form and logging
-
Login page
A login page is a standard page with two plain inputs:<form name="loginform" action="" method="post" style="margin: 20px 0px 0px 20px;"> <table align="left" border="0" cellspacing="0" cellpadding="3"> <tr> <td>Username:</td> <td><input type="text" name="username" maxlength="30" autofocus></td> </tr> <tr> <td>Password:</td> <td><input type="password" name="password" maxlength="30"></td> </tr> <tr> <td colspan="2" align="right" style="padding-top:10px;"> <button caption="Login" type="submit">Login</button> </td> </tr> </table> </form>Per default bcdui static resources are accessible without login, you can also use BCD-UI buttons if you want.
-
Login logging
By addingbcd_log_loginBindingSet to your application, all login attempts, and their result is logged into the corresponding table.
To set up users and their authorization, you can choose the simple setup by hard-coding them in shiro.ini, by maintaining them in BCD-UI’s database or authenticated with oAuth (AD, Google, facebook etc) combined with rights maintained in your database.
Page access rights
No matter which method you use for defining users and their roles, use the [urls] section in shiro.ini to define access permissions needed for pages. It is easy to also adjust the menu to offer only allowed pages.
 (1)
/cube/**              = authc
(2)
/api/** = authc, perms["pages:admin"]| 1 | Here we define that any authenticated user can access /cube |
| 2 | For /api/** we require login and a 'pages:admin' permission |
14.3. Define users in shiro.ini
You can have an easy shiro.ini - only setup in the following way:
[users]
admin    = pw123, adminRole
cubeUser = pw456[roles]
adminRole = pages:adminUsers with 'adminRole' also have the pages:admin right.
14.4. Define users in the database
Instead of having a static set of users and passwords in shiro.ini, you can store users and passwords in the database.
#### Switch to BCD-UI well known BindingSets (bcd_sec_user[_settings|_roles])
## for authentication and authorization supporting salted passwords, etc. (named option 2. above)
## make sure you created an appropriate WEB-INF/bcdui/subjectSettings.xml as well if enabling
# realmBcdJdbc = de.businesscode.bcdui.subjectsettings.JdbcRealm
## for subject preferences support
## make sure you created an appropriate \WebContent\bcdui\conf\subjectPreferences.xml as well if enabling
# realmSubjectPreferences = de.businesscode.bcdui.subjectsettings.SubjectPreferencesRealm
# For security reasons BindingItems of password and salt are blind in BindingSet. They are assumed to have columns name password/password_salt. Here you can overwrite that.
# realmBcdJdbc.passwordColumnName     = password
# realmBcdJdbc.passwordSaltColumnName = password_salt
# realmBcdJdbc.hashIterations         = 1024
# to disable salted passwords (discouraged) and for backwards compatibility set this flag, password is considered plain text then
# realmBcdJdbc.hashSalted = false
Keep [users] and [roles] sections empty and follow for [urls] the description given in the chapter above.
14.5. SubjectSettings config
Add a file WEB-INF/bcdui/subjectSettings.xml with at least the following content:
<?xml version="1.0" encoding="UTF-8"?>
<SubjectSettingsConfig xmlns="http://www.businesscode.de/schema/bcdui/subjectsettings-1.0.0">
  <SubjectFilterTypes>
  </SubjectFilterTypes>
  <Authentication>
    <SubjectSettings/>
  </Authentication>
  <SubjectSettings>
    <Jdbc><DefaultDataSource/></Jdbc>
  </SubjectSettings>
</SubjectSettingsConfig>
Later you can define BindingSet related security restrictions here as described in BindingSet Features / Row-Level-Security
14.6. User related BindingSets
Add bcd_sec_user and bcd_sec_user_settings BindingSets (and the corresponding tables).
There is no prebuilt UI editor for these two tables, but their content should be self-explanatory.
All attributes and permissions assigned to a user in the table corresponding to bcd_sec_user_settings are read when the user logs in.
These become in-memory subject settings, which can be used to query whether a user has a certain permission.
These permissions are checked for example by the security filter when accessing an url.
14.7. Custom setup
You may also provide your own LoginServlet or Realm for a custom setup of deriving users and their attributes. Please check Shiro documentation for more options.
14.8. OAuth2 with Azure / Google etc
BCD-UI provides Shiro integrated implementation for general OAuth2 authentication (referred to as oauth in this docu) and ready-to-use modules for Azure and Google integration.
Authentication is handled by OAuth, permissions are managed by application through SubjectSettings.
-
Prerequisites
-
Register your client application to Azure/Google/x to obtain a client and a client secret. For Google, we use 'email' scope and for Azure
https://graph.microsoft.com/user.read, but you can override this and use whatever you prefer to use for authentication.
-
-
Configuration
The shiro.ini template of BCD-UI describes the setup, more about this the following section
oAuth sample with Azure#### OAuth start (named option 2.2 above) ## Use this to OAuth authenticate against Azure / Google. Make sure to enable /oauth in [url] section. ## Some information is provided by OAuth provider when setting up your application there ## Azure # oauthcAzure = de.businesscode.bcdui.subjectsettings.oauth2.OAuthAuthenticatingFilter # oauthcAzure.optionalProviderId = azure # oauthcAzure.authorizeEndpoint = # provided by Azure # oauthcAzure.authScope = openid https://graph.microsoft.com/user.read # oauthcAzure.clientId = # provided by Azure # oauthcAzure.redirectUrl = http://myapp.com/oauth # Adjust and tell this Azure # oauthcAzureRealm = de.businesscode.bcdui.subjectsettings.oauth2.OAuthRealm # oauthcAzureRealm.authenticator = $oauthcAzure # oauthcAzureRealm.apiEndpoint = https://graph.microsoft.com/v1.0/me/ # oauthcAzureRealm.clientSecret = # provided by Azure # oauthcAzureRealm.tokenEndpoint = # provided by Azure # oauthcAzureRealm.principalPropertyName = userPrincipalNameThe mentioned template shiro.xml also describes oAuth with Google and how to combine multiple providers,
14.9. Kerberos / Windows SSO / Windows Authentication
BCDUI also provides transparent integration for authentication against Windows Active Directory (or any other Directory service) via Kerberos protocol. This is supported by the Enterprise Edition of BCD-UI, please contact BusinessCode GmbH for questions.
15. Subject Preferences
Subject preferences are name/value pairs which can be set client sided. To activate the feature, you need the following:
1) add the SubjectPreferencesRealm realm to your shiro.ini
realmSubjectPreferences = de.businesscode.bcdui.subjectsettings.SubjectPreferencesRealm securityManager.realms = …. $realmSubjectPreferences
2) map SubjectPreferences servlet in web.xml
  <servlet>
    <servlet-name>bcdui4.SubjectPreferences</servlet-name>
    <servlet-class>de.businesscode.bcdui.web.servlets.SubjectPreferences</servlet-class>
    <init-param>
      <param-name>cookieMaxAge</param-name>
      <param-value>31536000</param-value>
    </init-param>
    <load-on-startup>1</load-on-startup>
  </servlet>
  <servlet-mapping>
    <servlet-name>bcdui4.SubjectPreferences</servlet-name>
    <url-pattern>/bcdui/servlets/SubjectPreferences/*</url-pattern>
  </servlet-mapping>
3) add a /bcdui/conf/subjectPreferences.xml configuration file
<?xml version="1.0" encoding="UTF-8"?>
<sec:SubjectPreferencesConfig xmlns:sec="http://www.businesscode.de/schema/bcdui/subjectsettings-1.0.0" cookieName="bcdSubjectPreferences" cookiePath="/bcdui">
  <sec:Settings>
    <sec:Setting name="allowed_preference_name_1">
      <sec:SourceSetting ref="referenced_user_permission" isMulti="true|false" defaults="yourdefault1,yourdefault2"/>
    </sec:Setting>
    <sec:Setting name="name="allowed_preference_name_2">
      <sec:Values isMulti="true|false" preventEmpty="true|false">
        <sec:Value>allowed_value_1</sec:Value>
        <sec:Value default="true|false">allowed_value_2</sec:Value>
      </sec:Values>
    </sec:Setting>
  </sec:Settings>
</sec:SubjectPreferencesConfig>
15.1. Usage:
To set/update a subject permission, you can either call mapped SubjectPreferences servlet with name and value attributes in a POST request (multiple values -if allowed- can be separated by comma), or you use a WRS request with wrs:I/M/D rows to insert/modify/delete entries. The WRS consists of (at least) two columns with the names right_name and right_value. A GET request to the servlet returns you a 3 column WRS which lists all currently allowed values. The 3rd column holds true if the right is active at the moment.
Each sec:Setting node in your config describes one allowed attribute which you can set. To define the allowed values for that named permission, you can either give a list of static well known values (sec:Values/sec:Value) or you reference a user based permission via sec:SourceSetting. You can not do self-referencing here. sec:Values/sec:SourceSetting may have an attribute "isMulti" which -when set to true- allows you to set multiple values. For this, the servlet call needs to separate the single values by comma.
Default Values:
If you haven’t set any subject preference yet and want to access it, a default value is chosen and returned (if available). This is the value from the sec:Values list which is marked as default with the "default='true'" attribute. In case of an allowed multi setting, you can have multiple defaults. For sec:SourceSetting based entries, you can use the defaults attribute to give a comma separated string of default values. bcdAllAllowed can be used to set all allowed values as default. When you remove the last entry of a setting, it stays empty, when you have emptyAllowed="true" specified. Otherwise, the default value(s) is/are restored. If you modify the list by doing a POST operation, the values are manifested in a cookie if you specified a cookieName on config root. Optionally you can also change the cookiePath. When it comes to filling not yet set preferences, cookie values are taken over default values.
URL Usage:
If your setting is prefixed with "bcdClient:", you can reuse it in an URL, like "http://localhost:8080/myApp/${bcdClient:pageId}/index.html". The expression is replaced with the value and forwarded. Of course multiple expressions are possible. A value of "*" will be replaced with an empty string, in case the url then holds "//" somewhere, this will be cleaned up to "/". Ensure that the url is excluded from caching, otherwise you’d have to hit F5 after switching the value and accessing the page.
Client Visibility:
In general, "bcdClient:" prefixed values are visible on client side by accessing "bcdui.config.clientRights".
Read/Write security:
Set subject preferences can be also used for server sided read/write protection (see SubjectSettings). For this, you can define a SubjectFilterType as you know it from subject settings.
Example:
  <SubjectFilterType name="bcdUserBean:country">
    <Caption>country via bcdUserBean</Caption>
    <BindingItems>
      <C bRef="country"/>
    </BindingItems>
  </SubjectFilterType>
And in a binding you can reference it the usual way then. allowed:allWrite can be any right type you defined.
  <SubjectSettings>
   <Security><Operation permission="allowed:allWrite" name="write"/></Security>
    <SubjectFilters>
      <SubjectFilter type="bcdUserBean:country"/>
    </SubjectFilters>
  </SubjectSettings>
15.2. i18n Language switch:
bcdui.i18n.switchLanguage function requires the upper mechanism (realm/web.xml/config) to be enabled and a <sec:Setting name="bcd_i18n:lang"> needs to be defined in your config with suitable allowed values.
Setting a value programmatically:
import de.businesscode.bcdui.web.servlets.SubjectPreferences;
SubjectPreferences.setPermission("bcdLimit:country", "DE");
16. Caching
16.1. Caching overview
Caching is a mechanism to speed up performance drastically, next to database tuning it is the most important performance measure. BCD-UI supports caching and makes caching setup easy. It allows for reducing server and network load and improving user experience at the same time. Depending on the type of expected access different caching strategies are optimal. BCD-UI supports two types of caching
- Client side caching
-
Client side caching is often the most effective way of caching. It prevents completely the need for repeated requests to a server. No load at all is produced for network and server and the user sees the requested data immediately, more like in a desktop application.
- Server side caching
-
Server side caching use the cache on the server. The clients need to do an actual request but repeated identical requests from multiple clients, like default reports, are answered with low overhead.
The definition of when a resource expires is done identically for server and client caching.
It is possible to define the 'expires' date of the answer for a request as a sample occurring at Tue, 01 Dec 2009 12:30:40 UTC in terms of
- ExpiresAbsTime
-
time, like "00:00:00" leading to
Wed, 02 Dec 2009 00:00:00 UTC - ExpiresAbsDow
-
day of week incl. hour, like "Sat-12" leading to
Sat, 05 Dec 2009 12:00:00 UTC - ExpiresAbsDatetime
-
absolute date time, like "2011-01-20 12:00:00" leading to
Thu, 01 Jan 2011 12:00:00 UTC - ExpiresRelDays
-
number of days starting from the request, same time, like "2" leading to
Thu, 03 Dec 2009 12:30:40 UTC - ExpiresRelTime
-
number of hours/min/sec starting from the request, like "01:00:05" leading to
Tue, 01 Dec 2009 13:30:45 UTC - CacheRequestDirective
-
native HTTP1.1 header string to be set in Cache-Control header
There can be multiple space separated values for ExpiresAbsTime and ExpiresAbsDow, like "00:00:00 12:00:00", the next matching one is used for the response expires. The response will have the HTTP Expires header be set accordingly.
Disable Caching
During development, usually you do not enable caching. For this case BCD-UI provides the possibility to enable/disable all caching settings. To achieve this please define an environment entry within your context.xml file with the name: "bcdui/disableCache" like this:
<Environment name="bcdui/disableCache" type="java.lang.Boolean" value="true"/>RequestLifecycleFilter will send a Cache-Control: no-cache; no-store for all resources if set to true.
16.2. Client side caching
Client side caching is by far the most efficient way of caching in most cases. ClientCachingFilter is responsible for adding caching information to the HTTP response. Client filters also allow an ExcludeUrls parameter with a space separated list of regular expressions. If an expression matches the request path, the filter takes no action.
Static files can usually be cached. How long depends on when a re-deployment may happen.
Typically, if deployments happen over the week-end, set ExpiresAbsDow to 'Sat' as shown above.
To identify static files it is possible to define for which extensions the ClientCachingFilter applies via ExtensionsRestriction.
In a reporting environment, reporting and reference data can often be cached until the next morning.
This is supported by setting ExpiresAbsTime to '07:00:00'.
To support different caching times for different data, create different servlet instances at these URLs in your web.xml.
| Always exclude /bcdui/servlets/ and /bcdui/bcdui.js from caching. In most cases you also want /vfs/ to update immediately. |
The default web.xml contains 2 setups. The one initially enabled is optimized for development, caching only BCD-UI sources, for production enable the second one, caching all static resources.
Other headers
For the client side header it is also possible to define the response header value of cache-directive with the cache-response-directive parameter.
See sample for no-cache below.
The response will have the HTTP Cache-Control header be set accordingly.
17. Bindings
17.1. Bindings Overview
A BindingSet defines the logical view of a table or view of a database. Bindings are maintained in simple XML files at WEB-INF/bcdui/bindings and introduce the following capabilities:
- Logical naming
-
Logical names for views, tables (BindingSet) and columns (BindingItem) ease the understanding harmonizing of the data model.
- Logical data types
-
Logical type of BindingItem (column) and other meta information beyond database’s capability allow adopting and overwrite a physical database.
- Aggregation hierarchies - BindingGroups
-
The option to choose best fit among multiple tables depending on the actual BindingItems (columns) needed, similar to a materialized view or join view, i,e, for the current request the best fit (the highest aggregation) table is chosen
- Relations, i.e. Joins
-
The option to do joins only if needed based on the actual BindingItem (column) addressed
- Row level security
-
The option to enforce constraints (Filter) on the SQL queries like user rights or language
- Server values
-
The option to enforce values server-side, for example the user’s id.
- Write pre- and processing
-
The option to enforce additional processing of accesses to the database, for example application specific way to keep track of changes.
- Datasource
-
Each BindingSets can refer to a different database.
Only tables and columns with a binding can be accessed by a BCD-UI application. This mechanism enables the server to limit the data access of the front end and provides meta information about the database columns.
Bindings are maintained as XML files in WEB-INF/bcd/bindings in the following form: A simple binding looks like the following:
<BindingSet xmlns="http://www.businesscode.de/schema/bcdui/bindings-1.0.0"
            id="myGeoData" table="BCDUITEST_MD_GEO">   (1) (2) (3)

  <C id="country" isKey="true" caption="Country"> (4)
    <Column>country</Column> (5)
  </C>
</BindingSet>| 1 | BindingSet root element namespace need to be correct |
| 2 | id is the logical name within the application |
| 3 | table is the physical name of the table or view it the database |
| 4 | Each bnd:C is a BindingItem represents an individual column, you give it a logical id, and you can enforce some attributes |
| 5 | This is the column expression for the database, often simply the column name but in can also be something more complex like substr(colname,2) |
17.2. BindingSet features
Row-level-security
When reading from a BindingSet via Wrs, the access can be limited for a user on row-level. For example a user may only see entries for UK even if the query does not have this restriction. With the same method, a user’s language setting can be applied to an i18n caption lookup table in the background. This is done via a server-side added where constraint depending on user settings. This is configured by cooperation of the following three artifacts:
-
A sec:SubjectFilterType definition
A SubjectFilterType in WEB-INF/bcdui/subjectSettings.xml defines the BindingItem on which to apply the restriction, and a BindingSet with the user’s rights, default is bcd_sec_user_settings.
<SubjectSettingsConfig xmlns="http://www.businesscode.de/schema/bcdui/subjectsettings-1.0.0"> <SubjectFilterTypes> <SubjectFilterType name="geo:ctr"> <Caption>Countries</Caption> <BindingItems> <C bRef="country"/> </BindingItems> </SubjectFilterType> </SubjectFilterTypes> <!-- ... --> </SubjectSettingsConfig> -
A reference to such a definition in BindingSet.
In the restricted BindingSet you just need to refer to such a SubjectFilterType and have the BindingItem with the correct id country.
<BindingSet xmlns="http://www.businesscode.de/schema/bcdui/bindings-1.0.0" id="rowLevelBs"> <!-- all C's etc ... --> <C id="country">..</C> <!-- all C's etc ... --> <SubjectSettings> <SubjectFilters> <SubjectFilter type="geo:ctr"/> </SubjectFilters> </SubjectSettings> </BindingSet> -
Assigned values regarding this permission to the current user in bcd_sec_user_settings.
Well-known BindingSet bcd_sec_user_settings is expected to have three BindingItems: user_id, right_type and right_value. Each row assigns an allowed country to a user for the geo:ctr right.
Bindings write-protection
If (and only if) a WEB-INF/bcdui/subjectSettings.xml is present in a project, all BindingSets are write-protected when accessed via Wrs. To allow a user to insert into or update a view/table behind a BindingSet, you must
-
Define that the BindingSet is write-able via a bnd:SubjectSettings/bnd:Security/bnd:Operation entry
To configure security on your binding do the following:
<BindingSet xmlns="http://www.businesscode.de/schema/bcdui/bindings-1.0.0" id="myBindingSetId"> <!-- all C's etc ... --> <SubjectSettings> <Security> <Operation name="write" permission="perms1 perms2:ctx1 perms2:ctx2"/> </Security> <!-- possible SubjectFilter elements ... --> </SubjectSettings> </BindingSet> -
Provide the user with sufficient rights
Currently, BindingSets understand only one operation called write which protects ANY modification to a table (C-UD), the permission takes a list (space separated) of permissions which are evaluated by Shiro, hence Shiro’s syntax can be applied here.
Note: the list is inclusive, meaning that the operation is granted only in case the user retains ALL permissions listed. The permission list may also be empty or be absent at all, in such a case NO check is done for this operation, thus it effectively disables write-protection.
Write pre-processing
The optional write pre-processing allows enforcing additional processing of data before it is written to the BindingSet.
A project specific callback derived from the de.businesscode.bcdui.binding.write.WriteProcessingCallback
can be called to modify the data to be written, for example for security reasons.
When multiple callbacks are configured, they are called in given order.
A callback receives the following events:
-
endHeader
-
endDataRow
See above configuration for an example.
WrsModificationCallback
WrsModificationCallback is a general implementation of de.businesscode.bcdui.binding.write.WriteProcessingCallback offering WRS values manipulation on the server. The class is set up using parameters in the Binding definition document. Please consult the API documentation on class de.businesscode.bcdui.binding.write.WrsModificationCallback for further information.
In short, this callback allows you to provide server-side or constant values for WRS data, to either coalesce it with data sent from client and even to assure the data to exist whether is has been sent from client or not. A sample:
<BindingSet xmlns="http://www.businesscode.de/schema/bcdui/bindings-1.0.0" id="bcd_test_table" table="bcd_test_table">
  <C id="someValue_name" type-name="VARCHAR" isKey="true">
    <Column>TEST_NAME</Column>
  </C>
  <C id="someOtherValue" type-name="NUMERIC">
    <Column>TEST_VALUE</Column>
  </C>
  <SubjectSettings>
    <Security>
      <Operation permission="" name="write"/>
    </Security>
  </SubjectSettings>
  <WriteProcessing>
    <Callbacks>
      <Callback class="de.businesscode.bcdui.binding.write.WrsModificationCallback">
        <!-- for someValue_name binding item the value is either taken from client or (if null) the value
          'server value' will be written to database -->
        <Param bindingItemId="someValue_name" expression="server value"/>
        <!-- since coalesce is set to false, someOtherValue binding-item will always be written value:
          'session: ...' to database -->
        <Param bindingItemId="someOtherValue" expression="session: ${bcdBean.sessionId}" isCoalesce="false"/>
      </Callback>
    </Callbacks>
  </WriteProcessing>
</BindingSet>
Ready to use WrsModificationLog
WrsModificationLog is a convenience implementation of de.businesscode.bcdui.binding.write.WrsModificationCallback offering WRS modification logs. It maintains the items:
-
bcdUpdateStamp
-
bcdUpdateBy
-
bcdCreateStamp
-
bcdCreateBy
as appropriate. See class documentation for more information.
<BindingSet xmlns="http://www.businesscode.de/schema/bcdui/bindings-1.0.0" id="bcd_test_table" table="bcd_test_table">
  <C id="someValue_name" type-name="VARCHAR" isKey="true">
    <Column>TEST_NAME</Column>
  </C>
  <C id="someOtherValue" type-name="NUMERIC">
    <Column>TEST_VALUE</Column>
  </C>
  <C id="bcdUpdateStamp" type-name="TIMESTAMP" isReadOnly="true">
    <Column>update_stamp</Column>
  </C>
  <C id="bcdUpdateBy" type-name="VARCHAR" isReadOnly="true">
    <Column>update_by</Column>
  </C>
  <C id="bcdCreateStamp" type-name="TIMESTAMP" isReadOnly="true">
    <Column>create_stamp</Column>
  </C>
  <C id="bcdCreateBy" type-name="VARCHAR" isReadOnly="true">
    <Column>create_by</Column>
  </C>
  <SubjectSettings>
    <Security>
      <Operation permission="" name="write"/>
    </Security>
  </SubjectSettings>
  <WriteProcessing>
    <Callbacks>
      <Callback class="de.businesscode.bcdui.binding.write.WrsModificationLog"/>
    </Callbacks>
  </WriteProcessing>
</BindingSet>
BindingInclude / XInclude
Recurring groups of BindingItems, for examples sets of levels of a dimension or sets of measures do not need to be repeated in all
BindingSets but can be included on XML level via xi:include.
If you use b:BindingInclude as root, the BindingSet will not be instantiated itself but is only for importing it elsewhere.
Relations
Relations allow for joining with additional BindingSets if needed. For example, add a section like
  <Relation rightBindingSet="myCountryData" type="leftOuter">
    <Imports>
      <ImportItem name="orig_country_caption">
        <BindingItemRef name="country_caption"/>
      </ImportItem>
    </Imports>
    <Condition>
      <IsEqual>
        <BindingItemRef name="orig_country" side="left"/>
        <BindingItemRef name="country_code" side="right"/>
      </IsEqual>
    </Condition>
  </Relation>

  <Relation rightBindingSet="myCountryData" type="leftOuter">
    <Imports>
      <ImportItem name="dest_country_caption">
        <BindingItemRef name="country_caption"/>
      </ImportItem>
    </Imports>
    <Condition>
      <IsEqual>
        <BindingItemRef name="dest_country" side="left"/>
        <BindingItemRef name="country_code" side="right"/>
      </IsEqual>
    </Condition>
  </Relation>
to the BindingSet sample from chapter Minimal Cube and you can also show the countries' caption.
BindingSetGroup
| BindingSetGroup is an EnterpriseEdition extension, not available for CommunityEdition. |
A BindingSetGroup allows to be treated as a BindingSet, but the actual BindingSet used depends on the list of BindingItems being requested. The first BindingSet in order providing all BindingItems is chosen. This allows for example to
-
Redirect a request to the table with the highest aggregation level providing all required dimensions
-
Redirect a request to a table with the right dimensions, for example cw vs. month.
Therefore, this feature is very useful for optimizing database performance.
<b:BindingSetGroup xmlns:b="http://www.businesscode.de/schema/bcdui/bindings-1.0.0" id="shipmentCube">
  <b:BindingSetRef idRef="t_demo_shipment_kpi_mo"/>
  <b:BindingSetRef idRef="t_demo_shipment_kpi_cw"/>
  <b:BindingSetRef idRef="t_demo_shipment_detail"/>
</b:BindingSetGroup>
Details
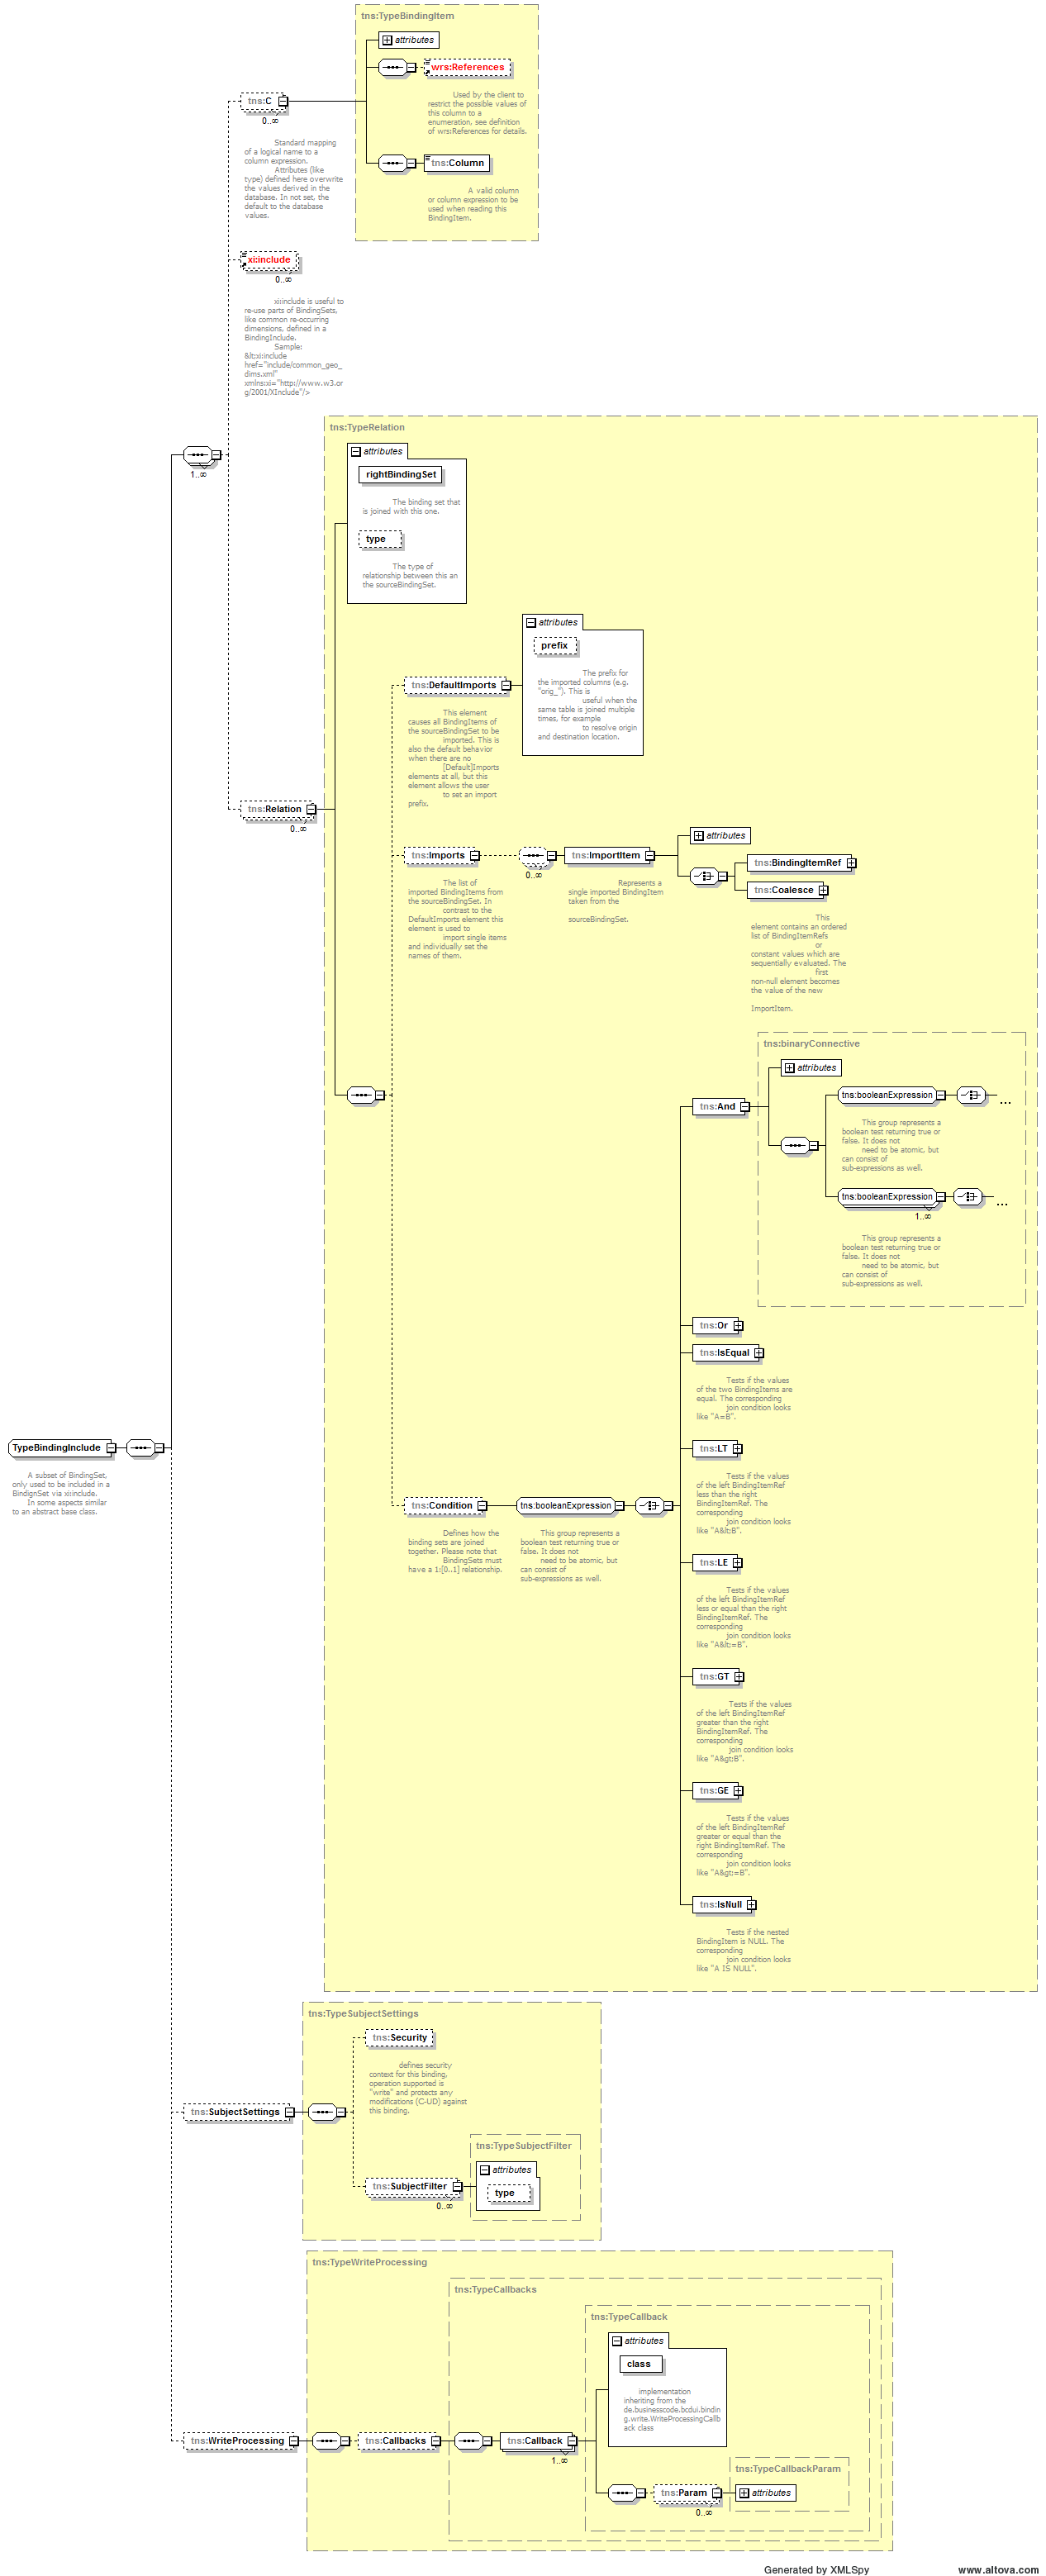
18. Application context and settings
18.1. Unified Expression Language
The BCD-UI System uses the Jakarta EE Unified Expression Language to put Server-side Values into XML documents at various places. With this feature it is possible to create for example request documents with the period set to the current month or year. This is especially useful when such a request document is based on the guiStatus and therefore can be bookmarked, because the bookmark could contain a dynamically changed date.
Usage scenarios
There are some XML documents where the EL can be used. These documents are described in the following sections.
- Request document / GuiStatus
-
The request document can make use of the EL to fill in some values (usually filters) with server-side defaults. Example:
<Status xmlns="http://www.businesscode.de/schema/bcdui/guiStatus-1.0.0"> <Filter xmlns="http://www.businesscode.de/schema/bcdui/filter-1.0.0"> <Expression bRef="date" op="=" value="${session.defaultDate}"/> </Filter> </Status> - WebRowSet Servlet
-
This use case is applied when saving a WebRowSet on the server which should contain server-defined values. Example
<Wrs xmlns="http://www.businesscode.de/schema/bcdui/wrs-1.0.0">
  <RequestDocument/>
  <Header>
    <Columns>
      <C pos="1" id="countryId"/>
      <C pos="2" id="countryName"/>
    </Columns>
  </Header>
  <Data>
    <I>
      <C>${bcdfn:generateId("dataIds")}</C>
      <C>New Country</C>
    </I>
  </Data>
</Wrs>
In this WebRowSet the bcdfn:generateId function is used. This function generates a new ID (e.g. from an Oracle Sequence) for a certain scope (e.g. the name of the Sequence).
- Bindings
-
The EL is used within the Bindings to set some default values for the Binding Items. These values are evaluated by the WebRowSet servlet or other Servlets using Bindings to set some default filters for columns. This technique makes it very easy to implement row-level security.
EL variables and functions
The EL context defined by BCDUI offers access to the "request" and "session" variables. If the EL occurs within an XML document, it also defines a "document" variable pointing to the DOM document. These variables "request" and "session" variables work similar to the ones defined in JSP so that Expressions can be re-used. The context also contains the functions declared in webpage.tld to makes it even more compatible with JSP.
Using EL within custom servlets
It is also possible to use the Expression Language within custom code. To achieve this an object
of the class de.businesscode.bcdui.el.ELEnvironment must be created and its
eval method can then evaluate all EL expressions within a specified String.
19. WebRowSet
19.1. Wrs (Web Row Set) Overview
BCD-UI delivers and receives data in the following XML format.
BCD-UI Web Row Set Wrs is an easy-to-use document format, called Wrs. Data loaded stays in this format at the client and can be used as a local data source for Renderer etc.
A simple Wrs send from the server looks like this:
Web Row Set server response
<Wrs xmlns="http://www.businesscode.de/schema/bcdui/wrs-1.0.0">
<Header>
<BindingSet>kpi_cw</BindingSet>
<Columns>
<C pos="1" id="ctr" type-name="VARCHAR" display-size="22" nullable="1" signed="true"/>
<C pos="2" id="cw" type-name="INTEGER" display-size="22" scale="0" nullable="1" signed="true"/>
<C pos="3" id="low" type-name="NUMERIC" display-size="22" scale="0" nullable="1" signed="true"/>
<C pos="4" id="high" type-name="NUMERIC" display-size="22" scale="0" nullable="1" signed="true">
<A id="someTarget" name="target" caption="target"/>
</C>
</Columns>
</Header>
<Data>
<R id="1"><C>BE</C><C>23</C><C>1200</C><C target="1235">1300</C></R>
<R id="2"><C>CZ</C><C>24</C><C>1234</C><C target="1200">1434</C></R>
<R id="3"><C>DE</C><C>25</C><C>1321</C><C target="1000">1421</C></R>
<R id="4"><C>ES</C><C>26</C><C>1102</C><C target="90">1202</C></R>
<R id="5"><C>FR</C><C>27</C><C>1234</C><C target="1000">1334</C></R>
<R id="6"><C>GB</C><C>28</C><C>1243</C><C target="900">1343</C></R>
</Data>
</Wrs>It has a wrs:Header element describing the columns and their attributes and a wrs:Data element holding the rows of the result. The target is a caption which is automatically translated to the user’s language by the default renders.
Each row has a unique id, whose value has no meaning beside being unique within the document and is convenient for referring to a specific row in the result.
Request document
To request a Wrs from the server, a request document in the following format is to be sent. As you can see it resembles SQl and should be easy to understand:
<WrsRequest xmlns="http://www.businesscode.de/schema/bcdui/wrs-request-1.0.0">
  <Select>

    <!-- Which columns (i.e. bnd:C) to include -->
    <Columns>
      <C bRef="ctrId"/>
      <C bRef="mo">
        <!-- Attributes to main value, like sort order or long name: -->
        <A bRef="monthName" name="caption">
          <Calc>
            <Concat>
              <ValueRef idRef="captionPart1"/>
              <ValueRef idRef="captionPart2"/>
            </Concat>
          </Calc>
        </A>
      </C>
      <C bRef="travelers" aggr="min"/>
    </Columns>

    <!-- Where to get the data from -->
    <From>
      <BindingSet>ctrPeople</BindingSet>
    </From>

    <!-- Where clause -->
    <Filter xmlns="http://www.businesscode.de/schema/bcdui/filter-1.0.0">
      <And>
        <Expression bRef="yr" op="=" value="2010"/>
        <Expression bRef="cw" op="=" value="1"/>
      </And>
    </Filter>

    <Grouping>
      <C bRef="ctrName"/>
      <C bRef="mo"/>
    </Grouping>

    <Ordering>
      <C bRef="ctrName" order="desc"/>
    </Ordering>

  </Select>
</WrsRequest>
You can also use Common Table Expressions ("WITH-Clause", including recursive queries), Joins of all kinds, Grouping Sets and Unions. You can even request server side calculations on the fly by using a wrs:C/wrq:Calc element.
Use the XML auto-suggest feature of your IDE when editing a Wrs request to find all options.
Filter format
Requests and per the output of choosers becoming filters follow BCD-UI’s filter format. Filter conditions can be nested and are evaluated canonically.
<Filter xmlns="http://www.businesscode.de/schema/bcdui/filter-1.0.0">
<And>
<Expression bRef="val" op=">=" value="1000"/>
<Expression bRef="val" op="<=" value="2000"/>
</And>
<And>
<Or>
<Expression bRef="ctrName" op="="/>
<!-- No value means null, this filter means "is null" -->
<Expression bRef="ctrName" op="like" value="A%" escape="\\"/>
</Or>
<And>
<Expression bRef="yr" op="=" value="2010"/>
<Expression bRef="cw" op="in" value="1,2,3"/>
</And>
</And>
</Filter>Above leads to:
(val>=? AND val <=?) AND (ctrName IS NULL OR ctrName like ? ESCAPE ?) AND (yr=? AND cw IN (?,?,?)More often than not you may want to use a dynamic filter, for example based on user selections. One easy way to achieve that is to create you request, put it into an XSLT and extend the f:Filter part with
<xsl:apply-templates select="$guiStatus/*/f:Filter/*"/>.
|
Security: The server makes sure that you are safe against any king of SQL injection or accessing data not meant for the user as defined in the addressed bnd:BindingSet. For example SubjectFilters are always added transparently in addition to the filters you define in the query and prepared statements are used for security and performance reasons. |
Saving data
To change data in the database you can create or modify and existing Wrs with information which rows to modify, insert or delete. BCD-UI’s widget will understand that you write to a Wrs and change it automatically that way.
<Wrs xmlns="http://www.businesscode.de/schema/bcdui/wrs-1.0.0">
  <Header>
    <BindingSet>country_table"</BindingSet>
    <Columns>
      <!-- Definitions of the columns -->
      <C pos="1" id="ctrcd">
        <A id="ctr_caption" name="caption"/>
      </C>
      <C pos="2" id="population"/>
    </Columns>
  </Header>
  <Data>
    <R id="id0">
      <C caption="Austria">AU</C>
      <C>8000000</C>
    </R>
    <D id="id2">
      <!-- Row to be deleted -->
      <C caption="Deutsche Demokratische Repubik">DR</C>
      <C>18000000</C>
    </D>
    <M id="id3">
      <!-- Row to be updated -->
      <C caption="Great Britain">GB</C>
      <!-- Current column value -->
      <O caption="Great Britain">GB</O>
      <!-- Original column value -->
      <O>Britain</O>
      <O>England</O>
      <C>55000000</C>
      <O>55000000</O>
    </M>
    <I id="id4">
      <C caption="France">FR</C>
      <C nil="true"/>
      <!-- Without the nil attribute, this would be an empty string -->
      <!-- The following is a sample for a server side replaced value -->
      <C>
        <ServerValue name="GenerateId" param1="scope" param2="alias"/>
      </C>
    </I>
  </Data>
  <MaxRowsExceeded maxRows="500">true</MaxRowsExceeded>
</Wrs>
Each row can be
-
wrs:Rfor an unmodified row, will be ignored -
wrs:Dfor a row that is to be deleted -
wrs:Ifor a row that is to be inserted -
wrs:Mfor a row that is to be updated. The original value of the column follows in awrs:Oelements after the respectivewrs:Celement
Of course, the definition of the bnd:C/@iskey attribute is important in the bnd:BindingSet for this to work as expected.
Failures
The server responses technical errors via SOAP 1.2 fault
<Envelope xmlns="http://www.w3.org/2003/05/soap-envelope" xmlns:bcd="http://www.businesscode.de/schema/bcdui/wrs-1.0.0">
  <Fault>
    <Code>
      <Value>Sender</Value>
    </Code>
    <Subcode>
      <Value>sqlsoapfaultcode:InvalidXml</Value>
    </Subcode>
    <Reason>
      <Text xml:lang="en-US">An error occurred, DB down</Text>
    </Reason>
    <Body>
      <bcd:WrsRequest>...</bcd:WrsRequest>
      <bcd:Url>original URL</bcd:Url>
      <bcd:more_info_in_XML_like_stacktrace_in_debug_case/>
    </Body>
  </Fault>
</Envelope>
19.2. Cell addressing
Identifying the right column can be done via its hard-coded position in an XPath
/*/wrs:Data/wrs:R[1]/wrs:C[2]This is easy but also easily breaks and is hard to read. Thus, it is better to identify a column via its logical name 'CP_DESC', this will work in an XPath outside and inside XSLT:
/*/wrs:Data/wrs:R[1]/wrs:C[number(/*/wrs:Header/wrs:Columns/wrs:C[@bRef='CP_DESC']/@pos)]/text()In an XSLT, a key can help to do this even faster and easier with the help of keys:
<xsl:stylesheet xmlns:xsl="http://www.w3.org/1999/XSL/Transform" xmlns:wrs="http://www.businesscode.de/schema/bcdui/wrs-1.0.0" version="1.0">
  <xsl:key name="colHeadById" match="/*/wrs:Header/wrs:Columns/wrs:C" use="@id"/>
  <xsl:template match="/">
    <xsl:value-of select="/*/wrs:Data/wrs:R[1]/wrs:C[number(key('colHeadById','CP_DESC')/@pos)]"/>
  </xsl:template>
</xsl:stylesheet>
19.3. XSD Schema
Details
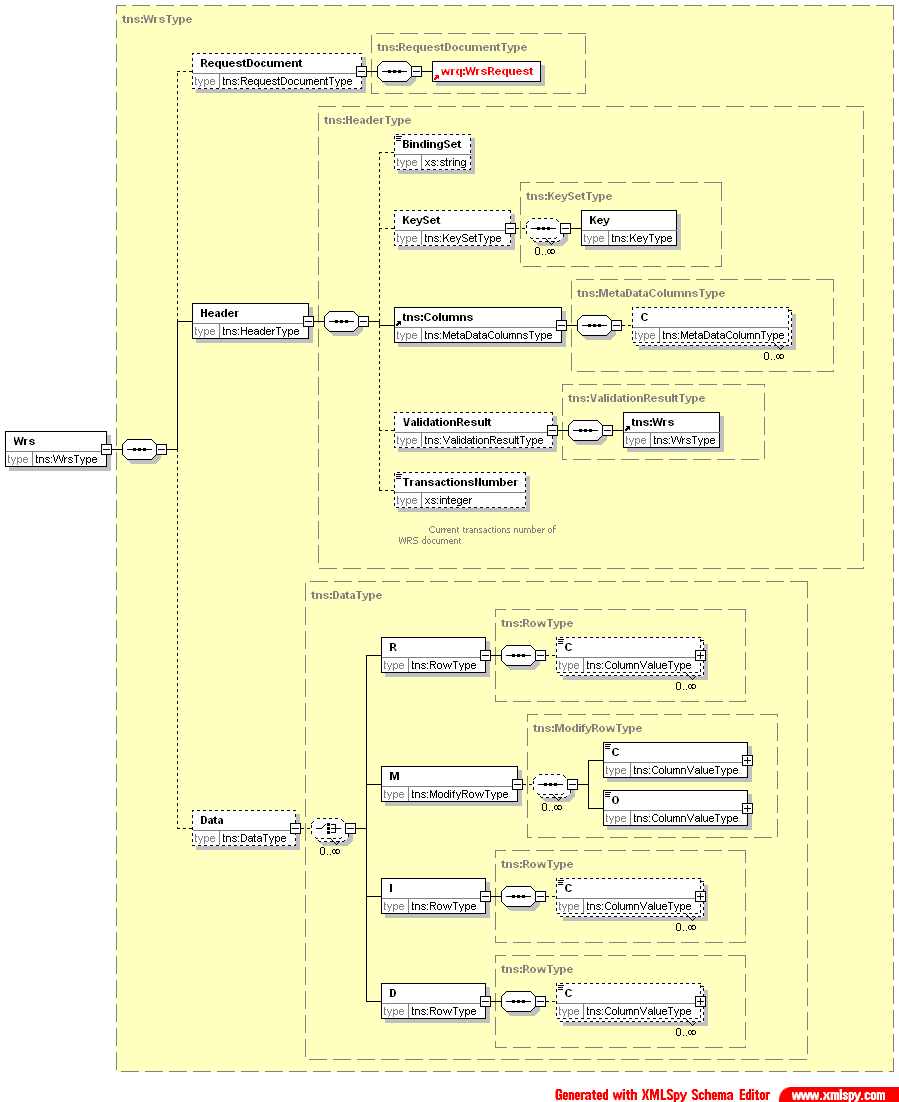
20. Servlets / Filters
20.1. Overview
BCD-UI Filters and Servlets
BCD-UI comes with the following filters and servlets, which are already mapped to their places in the default web.xml of BCD-UI:
These the only servlets which the user of BCD-UI uses or configures directly under normal circumstances.
- WrsServlet
-
Serves data in the form of a Wrs web row set as response to a WebRowSet request. It is mapped twice to allow parts to be client side cached and other not to be cached. This is the only servlet used directly by non-BCD-UI library code. Maps to bcdui/servlets/wrsServlet and bcdui/servletsCached/WrsServlet.
- ClientCachingFilter
-
Allows controlling client-side caching. Can be instantiated multiple times to allow different caching strategies for different parts. It is recommended to cover all static resources and only slowly changing reference data for example at bcdui/servletsCached/wrsServlet.
Background servlets and filters
The following servlets do their work in background. Users of BCD-UI usually do not get in direct contact with them
- RequestLiveCycleFilter
-
Manages livecycle of BCD-UI server objects. Maps to the full application.
- StaticResourceServlet
-
Severs static resources like js or img files from the library which are packaged in bcd.jar. They are mapped to their logical places and appear to be located at WebContent/bcdui. Maps to bcd-ui library parts.
- BCDUIConfig
-
Serves initial configuration information for BCD-UI frontend library. Maps to bcdui/servlets/config.js.
- ZipLet
-
Allows the library a more efficient data exchange between client and server and prevents URLs becoming too long. Maps to bcdui/servlets/ZipLet.
21. Virtual File System (VFS)
21.1. Virtual File System (VFS)
The Virtual File System (VFS) allows you to store resources in the database and make them available like real physical resources.
As an example, you can take the cube template editor. It makes use of the VFS. The report layout is stored in the database as an XML file which can be accessed at runtime via the path "/vfs/reports/myTestCube/layouts.xml". You can even store, modify, reload binding files in the database. They will have a higher priority than static ones with the same id.
VFS Setup
For the virtual file system you need a database table and a corresponding binding set with the well known id "bcd_virtualFileSystem", see bcd_virtualFileSystem.xml
The columns in detail:
- path
-
The path under which the stored data is available. For example: "/vfs/reports/MyReport/MyReportLayouts.xml"
- resourceClob
-
A clob object holding the data. For example (cube template):
- resourceBlob
-
A blob object holding the data.
- isServer
-
A 0/1 value specifying is the data is a server-only (= 1) resource and won’t be available on client side.
VFS reading, writing, refreshing and VFS Bindings
As mentioned, data from the VRS is accessible via the given path. So you can e.g. create a model out of the stored data like this:
new bcdui.core.SimpleModel({url: bcdui.contextPath + '/vfs/reports/myTestCube/layouts.xml'})Writing can be achieved by sending a wrs request to the server, e.g. with the help of an AutoModel.
var vfs = new bcdui.core.AutoModel({bindingSetId: "bcd_virtualFileSystem", bRefs: "path resourceClob" });
vfs.execute();
// Now modify the path (at /*/wrs:Data/wrs:R/wrs:C[1])
// and the value of the resourceClob (at /*/wrs:Data/wrs:R/wrs:C[2])
// and store it back via sendData
vfs.sendData();
After writing data to the VFS, you might need to refresh the cache to make the changes active. You can do this by calling the CacheManager servlet with an action parameter:
jQuery.ajax({
  method: "GET",
  url : bcdui.contextPath+ "/bcdui/servlets/CacheManager?action=refreshVFS",
  success : function (data, successCode, jqXHR) { /* do something */ }
});- Available action values are: refreshVFS
-
clears the VFS cache.
22. Debugging
22.1. Support for debugging
- Unzip the gui status
-
To see the guiStatus used in requests in their uncompressed form, send it as
dataparameter to the ZipLet servlet. For example:http://localhost:8080/webApp/bcdui/servlets/ZipLet?data=z2e-f7xPr3FQumlE…; - Monitor network traffic
-
Eclipse "TCP/IP Monitor" view as well as highly recommended Fiddler tool can server as proxies to monitor network traffic exchanged between browser and server.
- Server side logging
-
log4j2.xml file in call path allows fine-grained control of server side logging. Per default this is found in the /src/java folders of the template applications.
- Endless waiting renderers
-
use
bcdui.factory.objectRegistry.getWaitingIds()to detect ids of renderer/wrapper, waiting for yet non-existing ids. - Find out which BindingItems a binding set has
-
de.businesscode.bcdui.binding.Bindings.getInstance().get("b4_bsg_tte", java.util.Arrays.asList("cage_dy"))
- Read information about a specific BindingItem
de.businesscode.bcdui.binding.Bindings.getInstance()
    .get("b4_bsg_tte", java.util.Arrays.asList("cage_dy"))
    .get("cage_dy")
.getJDBCDataTypeName()- Use the browser developer console to examine client issues
-
All modern browser have a console, where you can execute issue JavaScript commands to examine object status
- Use request parameter debug=true
-
The debug request parameter makes the application more picky about JavaScript parameters and turns on client logging that might help.
22.2. Common error messages
- ERROR - Internal stylesheet error. this['node-set']= function (x) { return x; } 0 0 Unzip gui status
-
This error message occurs if an import of a stylesheet fails inside a stylesheet. The nodeset function is usually the first line after the
includestatement - IE: An Invalid character was found in text content. Or: Switch from current encoding to specified encoding not supported.
-
Wrong encoding im xsl:output
- Mozilla FireFox
-
In general use IE tfor debugging XSLT, it will give better error messages.
One thing specific about Mozilla: If your stylesheet’s output produces multiple top-level elements (which is not allowed), Firefox does not throw an error like IE for the same output but wrap the output into an artificial root element instead. - IE: stack overflow at line: 0
-
Is often related to an IE caching issue, in many cases it goes away with caching being enabled.
23. Bootstrap
This helps to set up your development environment for BCD-UI.
23.1. Getting the tools
To start development with BCD-UI, first get the tools:
-
Make sure you have JDK 11 or higher
-
Install an IDE of your preference, we assume Eclipse in our samples.
-
Install a Jakarta EE web server like Oracle WebLogic, IBM Websphere or JBoss, we assume Tomcat 8.5or 9 in our examples
|
If you are not already familiar with the concept if of Java Web Applications, you find many good tutorials. Here are some very short for Eclipse as Servlet in a Tomcat-combination:
|
Tomcat compress resources
For performance reasons, you should allow compression for static resources.
For Tomcat adjust in server.xml,
see BCD-UI/Server/configFiles/tomcat/server.xml
XML schema xsd catalog
Adding the XML schema catalog of BCD-UI to your workspace will support you in creating XML configuration files for BCD-UI by linking to https://businesscode.github.io/BCD-UI-Docu/xsd/bcduiCatalog.xml
For Tomcat, follow these steps:
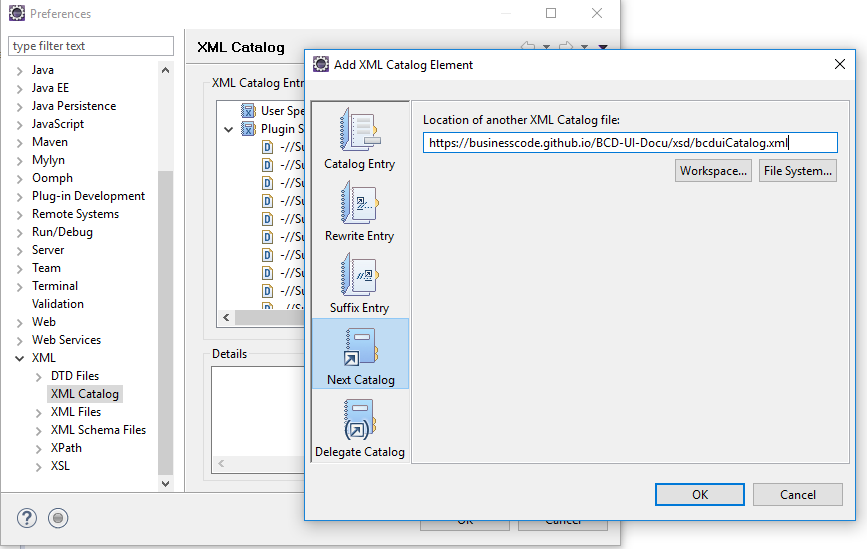
will bring you:
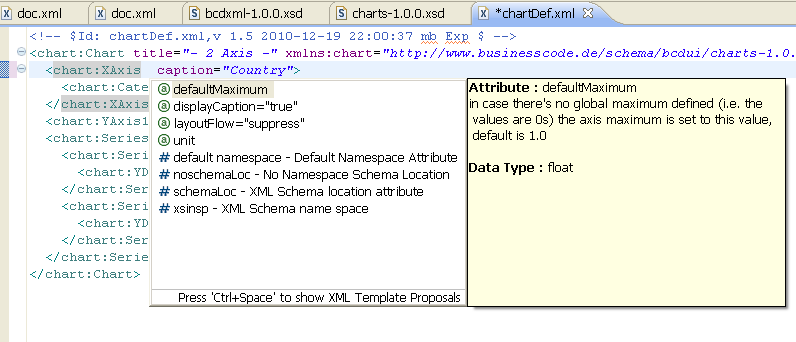
| You refresh them with the "Reload Entries" feature in Eclipse. Keep in mind that online they always reflect the latest XML schemas, independent of the version of BCD-UI you are using. |
JavaScript / TypeScript Api
BCD-UI provides a file with its JavaScript API. Add this to your IDE, and you will have auto-complete while editing JavaScript orTypeScript. The files can be found here: https://github.com/businesscode/BCD-UI-Docu/tree/master/resources.
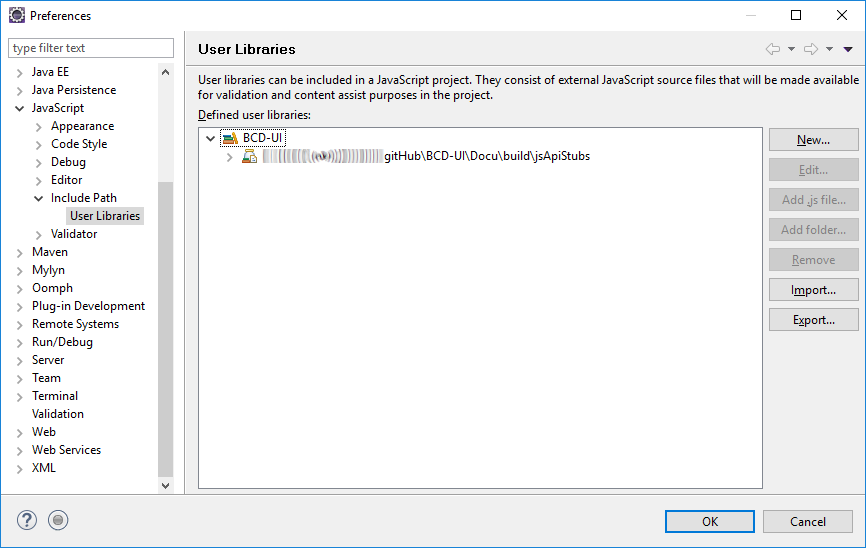
will bring you, code completion and help tooltips while hovering with your mouse:
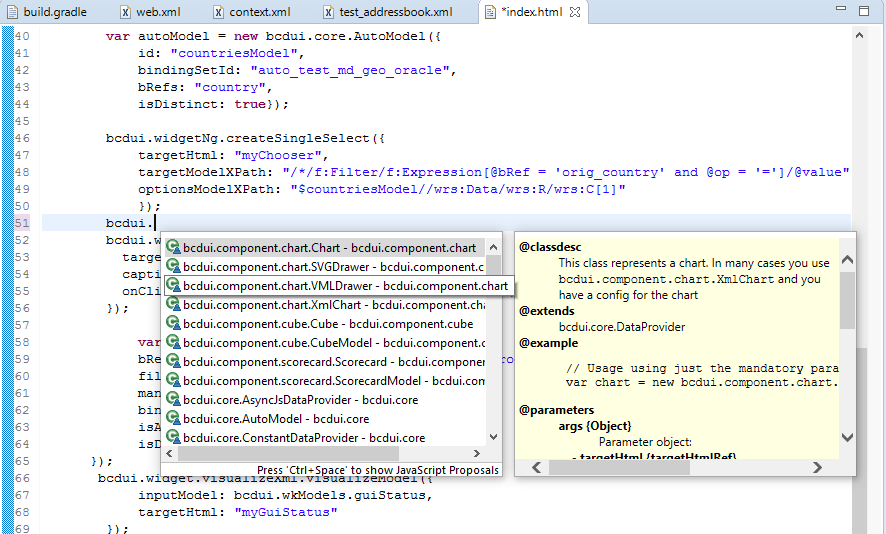
The real usage of BCD-UI implementation is not done with import. This import of the stubs is removed by BCD-UI automatically when the JavaScript file is served to the client. Its only purpose is making the API available to the editor.At runtime the implementation is served from bcd-ui-core.jar. As you will see, that is loaded with |
<script type="text/javascript" src="../bcdui/bcdui.js"></script>24. Application Setup
A BCD-UI application is a regular Jakarta EE application. These steps are show how to add BCD-UI to an existing web application project.
There are many good tutorials for each IDE on how to set up such a web application. For Eclipse, you could follow this one on Medium.
| Before adding BCD-UI to your project, make sure you test your plain web application. Open a page, call a test Servlet, all without BCD-UI. You should be familiar with running a web application without BCD-UI as it is the bases for BCD-UI. |
24.1. Adding BCD-UI
-
Add BCD-UI jars
In this tutorial we use Gradle build tool for defining dependencies. Don’t be afraid, you do not need to know much about Gradle to follow this tutorial.
Eclipse (Buildship plugin installed per default) and IDEA support gradle out of the box. For Visual Studio Code, add the Gradle extension.Add a
build.gradlefile as shown here https://github.com/businesscode/maven-repo to your project root.When working with Eclipse, open and select your project root, if your project is already in Eclipse Workspace, then add "Gradle Nature" to the project and trigger "Gradle-Refresh".
we refer to webAppDirName = "WebContent"as the content directory in the gradle file, please ensure it matches your web module configuration.It worked when you see BCD and all of its dependencies under
Project and External Dependencies.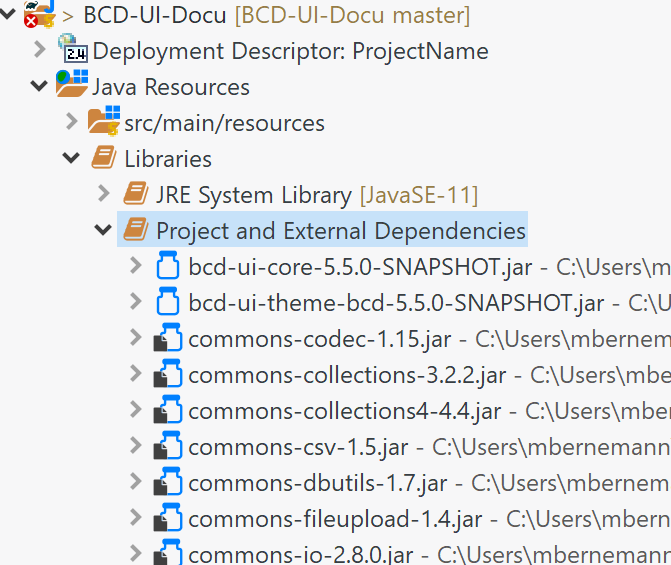
These two jars not only hold all Java classes for the server but also all client side sources of BCD-UI like JavaScript and XSLT. BCD-UI has a Servlet that makes sure they are served to the client along with your client side sources, which are placed were you would usually place them. If you prefer to go without Gradle, you may also manually download the BCD-UI’s jars, and their dependencies mentioned in BCD-UI/Docu/development/bcdui_dependencies.gradle and put them into WEB-INF/lib. But this is not recommended.
-
Add Entries to web.xml
To register BCD-UI’s servlets and filters, add the entries from BCD-UI/Server/configFiles/WebContent/WEB-INF/web.xml to your web.xml.
Now comment out the <filter> bcdui4.ShiroFilter including its <filter-mapping>. Otherwise, you will be redirected to a login.htm page, which you do not have yet.
When you upgrade to a new version of BCD-UI check in release notes whether it changed. -
Create an empty WEB-INF/bcdui/bindings
All configuration files for BCD-UI are located at WEB-INF/bcdui. Create an emptyWEB-INF/bcdui/bindingsfolder, later you’ll add Bindings here. -
Add logging configuration
Copy BCD-UI/Server/configFiles/log4j2_debug_.xml to your project’ssrc/main/resourcesfolder and rename it to log4j2.xml. -
Copy BCD-UI/Server/configFiles/subjectSettings.xml to
WEB-INF/bcdui -
Add entries for the database
See context.xml for entries for several databases for Tomcat.
The jndi entry<Environment name="bcdui/defaultConnection" type="java.lang.String" value="jdbc/connectionXX"/>is important as it denotes the connection used of none is explicitly given in a BindingSet.
-
Unzip bcduiTsTypes.zip at https://github.com/businesscode/BCD-UI-Docu/tree/master/resources into your project.
This file allows for autocompletion of BCD-UI JavaScript classes in the IDE
24.2. BCD-UI folder layout
BCD-UI follows standard Java Web Application layout.
One thing less common though is that the JavaScript and other static sources come with the 2 BCD-UI jars mentioned. So they are in these jars which itself is in WEB-INF/lib. As you know, usually the browser cannot request any content from WEB-INF/ directly, for example a css file. But BCD-UI’s built-in StaticResourceServlet serves these files from the jar at the virtual folders /bcdui/js, /bcdui/xslt etc.
|
Take a moment to understand the structure and what to expect physically in Eclipse (strong font) and what parts are only virtually there, once deployed (italic font).
|
|||||
|
Taking care for jars below template |
||||
|
Project’s server side resources |
||||
|
Project java sources |
||||
|
Project’s static server side resources |
||||
|
Logging settings template |
||||
|
Webapp itself |
||||
|
Project’s HTML pages, JavaScript etc |
||||
|
BCD-UI’s virtual main folder for client resources, blended here by a Servlet: |
||||
|
JavaScript library mapped from bcd-ui-core.jar |
||||
|
XSLT library mapped from bcd-ui-core.jar |
||||
|
Themes library mapped from bcd-ui-theme.jar |
||||
|
BCD-UI’s servlets are mapped here |
||||
|
|||||
|
Configuration for BCD-UI |
||||
|
Project’s BCD-UI BindingSets are put here |
||||
|
Gradle virtually puts the content here: |
||||
|
3rd party and project libs |
||||
|
Java classes and static sources (js,xslt) virtually mapped to and served to the client from |
||||
|
Themes, mapped to /bcdui/theme at runtime |
||||
|
Contains some BCD-UI library related entries template |
||||
|
|||||
|
Contains JDBC database connections template |
||||
This tutorial itself is built around a fully functional BCD-UI application, which you inspect here https://github.com/businesscode/BCD-UI-Docu.
25. General Features
25.1. General Features
- Bookmark feature
-
Each page together with its settings like filter choosers or which parts are opened or hid. Can be bookmarked. Such a bookmark can be used as the starting point to enter the application and as a quick navigation link including previous settings. Additionally, the link can be passed to others in case they have sufficient rights to enter the page.
25.2. Transactions and connection pooling
Per default each request is associated with a transaction. Each server activity retrieves its connection from the request object, providing the data source name. All activities within the same request get the same connection when retrieving it from the request. The first database access in a request starts the transaction, and the request finishes transaction with commit unless a ServletException is uncatched, or a SOAPFault is returned, in this case a roll-back is executed. Still, each step may itself decide to commit or rollback its work.
In case the client wants multiple writes to become part of one database transaction, it will a multi-WRS document.
25.3. XML Inclusion
The BCD-UI library makes use of XML inclusion to support some advanced XML features. These include are allowed in XML files read on the server and also on the client. The main reasons to use XML
inclusion are as follows:
Use cases
- Reusing XML parts in different documents
-
XML inclusion is especially useful is some XML documents share common content. Then this content can be put to a separate XML file. This use case is often applied in Binding files when two binding files have the same column names (e.g. for common dimension columns like period or geography).
- Merge different XML data sources
-
Some XML documents require information from other sources (like reference data in grids) which can be implemented by defining a master document containing inclusions of other referenced documents.
- Lazy loading
-
BCD-UI offers a special kind of include (bcdxml:include) for the client. This bcdxml:include can be evaluated on demand rather that resolving it immediately on loading. It is the basis for most lazy loading mechanism on the client.
- Structuring large documents
-
It can be useful to split very large XML documents into parts to make them more readable.
Implementation
There are three kinds of XML inclusion supported by BCD-UI:
- XInclude without any XPointer
-
This basic xinclude type is available on the server and on the client. These
includeare replaced with the whole document available on the specified href. Example:<xi:include xmlns:xi="http://www.w3.org/2001/XInclude" href="myDoc.xml"/> - XInclude with XPointer element() Scheme
-
This xinclude is also available on the server and client, and it offers the selection of one single XML element to be included. Example:
<xi:include xmlns:xi="http://www.w3.org/2001/XInclude" href="myDoc.xml" xpointer="element(/1/2)"/> - XInclude with xpointer() Scheme
-
The BCD-UI client processor also supports xincludes with a limited set of the xpointer() Scheme. It supports all XPointers corresponding to one single XPath. With this XPath the target document is then filtered before it is inserted at the xinclude. Example:
<xi:include xmlns:xi="http://www.w3.org/2001/XInclude" href="myDoc.xml" xpointer="xpointer(/*/Country[. = 'DE']/City)"/> - bcdxml:include
-
Another client-only feature is the bcdxml:include. This is an extension to the standard XInclude in that it supports two additional features: It can contain a request document inside its body. If this is present it is compressed and then appended to the href. Example:
<bcdxml:include xmlns:bcdxml="http://www.businesscode.de/schema/bcdui/bcdxml-1.0.0" href="myDoc.xml" xpointer="xpointer(/*/*)"/>Example with nested status document:
<bcdxml:include xmlns:bcdxml="http://www.businesscode.de/schema/bcdui/bcdxml-1.0.0" href="myDoc.xml"> <Status xmlns="http://www.businesscode.de/schema/bcdui/guiStatus-1.0.0"> <Filter xmlns="http://www.businesscode.de/schema/bcdui/filter-1.0.0"> <And id="period"> <Expression bRef="dy" op=">=" value="2010-01-01"/> <Expression bRef="dy" op="<=" value="2010-12-31"/> </And> </Filter> </Status> </bcdxml:include>TODO: verify
26. Compatibility
26.1. Compatibility of BCD-UI
As of 2022, BCD-UI works without modifications within the following environments
-
JDK 11+
-
Tomcat 8.5+ and other servers with Jakarta EE web profile
-
Recent Edge, Firefox, Safari and Chrome versions
-
Internet Explorer 11
-
Oracle 11+
-
Postgres 10+
-
SQLServer 2016+
-
Teradata 10+ in EnterpriseEdition
-
MySQL with limitations, please contact BusinessCode
-
Java Jakarta EE web profile, JDBC, Servlet, JAXB and optionally JSP
-
ECMA/JS, DHTML, CSS, HTML, JSON and SVG
-
XML, XSLT, XPath and XSD
-
Ajax, webservices, XForms architecture and EXSLT
-
Apache commons, jQuery and various other open source libraries
-
Gradle, Eclipse and IntelliJ IDEA, git
26.2. Developing for specific browsers
Known browser limitations
-
favicon.ico is picked up by FireFox when found in webapp root, ie does not do this
-
IE does not allow setting the name attribute via DOM (helper function in corePackage.js)
-
FireFox throws exception when writing <input>text</input>, this is in sync with the specs
-
IE ignores overflow when filter is set in css
-
IE: innerHTML (used by renderer) for <script> and <style> tags require both to start with a scoped element, like
<input type="hidden"/><script defer="false"…, and the script tag in addition requires andefer="false"attribute -
IE has a maximum URL length of 2083 bytes, others do not. When copying URLs from other browsers, they may be less compressed (because it was not necessary), so they may be too long.
-
FireFox: the bookmarks created with the bookmark tag open in a sidebar window by default, unless the bookmark property is adjusted manually by the user or if the bookmark is opened in a new tag
-
Chrome/WebKit: don’t support bookmark via JavaScript at all
-
IE seems to handle position() in xsl:key/@match expressions wrong. Sample: match="/*/Something[@pos>3][position()<2]". It will find an empty list instead of a list with two elements.
-
Due to a well-known bug in FireFox (at-least 10-24), you need to enable 3rd-party cookies or better add an exception for a webpage with BCD-UI. This flag is per default off ("disabled") since version 22.
Working with webkit browsers
Webkit/Chromium based browsers like Edge, Safari, Chrome and Opera compatibility requires the following to be taken into account
-
Declare all namespaces used by XSLT, since documents addressed via document() and xsl:import are included in the host XSLT and elements with undeclared namespaces inherit the default namespace of the (possibly generated) host XSLT
-
When using createElementWithPrototype or similar, always work with an explicit namespace, do not use the empty namespace.
-
xsl:include is not supported (use xsl:import instead)
-
xsl:apply-imports is not supported. (normally xsl:apply-templates will be sufficient)
-
when using xsl:sort, you are limited to use up to 15 successive ones
-
Do not use msxml:node-set(), declare and use exslt:node-set() even for IE.
-
When generating XSLT with the help of XSLT, use 'generateXSLT' as the generation mode
-
When generating XSLT and matching on an input template XSLT, be aware that those elements do not have xsl as namespace because they are embedded, use select="*[local-name()='output']" and so on instead. Also do not copy such elements into the output as they would keep the non-xsl namespace, create these elements with <xsl:element name="output" namespace="http://www.w3.org/1999/XSL/Transform"/> instead
-
For webkit it is not allowed to use variables in template match attributes, like <xsl:template match="*[@attr=$myVar/Values]">…
-
When a node is provided to the XSLT processor as input, that node becomes the document root, for Gecko and IE "/" remains the root.
-
Mix of constant strings and AVT (Attribute Value Template) is not allowed. So use attr="{concat('abc ', $var)}" instead of attr="abc {$var}" for webkit."
-
For Webkit the imports are resolved by BCD-UI. This is done by including the imported stylesheet leaving out templates with the same @match/@name and @mode values for which already a template in the importing stylesheet exists. But since the others are included then an imported template with match="ns:E[@a]" will win over a template with match="ns:E" existing in the importing stylesheet. This will let Webkit behave differently than other browsers. Make sure to prevent this situation by defining exact matching templates in the importing stylesheet.
-
It is much faster if in wrs:C[indexExpr] indexExpr is a plain number (a variable holding a number) than an expression. Move such an expression to a helper variable.
-
Large documents slow Webkit down. Only provide the part of large documents, if possible. Use xsl:stylesheet/@bcdxml:wrsHeaderIsEnough to minimize the input for example for generating stylesheets only needed the header.
-
All known namespace declarations are repeated on the highest node of each subtree of explicitly written elements. For example <wrs:C/> will hold all such namespace-nodes if all elements above are created via xsl:element or xsl:copy. As a workaround, write the root node (in this case wrs:Wrs) also explicitly <wrs:Wrs>…</wrs:Wrs>, then this is the highest, and they will ony appear once. This improves performance, because Webkit is sensitive against documents with a large serialization representation.
27. Configuration
27.1. Configuration overview
BCD-UI obtains its configuration from the parameters from JNDI context (as specified by servlet container) for the backend-part and provides client configuration parameters for the client part. The de.businesscode.bcdui.toolbox.Configuration is the API to retrieve that configuration. Additionally, the Configuration class maintains de.businesscode.bcdui.toolbox.config.DbProperties instance for well-known scopes: server and client allowing dynamic configuration.
- 'server' scope
-
are JNDI defined parameters, additionally parameters from database (DbProperties) with scope "server", DbProperties parameters have precedence over JNDI defined parameters. Please always define a TYPE for this scope and stick to same type as originally defined in context.xml when overriding parameters.
- 'client' scope
-
The only way to enable configuration to be set to client is to enable DbProperties, the client parameters are held in "client" scope. These properties are emitted by the BCDUIConfig servlet and exposed into
bcdui.configJS object. The TYPE for client-scope property is NOT evaluated, and the property value is ALWAYS exposed as a String, hence the value must not be quoted.
27.2. DbProperties setup
Setting up the DbProperties to be transparently reflected by the de.businesscode.bcdui.toolbox.Configuration API is a matter of exposing the "bcd_db_properties" BindingSet. Configuration class will auto-detect this BindingSet upon initialization and if found, will initialize the DbProperties instance. DbProperties may refresh the configuration from Database asynchronously every period given to refresh, or the refresh can be controlled programmatically. This class is NOT a singleton so may be reused in projects, it takes a BindingSet of kind "bcd_db_properties" to initialize. The Configuration class yields an instance of DbProperties stuck to well-known BindingSet "bcd_db_properties".
Default configuration apply:
<Environment name="bcdui/config/dbProperties/reloadFrequencySeconds" type="java.lang.Integer" value="30"/>the bcd_db_properties table has the following column definition:
SCOPE |
this is a scope for this parameter. When working with * de.businesscode.bcdui.toolbox.Configuration.getConfigurationParameter(String) * de.businesscode.bcdui.toolbox.Configuration.getConfigurationParameter(String, T) * de.businesscode.bcdui.toolbox.Configuration.getConfigurationParameterOrNull(String id) the client scope parameters can be retrieved via de.businesscode.bcdui.toolbox.Configuration.getClientParameters(),
those are also exposed to the client and available in the The TYPE is obligatory for the parameter in server scope, while for client scope parameters the TYPE is ignored, and the value is always exposed as a string. |
NAME |
Parameter name. This is unique to the scope. For server scope the parameter names should follow JNDI naming convention like the parameters defined in context.xml, because those parameters are merged while parameters from database overwrite those defined statically. Pay attention to the TYPE here, as it has to be same as defined in context.xml For client scope you may take any name adhering to JS variable name syntax, so dots, spaces etc are not allowed. |
TYPE |
Type of parameter value. While client-scope parameters do not have typed values (the value is always exposed as a string), server scope parameters values are parsed into given type (which is a fully qualified class name). The value evaluation happens via reflection API and the only method target class has to expose is a static valueOf(String value) method. Hence, a type 'java.lang.Boolean' for parameter name 'myBoolean' would evaluate the value 'true' to Boolean.TRUE, such that de.businesscode.bcdui.toolbox.Configuration.getConfigurationParameter('myBoolean', false) would return Boolean.TRUE whereas de.businesscode.bcdui.toolbox.Configuration.getConfigurationParameter('myBoolean', "false") would throw a ClassCastException trying to cast Boolean to a String. Therefore, the type has to be really accurate and match types used in context.xml. |
VALUE |
a value for this parameter. For client scope parameter this value will be exposed as a String, hence must not be further quoted. The server scope value follows rules for its TYPE |